
Issue cards from your own software
Generate a personal wallet card link for any customer in your system. Deliver it through your own email, SMS, push, or in-app flow. The customer opens the link and saves the card to Apple Wallet or Google Wallet.
Developer integration
The 7stamp Integration API lets a CRM, ecommerce platform, POS, custom backend, or automation tool manage wallet loyalty cards with the contact identifier your own system already uses. It is the universal option when a specialised integration does not exist.
The API base URL is https://api.7loc.com/cards-api. Authenticate every request with an API key as a Bearer token. Use the linked OpenAPI reference for the live request and response schemas before building production logic.
The API is the write side of the integration stack. Use it whenever your own software should stay the operational source of truth while 7stamp handles the wallet loyalty layer.
Generate a personal wallet card link for any customer in your system. Deliver it through your own email, SMS, push, or in-app flow. The customer opens the link and saves the card to Apple Wallet or Google Wallet.
When a purchase closes in your custom POS, when an online order is paid on your website, or when a service is completed in your booking system, call the API to credit stamps. The card updates within seconds.
Issue a one-off voucher to a specific customer, create campaign-ready reward flows, and pull voucher status back into the systems that handle finance and service quality.
These are the public API routes behind the Make and Zapier actions. Read the exact schema in the API reference; do not infer field names from a different endpoint.
POST /cards/invite Creates a fresh personal install URL for an external contact.
POST /cards/invite/bulk Creates up to 100 invite links in a controlled batch.
GET /cards Looks up card records by external contact identifier.
GET /cards/{user_card_id} Returns the full state of one card by its internal 7stamp ID.
POST /cards/scan Adds stamps by card ID or External ID and records the source order when supplied.
GET /templates Lists card templates available to the key's workplace/profile.
GET /templates/{template_id}/design Reads visual settings for a known card template.
POST /vouchers/issue Issues a voucher to a card owner.
POST /messages/send Sends wallet-card push and/or email content to a card owner.
These are real 7stamp Admin screens. Open API & Integrations, add a key, then copy it into a secure server-side secret or automation connection.
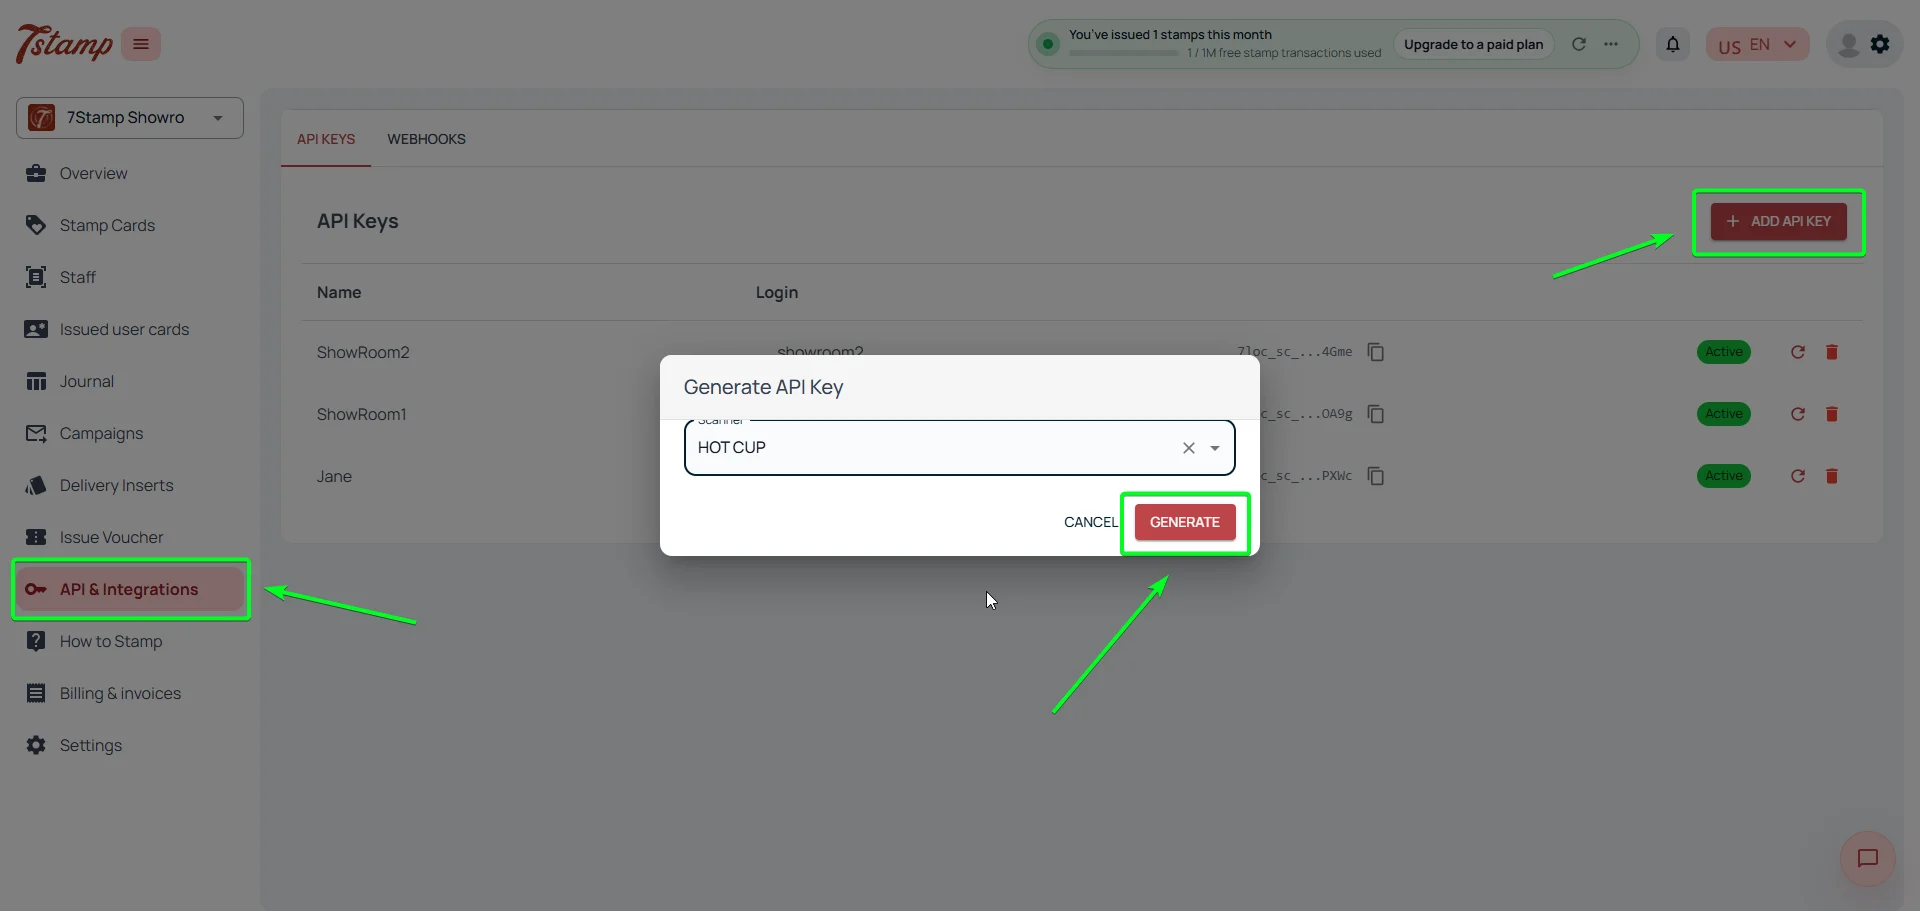
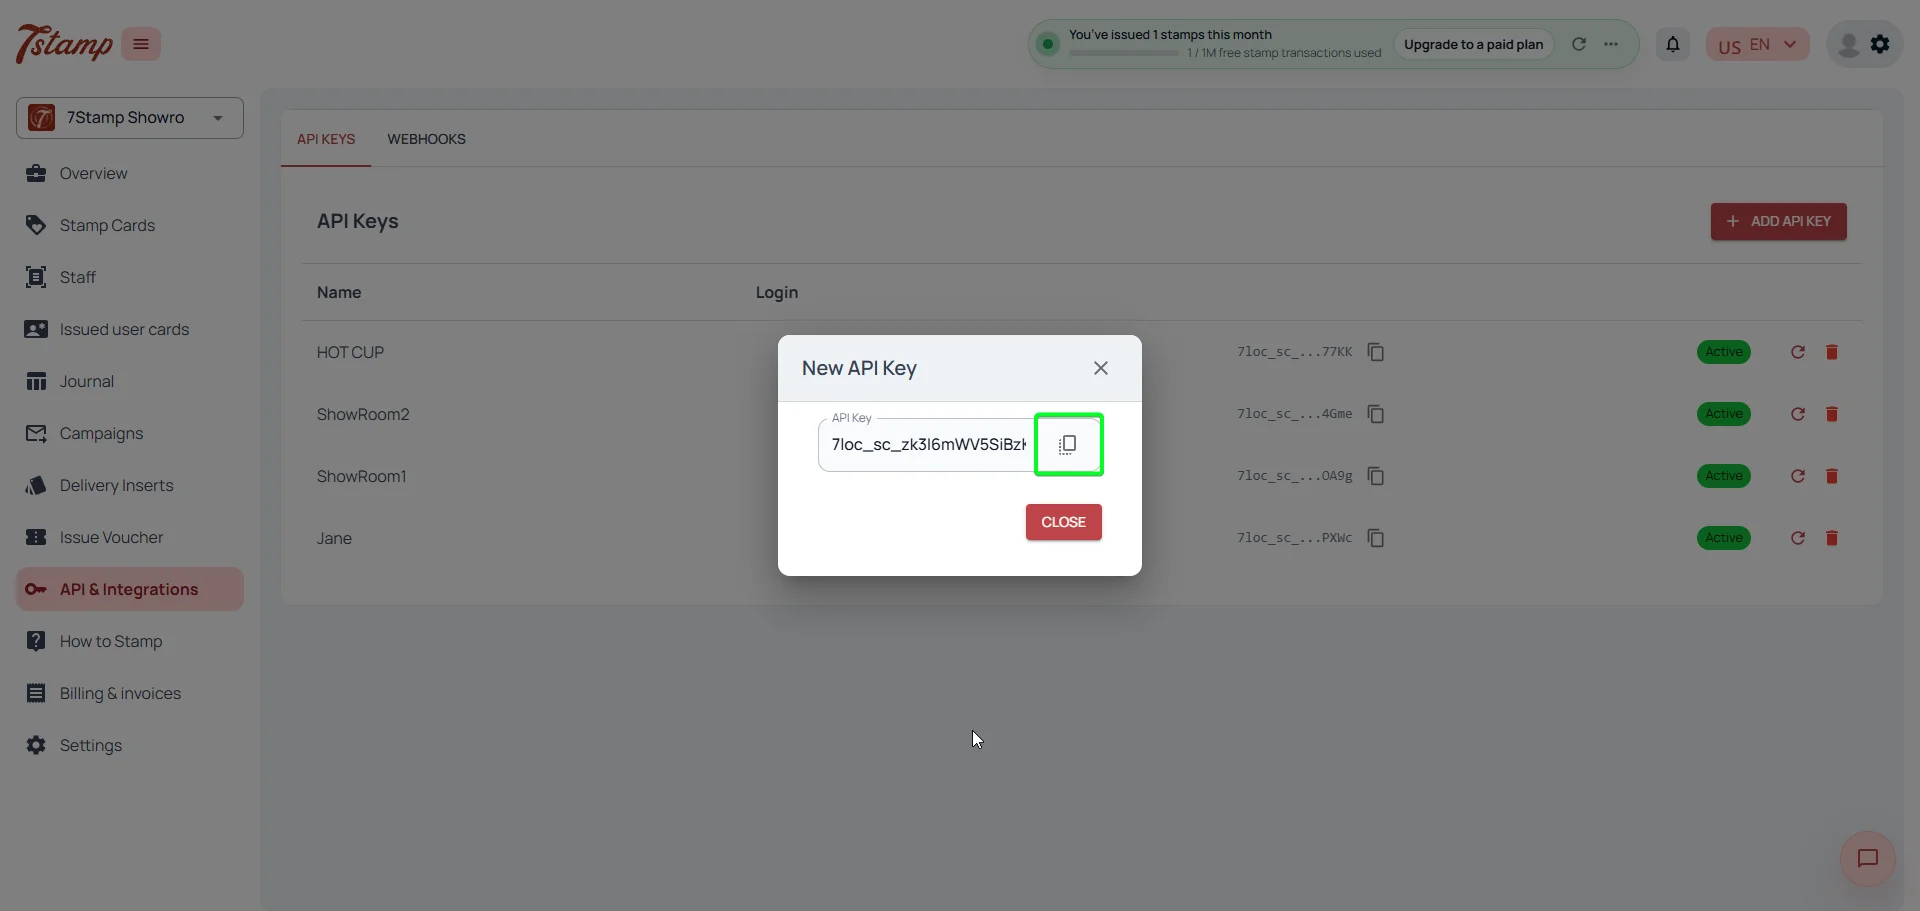
Create the key in 7stamp Admin under API Integrations → API Keys → Add API Key. A key belongs to one workplace/profile, so create separate keys for development and production when your account setup allows it. Rotate or revoke access from the dashboard if a secret is exposed.
External ID is the stable contact identifier from your system: a CRM ID, customer UUID, phone number, or email. Prefer an immutable system ID. Optionally add External Source to avoid collisions across systems and to make webhook correlation explicit.
When the profile has one active template, template_id can be omitted and 7stamp selects it automatically. When it has multiple active templates, pass the intended template_id. Read GET /templates first rather than hard-coding a guessed ID.
bash curl -X POST "https://api.7loc.com/cards-api/cards/invite" \
-H "Authorization: Bearer YOUR_7STAMP_API_KEY" \
-H "Content-Type: application/json" \
-d '{
"external_id": "crm_contact_8821",
"external_source": "hubspot",
"template_id": 42
}'Sign in to 7stamp Admin and create a key: API Integrations → API Keys → Add API Key. Store it in your secret manager, not source code or a client-side application.
Set the base URL to https://api.7loc.com/cards-api and add Authorization: Bearer followed by the key to every server-side request.
Call GET /templates first. A successful response confirms the token and shows the templates available to that workplace/profile.
Choose the stable External ID and optional External Source from your own system. Use the exact same identity pair in create, scan, lookup, and webhook logic.
Call POST /cards/invite with a disposable test contact. Verify the returned install URL before automating delivery to real customers.
Add POST /cards/scan, voucher, or message actions only after you have logging, error handling, and a safe retry/idempotency strategy in your own backend.
The public Swagger/OpenAPI reference contains the current endpoint, parameter, request-body, response, and webhook schemas. The interactive URL is https://api.7loc.com/cards-api/docs and the machine-readable contract is https://api.7loc.com/cards-api/openapi.json. Read it before implementing error handling or adding optional fields.
The key is a server-side secret. Do not expose it in browser JavaScript, a mobile app bundle, a public form, screenshots, Make/Zapier text fields, or support tickets. Use a server, secure automation connection, or secret manager. If the key is ever shared accidentally, revoke or rotate it in 7stamp Admin and update the affected connection.
In 7stamp Admin, go to API Integrations → API Keys → Add API Key. The token is then sent in the Authorization header as Bearer followed by the key.
Use https://api.7loc.com/cards-api and send Authorization: Bearer YOUR_7STAMP_API_KEY on each authorised request.
Only when the connected profile has exactly one active card template. If multiple templates are active, select the correct template_id from GET /templates.
Use the API for a custom POS, backend, site, or full control. Use Make for visual branching scenarios. Use Zapier for a mostly linear trigger-action workflow. All three rely on the same API key and API contract.
Related pages
Next step
Create the key, call GET /templates, create one invite for a disposable contact, then add production secrets, logging, retries, and webhook handling around the proven request.