
Create a card after a new CRM contact
Use the CRM contact ID as External ID, create a 7stamp card invite, then send the returned install URL through your usual email, SMS, or messaging step.
No-code automation guide
Use Make to connect 7stamp with a CRM, POS, online shop, spreadsheet, messaging tool, or any system that can send data into a scenario. The production-ready route today is Make's HTTP app for 7stamp API calls and Make's Custom webhook for incoming 7stamp events.
There is no public 7stamp app in Make's app picker yet. Do not wait for one: add HTTP → Make a request, use the exact URL, method, Bearer header, and JSON below, then map the fields from your source module. This is the same 7stamp Integration API a future connector would use.
Start with one event and one outcome. Once the test data is correct, add filters, routers, CRM updates, and follow-up messages around it.
Use the CRM contact ID as External ID, create a 7stamp card invite, then send the returned install URL through your usual email, SMS, or messaging step.
Trigger the scenario from a paid POS or ecommerce order. Map its stable customer ID and order ID into Scan a Card, then use an amount or explicit stamp count.
When a card event reports a reward or voucher, branch the scenario: update the CRM, notify the team, and send a wallet-card push or email only when needed.
Use Make's HTTP module to call 7stamp directly. This is the universal choice for a custom POS, ERP, booking engine, or any API-first service.
For each card below, add HTTP → Make a request, then set the method and URL exactly as shown. Use the same Bearer key for every request. The required mapping tells you what to supply from your CRM, POS, or ecommerce trigger.
Webhooks → Custom webhook Create a Custom webhook in Make, copy its URL, then paste that URL into the 7stamp profile webhook settings. This starts a scenario when 7stamp sends an event such as SCAN, REWARD_EARNED, or VOUCHER_ISSUED.
POST /cards/invite Creates a fresh personal install URL and delivery-insert code for one external contact.
POST /cards/invite/bulk Creates up to 100 invite links in one request. Use it for a controlled migration or campaign, not an unbounded contact export.
GET /cards Finds card records by External ID, with optional template and source filters.
GET /cards/{user_card_id} Reads the full state of one card when a prior step has returned its internal User Card ID.
POST /cards/scan Adds stamps from a purchase amount or an explicit count. It accepts User Card ID or External ID and can retain the external order reference.
GET /templates Lists the card templates available to the API key. Use it to test the connection or to select a template dynamically.
GET /templates/{template_id}/design Returns the visual design settings for a known template, useful when another system needs to display a consistent card choice.
POST /vouchers/issue Issues a voucher to a card owner identified by External ID or User Card ID.
POST /messages/send Sends content to the card owner through wallet-card push and/or email, subject to the configured channel and consent rules.
Full 7stamp endpoint URL This is the Make module that calls every 7stamp route above. Use a complete URL, select the documented method, add the Bearer header, and use JSON only when the route needs a body.
The names below are the real Make modules. Start with the first scenario, run it against a disposable contact, and only then add routers, filters, or production scheduling.
Expected result: The customer receives the install_url returned by 7stamp; your CRM can keep that URL in the same contact record.
Check: POST /cards/invite always creates a fresh invite. Use Find Cards first if your business rule is to avoid another invite for an existing contact.
Expected result: A successful scan response includes success, scan_id, stamps_added, and the post-scan card state for your next step.
Check: Use the same external_order_id on retries so the order can be traced in later webhook events; do not award stamps twice after an unclear failed run.
Expected result: Make receives the 7stamp event immediately and can find the matching CRM record via external_id and external_source.
Check: Keep the webhook URL private. Test a real event before switching on irreversible messages, vouchers, or CRM changes.
These are the exact 7stamp Admin screens. Create the key once, copy it into Make's secure HTTP connection/keychain, then immediately remove it from your clipboard.
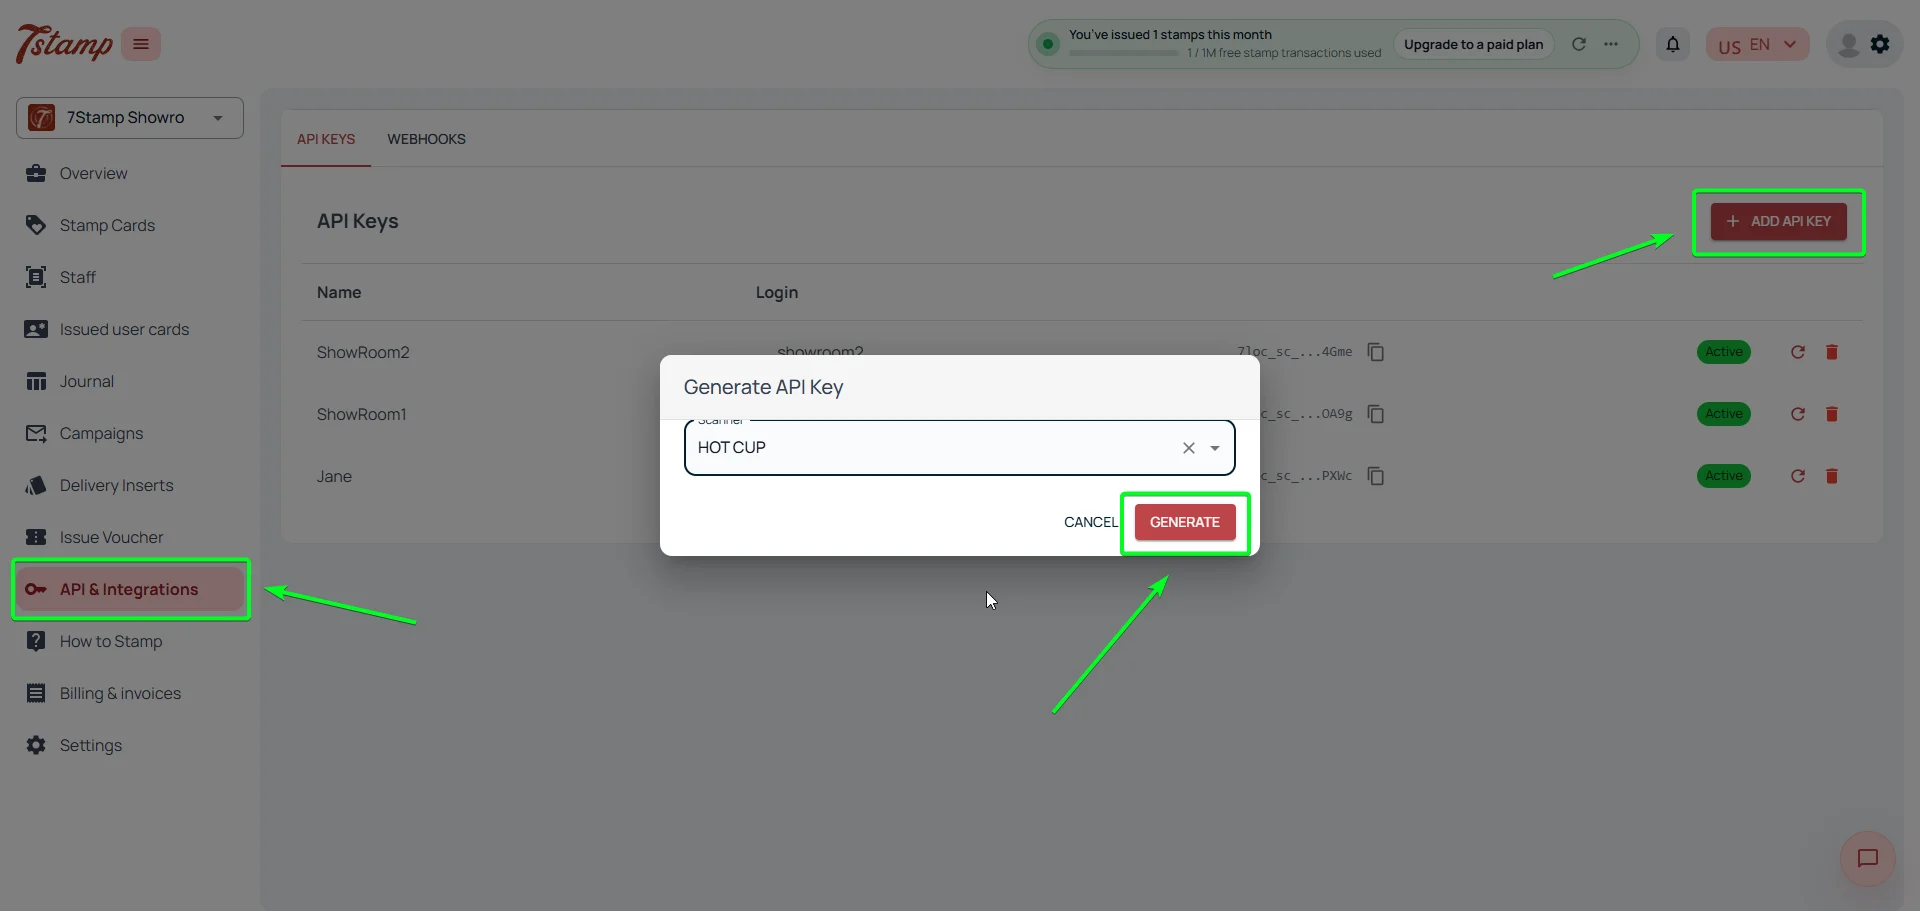
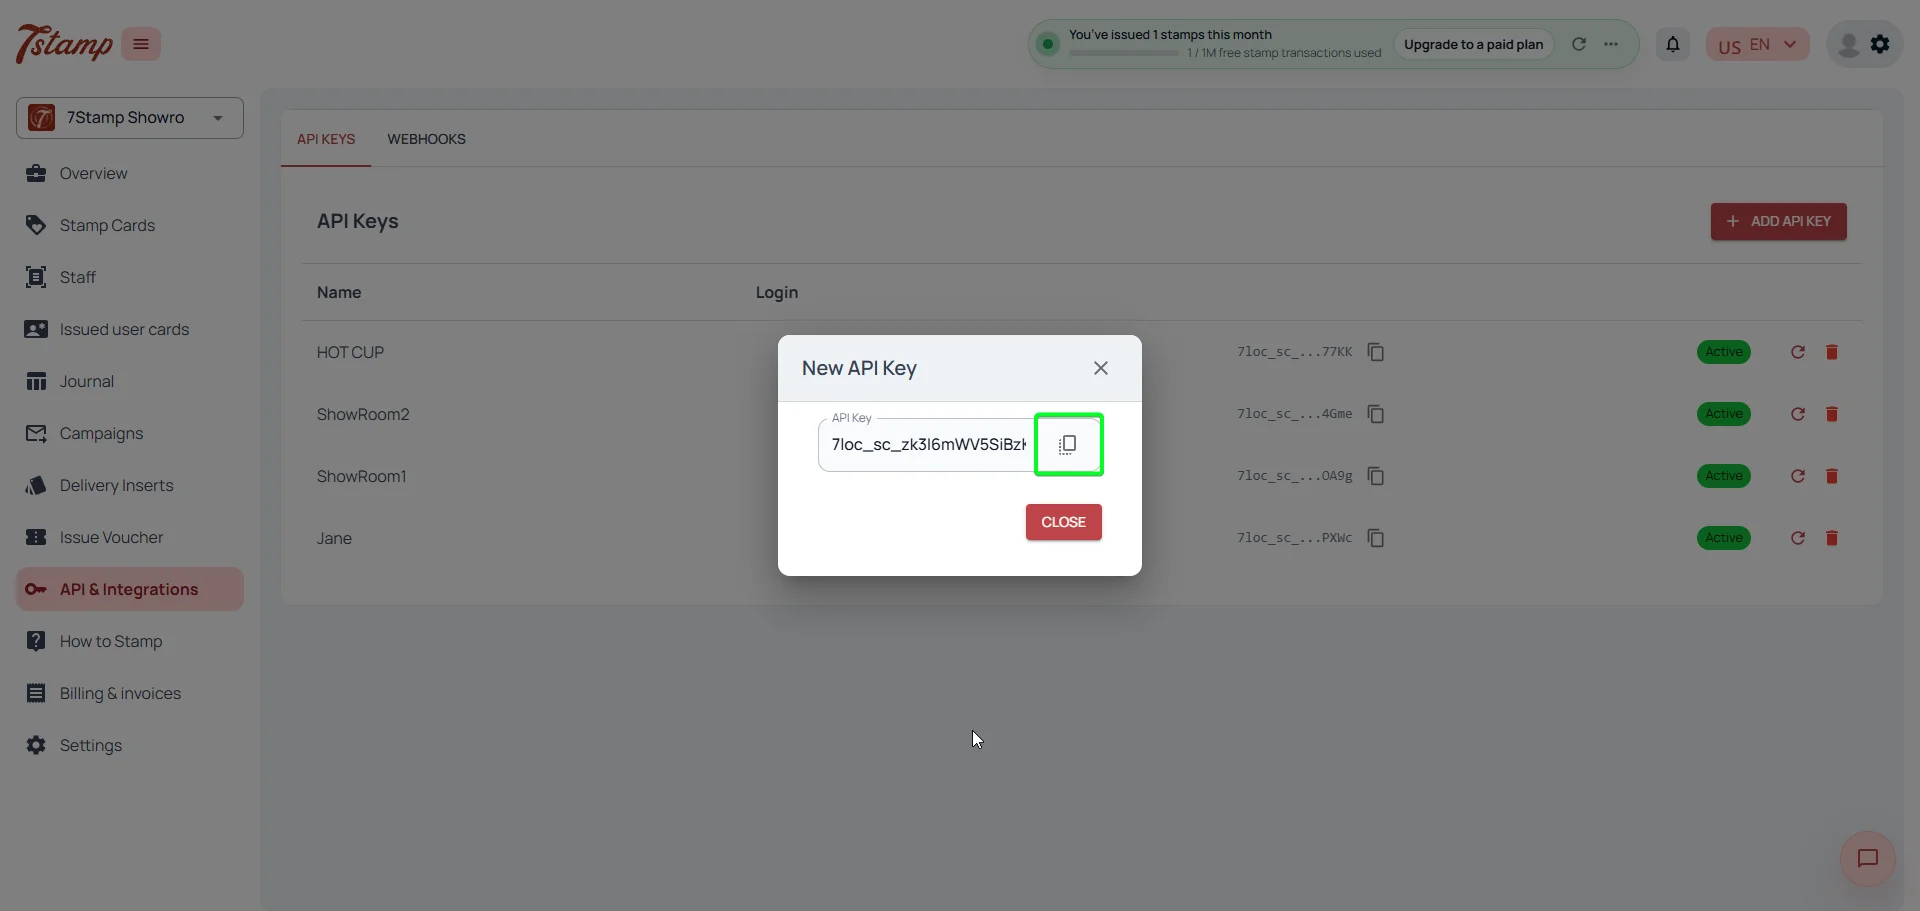
In 7stamp Admin, go to API & Integrations → API Keys → Add API Key. Store the value in Make's HTTP API-key connection/keychain when that option is available. Never map the key from a text field, place it in a note, or use it in a browser-facing workflow. A key belongs to one 7stamp workplace/profile.
Map the immutable ID from your CRM, POS, or commerce platform—for example a CRM contact ID or customer UUID. Add External Source such as hubspot, shopify, or poster when the same identifier could appear in more than one system.
When the connected 7stamp profile has one active card template, Template can be left empty. With multiple templates, map or choose template_id deliberately so every invite and scan reaches the intended loyalty programme.
http Method: POST
URL: https://api.7loc.com/cards-api/cards/invite
Headers:
Authorization: Bearer YOUR_7STAMP_API_KEY
Content-Type: application/json
Body type: Raw / JSON
{
"external_id": "crm_contact_8821",
"external_source": "hubspot",
"template_id": 42
}In 7stamp Admin, create a key in API & Integrations → API Keys → Add API Key. Use a separate test profile/key when your account setup allows it.
In Make, create a scenario and add the source trigger. Run it once before mapping so you can see a real sample contact or paid order.
Click the next plus, search for HTTP, and choose Make a request. Set the method, full URL, and headers from the operation card on this page.
Use GET https://api.7loc.com/cards-api/templates as the first request. Its successful response proves the key works without changing any customer data.
For POST routes, select application/json and paste the body shape from this guide. Map a stable External ID; add template_id only if the profile has multiple active templates.
Run with a disposable contact, inspect the HTTP output, and only then map its exact response fields into the next CRM, email, or messaging module.
Use HTTP for 7stamp now: it is the documented, production-ready route, not a reduced fallback. Choose it whenever you need a 7stamp operation, a new API route, or a custom POS/ERP connection. The OpenAPI reference is the source of truth for the method, full path, body, and response schema; the bearer key and base URL stay the same.
For an event-driven scenario, add Webhooks → Custom webhook and create a webhook. Copy its URL, open API & Integrations → Webhooks in the 7stamp profile, paste the URL, select the event types, save, and send a real test event. The 7stamp profile owns that subscription; the current API does not expose automatic webhook subscribe/unsubscribe endpoints.
The instructions on this page use Make modules that are available to every Make account. If you want a future native 7stamp module rather than HTTP, send us the workflow you need; until then, HTTP and Custom webhooks cover every documented 7stamp operation.
Yes. There is no public 7stamp app in Make today. Add HTTP > Make a request, use the complete 7stamp endpoint URL, and send Authorization: Bearer followed by your 7stamp API key. HTTP can call every documented endpoint.
In 7stamp Admin, open API Integrations, then API Keys, then Add API Key. The key is scoped to the workplace/profile that created it, so use a test profile for test scenarios whenever possible.
Use the stable identifier from the source system, preferably a CRM contact ID or customer UUID. Do not use a display name. A phone number or email can work, but can change and should be handled consistently.
Create a Webhooks > Custom webhook in Make, then paste its generated URL into the webhook settings of the 7stamp profile. Use a Make filter or router after delivery to handle the incoming event_type.
Next step
Create the API key, test List Templates, and build one invite or scan scenario with a disposable contact. Add routers and messaging only after that simple flow is reliable.