
റഫറൻസ്
ജീവനക്കാർക്കും ഉപഭോക്താക്കൾക്കും കിയോസ്ക്കുകൾക്കും ആൻഡ്രോയിഡ് പേയ്മെൻ്റ് ടെർമിനലുകൾക്കുമായി പ്രവർത്തിക്കുന്ന ആപ്പാണ് 7Stamp Scanner.
9. 7Stamp Scanner ആപ്ലിക്കേഷൻ — മാനുവൽ / Autopilot / കിയോസ്ക് / Terminal Mode
ജീവനക്കാർക്കും ഉപഭോക്താക്കൾക്കും കിയോസ്ക്കുകൾക്കും ആൻഡ്രോയിഡ് പേയ്മെൻ്റ് ടെർമിനലുകൾക്കുമായി പ്രവർത്തിക്കുന്ന ആപ്പാണ് 7Stamp Scanner. ഒരു കാർഡ് സ്കാൻ സ്റ്റാമ്പിംഗ്, വൗച്ചർ റിഡംപ്ഷൻ, ലോട്ടറി സ്പിന്നിംഗ്, Terminal Mode ചെക്ക്ഔട്ട് ലോയൽറ്റി ആക്കി മാറ്റുക എന്നതാണ് ഇതിൻ്റെ ജോലി. ഒരു സ്റ്റാഫ് അംഗത്തിൻ്റെ പോക്കറ്റിൽ, ഉപഭോക്താവിനെ അഭിമുഖീകരിക്കുന്ന സ്റ്റാൻഡിൽ അല്ലെങ്കിൽ ഇതിനകം ചെക്ക്ഔട്ടിൽ ഇരിക്കുന്ന പേയ്മെൻ്റ് ടെർമിനലിൽ ശാരീരികമായി ഇരിക്കുന്നത് ഇതാണ്. ഒരു സ്റ്റാഫ് ലോഗിൻ പ്രധാന സ്കാനർ മോഡുകളിലേക്ക് ആക്സസ് നൽകുന്നു - മോഡ് തിരഞ്ഞെടുക്കുന്നത് നിങ്ങളുടെ ബിസിനസ്സിൻ്റെ വേഗതയെയും സേവന സാഹചര്യത്തെയും ആശ്രയിച്ചിരിക്കുന്നു.
[സ്ക്രീൻഷോട്ട്: 1101_How_To_Scanpng.png]
9.1 എവിടെ 7Stamp Scanner പ്രവർത്തിക്കുന്നു
വെബ് പതിപ്പ് (ഏതെങ്കിലും ഉപകരണം): സ്കാനർ.7stamp.com
- ഏത് ആധുനിക ബ്രൗസറിലും പ്രവർത്തിക്കുന്നു: ഒരു സ്മാർട്ട്ഫോണിലോ ടാബ്ലെറ്റിലോ കമ്പ്യൂട്ടറിലോ.
- ഇൻസ്റ്റാൾ ചെയ്യേണ്ടതില്ല - പേജ് തുറക്കുക, നിങ്ങളുടെ Staff Login നൽകുക, ജോലിയിൽ പ്രവേശിക്കുക.
- ഒരു ഷെയർ വർക്ക് ലാപ്ടോപ്പ്, സ്റ്റാൻഡിൽ ഒരു ടാബ്ലെറ്റ്, ക്യാമറയുള്ള ഏത് Windows/Mac/Linux ഉപകരണത്തിനും അനുയോജ്യം.
- നിങ്ങൾക്ക് ഒരു ബാഹ്യ സ്കാനർ കണക്റ്റുചെയ്യാനും ഉപഭോക്തൃ കാർഡുകൾ സ്കാൻ ചെയ്യാനും കഴിയും. കോൺഫിഗറേഷൻ ആവശ്യമില്ല.
Android: ഗൂഗിൾ പ്ലേ · നേരിട്ടുള്ള APK iOS: ആപ്പ് സ്റ്റോർ
- നേറ്റീവ് ആപ്പ് - വേഗത്തിൽ പ്രവർത്തിക്കുന്നു, ഫോൺ ക്യാമറ നന്നായി ഉപയോഗിക്കുന്നു.
- സ്വന്തം ഫോണിൽ ജോലി ചെയ്യുന്ന ജീവനക്കാർക്ക് (പ്രീമിയം സേവനം, ഫീൽഡ് വർക്ക്, ഡെലിവറി) അനുയോജ്യമാണ്.
- നിങ്ങൾക്ക് ഒരു ബാഹ്യ സ്കാനർ കണക്റ്റുചെയ്യാനും ഉപഭോക്തൃ കാർഡുകൾ സ്കാൻ ചെയ്യാനും കഴിയും (അങ്ങനെയെങ്കിൽ Autopilot മോഡ് പരിഗണിക്കുക).
- കിയോസ്ക് മോഡിൽ ടാബ്ലെറ്റിൽ പ്രവർത്തിപ്പിക്കാം.
- ഡയറക്ട് APK — ആപ്പ് പാക്കേജ്
https://downloads.7stamp.com/7stamp-scanner.apkഎന്നതിൽ നിന്ന് നേരിട്ട് ഡൗൺലോഡ് ചെയ്യുക. Android പേയ്മെൻ്റ് ടെർമിനലുകൾക്കും ഒരു കൂട്ടം ഉപകരണങ്ങളിലുടനീളം ആപ്പ് കേന്ദ്രീകൃതമായി വിന്യസിക്കുന്നതിനും ഉപയോഗപ്രദമാണ്.
എന്താണ് തിരഞ്ഞെടുക്കേണ്ടത്. നിങ്ങൾക്ക് ഒരു ആൻഡ്രോയിഡ് ടാബ്ലെറ്റോ കൗണ്ടറിൽ ഐപാഡോ ഉണ്ടെങ്കിൽ - നേറ്റീവ് ആപ്പ് ഇൻസ്റ്റാൾ ചെയ്യുക. നിങ്ങൾ വ്യത്യസ്ത ഉപകരണങ്ങളിൽ നിന്ന് പ്രവർത്തിക്കുന്നുണ്ടെങ്കിൽ അല്ലെങ്കിൽ ഒരേ സമയം പങ്കിട്ട കമ്പ്യൂട്ടർ ഉപയോഗിക്കുന്നുണ്ടെങ്കിൽ — വെബ് പതിപ്പ് https://scanner.7stamp.com ഉപയോഗിച്ച് പോകുക. പ്രവേശനത്തിനുള്ള പ്രവേശനവും പാസ്വേഡും സ്റ്റാഫ് എന്നതിന് കീഴിൽ അഡ്മിൻ പാനലിൽ സൃഷ്ടിച്ചിരിക്കുന്നു.
9.2 ലോഗിൻ, നാവിഗേഷൻ
[സ്ക്രീൻഷോട്ട്: 0101-Login.png]
അഡ്മിനിൽ നിങ്ങൾ സൃഷ്ടിച്ച അതേ Staff Login ഉപയോഗിച്ച് നിങ്ങൾക്ക് ഏത് പ്ലാറ്റ്ഫോമിൽ നിന്നും (വെബ് / Android / iOS) ലോഗിൻ ചെയ്യാൻ കഴിയും (സ്റ്റാഫ് → + സൃഷ്ടിക്കുക → Staff Login സൃഷ്ടിക്കുന്നു). ലോഗിൻ ചെയ്ത ശേഷം, ആപ്പ് നിങ്ങളുടെ ബിസിനസ് പ്രൊഫൈലിലേക്ക് സ്വയമേവ ലിങ്ക് ചെയ്യുന്നു.
** സൈഡ് മെനു (മുകളിൽ ഇടത് വശത്തുള്ള ☰ ഐക്കൺ ഉപയോഗിച്ച് തുറക്കുന്നു):**
- Manual Mode — മാനുവൽ സ്കാനിംഗ് മോഡ് (സ്ഥിരസ്ഥിതി).
- Kiosk Mode — ഉപഭോക്തൃ സ്വയം സേവന മോഡ്.
- അഡ്മിൻ പാനൽ തുറക്കുക — അഡ്മിനിലേക്കുള്ള ദ്രുത ലിങ്ക് (
admin.7stamp.com). - ലോഗ് ഔട്ട് — സൈൻ ഔട്ട് ചെയ്യുക (മെനുവിൻ്റെ ചുവടെ, ചുവന്ന ബട്ടൺ).
മെനുവിലൂടെ മാനുവൽ, Autopilot എന്നിവയ്ക്കിടയിൽ നിങ്ങൾ “മോഡുകൾ മാറേണ്ടതില്ല”. Autopilot എന്നത് Manual Mode ൻ്റെ ഒരു ഉപ-മോഡാണ്, പ്രധാന സ്ക്രീനിൽ വലതുവശത്ത് ഒരൊറ്റ സ്വിച്ച് ഉപയോഗിച്ച് ടോഗിൾ ചെയ്തിരിക്കുന്നു (ചുവടെ കാണുക).
9.3 Manual Mode — ജീവനക്കാർ കൈകൊണ്ട് സ്കാൻ ചെയ്യുന്നു
[സ്ക്രീൻഷോട്ട്: 0201-WaitingScansManualMode.png]
ഉപഭോക്താവിൻ്റെ കാർഡ് ജീവനക്കാർ സ്വയം സ്കാൻ ചെയ്യുന്ന അടിസ്ഥാന സാഹചര്യമാണ് Manual Mode. ഉപഭോക്താവുമായുള്ള വ്യക്തിഗത ഇടപെടലിൻ്റെ ഭാഗമായ സ്റ്റാമ്പിംഗ് പ്രീമിയം സേവനത്തിൽ (ബ്യൂട്ടി സലൂണുകൾ, ബാർബർഷോപ്പുകൾ, സ്പാ, സിറ്റ്-ഡൗൺ റെസ്റ്റോറൻ്റുകൾ) ഉപയോഗിക്കുന്നു.
Manual Mode പ്രധാന സ്ക്രീൻ
- തലക്കെട്ട് സൂചകം: കാർഡ് സ്കാനിനായി കാത്തിരിക്കുന്നു — ഒരു സ്കാൻ സ്വീകരിക്കാൻ ആപ്പ് തയ്യാറാണ്.
- മുകളിൽ വലത് - Auto-Stamp (Scanner Only) ടോഗിൾ (മാനുവലിൽ ഓഫ്).
- സ്ക്രീനിൻ്റെ താഴെ - സമീപകാല ഷിഫ്റ്റ് ഇവൻ്റ് ലോഗ് (ഇഷ്യൂ ചെയ്ത / ഉപയോഗിച്ച / ഇല്ലാതാക്കിയ വൗച്ചറുകൾ). ഓരോ എൻട്രിയും ടാപ്പുചെയ്യാവുന്നതും വിശദാംശങ്ങൾ തുറക്കുന്നതുമാണ്.
- ഏറ്റവും താഴെ - രണ്ട് പ്രവർത്തന ബട്ടണുകൾ:
- 🔍 Search Customer — പേര്, ഇമെയിൽ, ഫോൺ അല്ലെങ്കിൽ കാർഡ് നമ്പർ എന്നിവ പ്രകാരം ഒരു ഉപഭോക്താവിനെ കണ്ടെത്തുക.
- 📷 Use Camera — ഉപകരണ ക്യാമറ തുറന്ന് ഒരു ഉപഭോക്തൃ കാർഡ് QR സ്കാൻ ചെയ്യുക.
ഒരു ഉപഭോക്താവിനെ കണ്ടെത്തുന്നതിനുള്ള നാല് വഴികളും സ്റ്റാമ്പ് കാർഡും
1. ഉപകരണ ക്യാമറ ഉപയോഗിച്ച് സ്കാൻ ചെയ്യുന്നു (Use Camera). പ്രവർത്തിക്കാനുള്ള പ്രധാന മാർഗം.
[സ്ക്രീൻഷോട്ട്: 0302-ScanByCamera.png]
സ്റ്റാഫ് അംഗം Use Camera ടാപ്പ് ചെയ്യുന്നു, ഉപഭോക്താവിൻ്റെ കാർഡ് QR-ലേക്ക് ഫോൺ/ടാബ്ലെറ്റ് ക്യാമറ ചൂണ്ടിക്കാണിക്കുന്നു (ഉപഭോക്താവ് അവരുടെ കാർഡ് Apple Wallet അല്ലെങ്കിൽ Google Wallet-ൽ തുറന്ന് സ്ക്രീൻ കാണിക്കുന്നു), ആപ്പ് ഒരു സെക്കൻ്റിൻ്റെ അംശത്തിനുള്ളിൽ കോഡ് തിരിച്ചറിയുകയും ഉടൻ തന്നെ ഉപഭോക്തൃ കാർഡ് തുറക്കുകയും ചെയ്യുന്നു.
2. ഒരു ബാഹ്യ സ്കാനർ ഉപയോഗിച്ച് ഉപഭോക്തൃ കാർഡ് സ്കാൻ ചെയ്യുന്നു.
നിങ്ങളുടെ ഉപകരണത്തിലേക്ക് സ്കാനർ ബന്ധിപ്പിച്ച് അത് ഉപയോഗിച്ച് ഉപഭോക്താവിൻ്റെ കാർഡ് സ്കാൻ ചെയ്യുക.
3. ഉപഭോക്തൃ തിരയൽ (Search Customer). ഉപഭോക്താവിൻ്റെ കയ്യിൽ ഫോൺ ഇല്ലെങ്കിൽ ഒരു തിരിച്ചടി.
[സ്ക്രീൻഷോട്ട്: 0301-CustomerSearch.png]
എപ്പോൾ ഉപയോഗപ്രദമാണ്:
- ഉപഭോക്താവ് അവരുടെ ഫോൺ ഉപേക്ഷിക്കുകയോ ചോർത്തുകയോ ചെയ്തു;
- ഉപഭോക്താവ് ഇപ്പോൾ സൈൻ അപ്പ് ചെയ്തു, കാർഡ് എവിടെയാണ് തുറക്കുന്നതെന്ന് ഇതുവരെ കണ്ടെത്തിയിട്ടില്ല;
- സ്റ്റാഫ് അംഗം അപ്പോയിൻ്റ്മെൻ്റ് വഴി പ്രവർത്തിക്കുകയും ഉപഭോക്താവിൻ്റെ കാർഡ് മുൻകൂട്ടി തുറക്കുകയും ചെയ്യുന്നു.
പേര്, ഇമെയിൽ അല്ലെങ്കിൽ കാർഡ് നമ്പർ എന്നിവ പ്രകാരം തിരയൽ പ്രവർത്തിക്കുന്നു.
4. നേരിട്ടുള്ള വൗച്ചർ തിരയൽ (വൗച്ചർ തിരയൽ). ഉപഭോക്താവ് കൈയിൽ ഒരു വൗച്ചറുമായി എത്തുമ്പോൾ (ഉദാ. അച്ചടിച്ച പേപ്പർ) അത് റിഡീം ചെയ്യാൻ ആഗ്രഹിക്കുമ്പോൾ. നിങ്ങൾക്ക് തിരയലിൽ വൗച്ചർ നമ്പർ നൽകാം, ഒരു ബാഹ്യ സ്കാനർ ഉപയോഗിച്ച് സ്കാൻ ചെയ്യാം അല്ലെങ്കിൽ ഉപകരണ ക്യാമറ ഉപയോഗിച്ച് സ്കാൻ ചെയ്യാം.
സ്കാൻ ചെയ്തതിന് ശേഷം ഉപഭോക്തൃ കാർഡ്
[സ്ക്രീൻഷോട്ട്: 0401-CustomerCard.png]
കാർഡ് കണ്ടെത്തിക്കഴിഞ്ഞാൽ, ഉപഭോക്തൃ കാർഡ് രണ്ട് ടാബുകൾ ഉപയോഗിച്ച് തുറക്കുന്നു:
- വിവരങ്ങൾ — അടിസ്ഥാന വിവരങ്ങൾ (പേര്, ഇമെയിൽ, കാർഡ് ഐഡി
#XXXXXX, എഡിറ്റ് ഉള്ള ജന്മദിനം ✏️). - വൗച്ചറുകൾ (N) — ഈ ഉപഭോക്താവിൻ്റെ എല്ലാ വൗച്ചറുകളുടെയും ലിസ്റ്റ്: സജീവം, വീണ്ടെടുക്കൽ, കാലഹരണപ്പെട്ടു.
മുകളിലെ ഏരിയയിൽ ഒരു ചുവന്ന റീസെറ്റ് സ്റ്റാമ്പുകൾ ബട്ടൺ ഉണ്ട് - ഉപഭോക്താവിൻ്റെ സ്റ്റാമ്പുകൾ പുനഃസജ്ജമാക്കാൻ ഇത് നിങ്ങളെ അനുവദിക്കുന്നു (ഉദാ. അവർ അവസാന ലക്ഷ്യം അവസാനിപ്പിച്ചാൽ, റിവാർഡ് ലഭിച്ചു, നിങ്ങൾ ഒരു പുതിയ കാർഡ് ആരംഭിക്കാൻ ആഗ്രഹിക്കുന്നു). ശ്രദ്ധിക്കുക. നിങ്ങൾ കാർഡ് റീസെറ്റ് ചെയ്യേണ്ടതില്ല: അടുത്ത തവണ റീസെറ്റ് ചെയ്യാതെ അവസാന ലക്ഷ്യത്തിൽ നിങ്ങൾ അത് സ്കാൻ ചെയ്യുകയാണെങ്കിൽ, സിസ്റ്റം ചാക്രികമായി ഒരു പുതിയ ആവർത്തനത്തിൻ്റെ ആദ്യ സ്റ്റാമ്പ് ഇടും.
സ്റ്റാമ്പ് നിയന്ത്രണങ്ങൾ
[സ്ക്രീൻഷോട്ട്: 0402-Stamped.png]
സ്ക്രീനിൻ്റെ താഴെ - സ്റ്റാമ്പ് നിയന്ത്രണങ്ങൾ:
- 🟢 + (പച്ച) — ഒരു സ്റ്റാമ്പ് ചേർക്കുക.
- 🔴 − (ചുവപ്പ്) - ഒരു സ്റ്റാമ്പ് നീക്കം ചെയ്യുക (നിങ്ങൾ ഒരു തെറ്റ് ചെയ്തിട്ടുണ്ടെങ്കിൽ).
- − / + ഉള്ള ഒരു അളവ് ഫീൽഡ് — ഒരേസമയം നിരവധി സ്റ്റാമ്പുകൾ ചേർക്കുക (ഉദാഹരണത്തിന്, കാർഡ് `തുക പ്രകാരം“ ഉപയോഗിക്കുകയും ഉപഭോക്താവ് വലിയ തുക ചെലവഴിക്കുകയും ചെയ്താൽ).
- 🔍 Search Customer — മറ്റൊരു ഉപഭോക്താവിനെ തുറക്കുക.
- 📷 — വീണ്ടും സ്കാൻ ചെയ്യുക.
ഒരു ലക്ഷ്യത്തിലെത്തുമ്പോൾ മൂന്ന് സാഹചര്യങ്ങൾ
ഒരു സ്റ്റാമ്പ് ഉപഭോക്താവിനെ ഒരു ലക്ഷ്യത്തിലേക്ക് കൊണ്ടുവരുമ്പോൾ (നാഴികക്കല്ലുകളിലൊന്ന് അല്ലെങ്കിൽ അവസാന ലക്ഷ്യം), സമ്മാനത്തോടുകൂടിയ ഒരു പോപ്പ്അപ്പ് സ്കാനർ കാണിക്കുന്നു. പോപ്പ്അപ്പ് ഉള്ളടക്കങ്ങൾ കാർഡിൽ കോൺഫിഗർ ചെയ്തിരിക്കുന്ന റിവാർഡ് തരത്തെ ആശ്രയിച്ചിരിക്കുന്നു.
1. റിവാർഡ് = Award (തൽക്ഷണ ടെക്സ്റ്റ് സമ്മാനം).
[സ്ക്രീൻഷോട്ട്: 0403-StampedAndGetAward.png]
സ്ക്രീനിൽ - സമ്മാന വാചകവും ചിത്രവും (“ഫ്രീ കോഫി”, “1 ഫ്രീ പേസ്ട്രി” മുതലായവ). സ്റ്റാഫ് അംഗം സ്ക്രീൻ ഉപഭോക്താവിനെ കാണിക്കുകയും വാഗ്ദാനം ചെയ്ത സമ്മാനം കൈമാറുകയും ചെയ്യുന്നു.
2. റിവാർഡ് = വൗച്ചർ (Smart Voucher കൂടെ Redeem Code).
[സ്ക്രീൻഷോട്ട്: 0404-StampedAndGetVoucher.png]
വൗച്ചർ അൺലോക്ക് ചെയ്തു! ചിത്രം, വൗച്ചർ ശീർഷകം, വൗച്ചർ നമ്പർ #XXXXX എന്നിവയുള്ള പോപ്പ്അപ്പ്. മൂന്ന് പ്രവർത്തനങ്ങൾ:
- വൗച്ചർ ഉപയോഗിക്കുക (പച്ച ബട്ടൺ) — സ്കാനറിൽ തന്നെ വൗച്ചർ റിഡീം ചെയ്യുക. വൗച്ചറിൽ Redeem Code ഓപ്ഷൻ പ്രവർത്തനക്ഷമമാക്കിയിട്ടുണ്ടെങ്കിൽ, സ്ക്രീൻ കോഡ് ടെക്സ്റ്റ് + QR + ബാർകോഡ് കാണിക്കുന്നു. ജീവനക്കാർ കോഡ് POS-ലേക്ക് പ്രവേശിക്കുന്നു / സ്കാൻ ചെയ്യുന്നു. വൗച്ചർ
റിഡീംഎന്നതിലേക്ക് നീങ്ങുന്നു, വീണ്ടും ഉപയോഗിക്കാനാകില്ല. - എല്ലാ വൗച്ചറുകളും കാണുക — ഉപഭോക്താവിൻ്റെ എല്ലാ വൗച്ചറുകളുടെയും ലിസ്റ്റ് തുറക്കുക (ഉദാ. ഉപഭോക്താവ് ആദ്യം മറ്റൊരു വൗച്ചർ റിഡീം ചെയ്യാൻ ആഗ്രഹിക്കുന്നുവെങ്കിൽ).
- ക്ലോസ് - പോപ്പ്അപ്പ് അടയ്ക്കുക; വൗച്ചർ സജീവമായി തുടരുകയും ഉപഭോക്താവിന് അത് പിന്നീട് ഉപയോഗിക്കുകയും ചെയ്യാം.
3. റിവാർഡ് = Lottery (ഒരു സമനില).
[സ്ക്രീൻഷോട്ട്: 0405-StampedAndGetLottery.png]
ജീവനക്കാരുടെ ഉപകരണത്തിൽ ലോട്ടറി സ്ക്രീൻ തുറക്കുന്നു. സ്റ്റാഫ് ഉപഭോക്താവിന് ഉപകരണം കൈമാറുന്നു (അല്ലെങ്കിൽ സ്ക്രീൻ കാണിക്കുന്നു) “പ്ലേ” ടാപ്പുചെയ്യാൻ അവരോട് ആവശ്യപ്പെടുന്നു. സ്പിന്നിനു ശേഷം, വേരിയൻ്റുകളിൽ ഒന്ന് തീർന്നു, തുടർന്ന് Award അല്ലെങ്കിൽ ഒരു വൗച്ചറായി കൈകാര്യം ചെയ്യുന്നു (മുകളിൽ കാണുക).
[സ്ക്രീൻഷോട്ട്: 0406-LotteryUsed.png]
മാനുവൽ മോഡിൽ ഒരു വൗച്ചറിൻ്റെ സ്വയം വീണ്ടെടുക്കൽ
[സ്ക്രീൻഷോട്ട്: 0407-CustomerVouchers.png] [സ്ക്രീൻഷോട്ട്: 0408-VoucherUsed.png]
ഉപഭോക്താവ് വാഗ്ദാനം ചെയ്ത സമ്മാനത്തിനായി പിന്നീട് എത്തുകയാണെങ്കിൽ (അത് ലഭിച്ചതിന് ശേഷം ശരിയല്ല), ജീവനക്കാർ അവരുടെ കാർഡ് തുറന്ന് വൗച്ചറുകൾ (N) ടാബിലേക്ക് മാറുന്നു. ഉപഭോക്താവിൻ്റെ എല്ലാ വൗച്ചറുകളും ഇവിടെ കാണാം. സ്റ്റാഫ് വലത് ടാപ്പ് ചെയ്യുന്നു → വൗച്ചർ തുറക്കുന്നത് വൗച്ചർ ഉപയോഗിക്കുക → സ്ഥിരീകരിക്കുക → സ്റ്റാറ്റസ് റിഡീം ചെയ്തു.
സുരക്ഷ: വൗച്ചർ സ്റ്റേറ്റ് മെഷീൻ (ഇഷ്യൂ ചെയ്തു → സജീവം → റിഡീം ചെയ്തു → കാലഹരണപ്പെട്ടു) ഇരട്ട ഉപയോഗം തടയുന്നു. റിഡീം ചെയ്ത ശേഷം വൗച്ചർ (അല്ലെങ്കിൽ അതിൻ്റെ സ്ക്രീൻഷോട്ട്) വീണ്ടും പ്രവർത്തിക്കില്ല.
9.4 Autopilot Mode — വരെ പശ്ചാത്തല സ്കാനിംഗ്
[സ്ക്രീൻഷോട്ട്: 0101-WaitingScans_AutoPilotMode.png]
Autopilot Mode Manual Mode ൻ്റെ ഒരു ഉപ-മോഡാണ്, അതിൽ സ്റ്റാമ്പുകൾ ചേർത്തിരിക്കുന്നു പശ്ചാത്തലത്തിൽ, സ്ഥിരീകരണങ്ങളോ മോഡലുകളോ ഒന്നുമില്ല. ഒരു കോഫി ഷോപ്പ്, ഫാസ്റ്റ് ഫുഡ്, ബേക്കറി, കാർ കഴുകൽ എന്നിവയിലെ തിരക്കുള്ള സമയത്തിന് അനുയോജ്യം - എവിടെയും ക്യൂവുള്ളതിനാൽ സേവനം മന്ദഗതിയിലാക്കാൻ കഴിയില്ല.
അത് എങ്ങനെ പ്രവർത്തനക്ഷമമാക്കാം
Manual Mode പ്രധാന സ്ക്രീനിൽ, മുകളിൽ വലതുവശത്തുള്ള Auto-Stamp (Scanner Only) ടോഗിൾ “ഓൺ” (പച്ച) എന്നതിലേക്ക് മാറ്റുക. സ്ക്രീൻ മാറുന്നു:
- ഐക്കൺ ഒരു ബാഹ്യ സ്കാനർ ചിത്രത്തിലേക്ക് മാറുന്നു.
- പ്രധാന തലക്കെട്ട് ഇങ്ങനെയാണ്: Auto-Stamp മോഡ് ആക്റ്റീവ്.
- ഉപശീർഷകം: “സ്കാനർ ഇൻപുട്ടിനായി മാത്രം സ്റ്റാമ്പുകൾ സിസ്റ്റം സ്വയമേവ.”
ഇത് എങ്ങനെ പ്രവർത്തിക്കുന്നു
“Scanner Only” എന്ന പദപ്രയോഗം അർത്ഥമാക്കുന്നത് ഈ മോഡിൽ **സ്റ്റാമ്പുകൾ എന്നത് ഒരു ഹാർഡ്വെയർ സ്കാനറിൽ നിന്നുള്ള ഇൻപുട്ട് വഴി മാത്രമേ ചേർക്കൂ എന്നാണ് Use Camera, Search Customer ബട്ടണുകൾ സ്ക്രീനിൽ ദൃശ്യമാകും, നിങ്ങൾക്ക് അവ ആവശ്യമുണ്ടെങ്കിൽ അവ ലഭ്യമാകും, എന്നാൽ അവ സാധാരണ Autopilot പ്രവർത്തനത്തിൽ ഉപയോഗിക്കില്ല - അവ ഒരു ബാക്കപ്പായി വർത്തിക്കുന്നു (ഉദാ. സ്കാനർ ഉപഭോക്താവിനെ എടുത്തില്ലെങ്കിൽ, നിങ്ങൾ അവയെ നേരിട്ട് കണ്ടെത്തേണ്ടതുണ്ട്).
വർക്ക്ഫ്ലോ:
- സ്റ്റാഫ് പതിവുപോലെ ഓർഡർ എടുക്കുന്നു (ടിൽ, ബാർ കൗണ്ടർ, വാഷ്).
- പണമടയ്ക്കുമ്പോഴോ അതിന് ശേഷമോ ഉപഭോക്താവ് അവരുടെ വാലറ്റ് കാർഡ് കാണിക്കുന്നു.
- ബാഹ്യ സ്കാനർ QR “ഒരു ബാർകോഡായി” പിടിക്കുന്നു.
- പശ്ചാത്തലത്തിൽ ഉപഭോക്താവിൻ്റെ കാർഡിലേക്ക് 7Stamp Scanner സ്റ്റാമ്പ് ചേർക്കുന്നു.
- മോഡൽ ഇല്ല - ക്യൂ നിർത്തുന്നില്ല.
- പുഷ് അറിയിപ്പ് വഴി ഉപഭോക്താവ് അവരുടെ വാലറ്റിൽ പിന്നീട് പുരോഗതി അപ്ഡേറ്റ് കാണുന്നു.
നിങ്ങൾക്ക് എന്താണ് വേണ്ടത്
- ബാർകോഡ് സ്കാനർ: USB അല്ലെങ്കിൽ ബ്ലൂടൂത്ത്, QR കോഡുകൾ വായിക്കാൻ കഴിയും. ഹണിവെൽ, സീബ്ര, ഡാറ്റാലോഗിക് എന്നിവയിൽ നിന്നുള്ള സ്റ്റാൻഡേർഡ് മോഡലുകൾ ചെയ്യും. സ്കാനർ കീബോർഡ് എമുലേഷനിലേക്ക് (HID മോഡ്) സജ്ജമാക്കണം.
- വരെയുള്ള ഒരു സ്ഥിരമായ ഉപകരണം:
scanner.7stamp.comതുറന്നതോ Android/iOS ആപ്പ് ഉള്ളതോ ആയ ലാപ്ടോപ്പ് അല്ലെങ്കിൽ ടാബ്ലെറ്റ്. - ** സ്ഥിരതയുള്ള ഇൻ്റർനെറ്റ്** - ഓരോ സ്റ്റാമ്പിലും തത്സമയം ക്ലൗഡിലേക്ക് പോകുന്നു.
Autopilot-ൽ ഒരു വൗച്ചറിൻ്റെ ഉപഭോക്താവിൻ്റെ സ്വയം വീണ്ടെടുക്കൽ
Autopilot-ൽ ജീവനക്കാർ വാലറ്റ് കാർഡ് “ഡയലോഗ് മോഡിൽ” ശാരീരികമായി സ്കാൻ ചെയ്യുന്നില്ല - അവർ ക്യൂവിൽ പ്രവർത്തിക്കുന്നു. എന്നാൽ ഉപഭോക്താവിന് അവരുടെ വൗച്ചർ സ്ഥലത്തുതന്നെ ഉപയോഗിക്കാനാകും**, അതിന് സ്വിച്ചിംഗ് മോഡുകൾ ആവശ്യമില്ല. വാലറ്റിലെ കാർഡ് പേജിൽ ഉപഭോക്താവിന് അവരുടെ വൗച്ചറുകളിലേക്ക് ഒരു ലിങ്ക് ഉണ്ട്. ഇത് തുറക്കുമ്പോൾ, ഉപഭോക്താവ് ഒന്നുകിൽ:
- ** Redeem Code കാഷ്യറെ വിളിക്കുന്നു
- ** അവരുടെ ഫോൺ സ്ക്രീനിൽ QR/ബാർകോഡ് കാണിക്കുന്നു**, കൂടാതെ കാഷ്യർ അത് ബാഹ്യ സ്കാനർ ഉപയോഗിച്ച് സ്കാൻ ചെയ്യുന്നു.
അതിനുശേഷം വൗച്ചർ `റിഡീം’ എന്നതിലേക്ക് നീങ്ങുന്നു, ഇനി വീണ്ടും ഉപയോഗിക്കാൻ കഴിയില്ല. ഒരു ബദലായി, കാഷ്യർക്ക് താൽക്കാലികമായി Auto-Stamp ടോഗിൾ ഓഫ് ചെയ്യാനും ഉപഭോക്തൃ കാർഡ് നേരിട്ട് തുറക്കാനും വൗച്ചർ ഉപയോഗിക്കുക ഉപയോഗിച്ച് വൗച്ചർ റിഡീം ചെയ്യാനും കഴിയും.
എപ്പോഴാണ് മാനുവലിലേക്ക് മടങ്ങേണ്ടത്
ഏത് നിമിഷവും ജീവനക്കാർക്ക് Auto-Stamp ടോഗിൾ ഓഫ് ചെയ്ത് മാനുവൽ സ്കാനിംഗിലേക്ക് മടങ്ങാം - ഉദാഹരണത്തിന്, ഉപഭോക്താവിന് എന്തെങ്കിലും പ്രശ്നമുണ്ടായാൽ (ഒരു വൗച്ചർ നഷ്ടപ്പെട്ടാൽ, സ്റ്റാമ്പുകൾ സ്വമേധയാ ക്രമീകരിക്കാൻ ആഗ്രഹിക്കുന്നു) അല്ലെങ്കിൽ നിങ്ങൾ അവരെ പേര്/ഇമെയിൽ വഴി നോക്കേണ്ടതുണ്ട്. എല്ലാ Manual Mode സവിശേഷതകളും ലഭ്യമാണ് - തിരയൽ, ക്യാമറ സ്കാൻ, മാനുവൽ വൗച്ചർ ഇഷ്യൂ ചെയ്യൽ, വീണ്ടെടുക്കൽ.
9.5 Kiosk Mode — ഉപഭോക്തൃ സ്വയം സേവനം
Kiosk Mode ടാബ്ലെറ്റ് ഉപഭോക്താവിനെ അഭിമുഖീകരിക്കുകയും ഉപഭോക്താവ് സ്വന്തം കാർഡ് സ്കാൻ ചെയ്യുകയും ചെയ്യുന്ന ഒരു പൂർണ്ണ സ്ക്രീൻ സ്വയം സേവന മോഡാണ്. സ്റ്റാഫ് ഈ പ്രക്രിയയിൽ ഏർപ്പെട്ടിട്ടില്ല - അതിനാൽ “സീറോ സ്റ്റാഫ് പരിശീലനം”. കോഫി ഷോപ്പുകൾ, ബേക്കറികൾ, ഫാസ്റ്റ് കാഷ്വൽ റെസ്റ്റോറൻ്റുകൾ, ലൈറ്റ് റീട്ടെയിൽ, കാർ വാഷുകൾ എന്നിവയ്ക്ക് ഇത് അനുയോജ്യമാണ്.
[സ്ക്രീൻഷോട്ട്: കിയോസ്ക്_Bakery.png]
Kiosk Mode സജ്ജീകരണം
ഘട്ടം 1. കിയോസ്കിലേക്ക് മാറുക.
[സ്ക്രീൻഷോട്ട്: 0101_SwitchToKioskMode.png]
സൈഡ് മെനുവിൽ (☰) Kiosk Mode തിരഞ്ഞെടുക്കുക. ആപ്പ് സെറ്റപ്പ് മോഡിലേക്ക് പ്രവേശിക്കുന്നു.
Make ഒരു Android ടാബ്ലെറ്റിലോ iPad-ലോ ആപ്പ് എങ്ങനെ “പിൻ” ചെയ്യാം എന്നതിനെക്കുറിച്ചുള്ള ഓൺ-സ്ക്രീൻ നുറുങ്ങുകൾ വായിക്കുന്നത് ഉറപ്പാക്കുക, അതിനാൽ ഉപഭോക്താവിന് അത് ചെറുതാക്കാനോ അടയ്ക്കാനോ കഴിയില്ല (ഉപകരണത്തിൻ്റെ കിയോസ്ക് മോഡ് എന്ന് വിളിക്കപ്പെടുന്നവ). ഇവയാണ് നിങ്ങളുടെ ടാബ്ലെറ്റിൻ്റെ സിസ്റ്റം ഫീച്ചറുകൾ — ഞങ്ങളുടെ സ്ക്രീനിലെ സൂചന അല്ലെങ്കിൽ നിങ്ങളുടെ ഉപകരണത്തിനായുള്ള മാനുവൽ വായിക്കുക.
ഘട്ടം 2. പ്രദർശിപ്പിക്കാൻ കാർഡ് തിരഞ്ഞെടുക്കുക.
[സ്ക്രീൻഷോട്ട്: 0201_StartKiosk_Select_Card.png]
നിങ്ങളുടെ ബിസിനസ്സിന് നിരവധി സ്റ്റാമ്പ് കാർഡുകൾ ഉണ്ടെങ്കിൽ (ഉദാ. കോഫിക്ക് ഒരു പ്രത്യേക കാർഡ്, പേസ്ട്രിക്ക് മറ്റൊന്ന്), ഈ നിർദ്ദിഷ്ട ടാബ്ലെറ്റിൽ കാണിക്കുന്ന ഒന്ന് തിരഞ്ഞെടുക്കുക. വ്യത്യസ്ത കാർഡുകൾക്കായി നിങ്ങൾക്ക് നിരവധി ടാബ്ലെറ്റുകൾ സജ്ജമാക്കാൻ കഴിയും.
ഘട്ടം 3. അധിക ഓപ്ഷനുകൾ.
[സ്ക്രീൻഷോട്ട്: 0202_StartKiosk_Options.png]
അധിക കിയോസ്ക് ലോഞ്ച് ക്രമീകരണം.
ആദ്യം - ** കളർ സ്കീം**. നിങ്ങളുടെ കാർഡിൻ്റെ പാലറ്റിൽ കിയോസ്ക് ലോഞ്ച് ചെയ്യാം അല്ലെങ്കിൽ ഞങ്ങളുടെ മുൻനിശ്ചയിച്ച സെറ്റുകളിൽ ഒന്ന് തിരഞ്ഞെടുക്കുക. നിങ്ങൾക്ക് ഏറ്റവും മികച്ചതായി തോന്നുന്ന ഓപ്ഷൻ പരീക്ഷിക്കുക!
ഏറ്റവും പ്രധാനപ്പെട്ട ഓപ്ഷൻ ** ഉടനടി സ്കാനുകൾ തടയുക** എന്നതാണ്. ഒരേ ഉപഭോക്താവിനെ തുടർച്ചയായി രണ്ട് തവണ സ്റ്റാമ്പ് സമ്പാദിക്കുന്നതിൽ നിന്ന് ഇത് തടയുന്നു: ഓപ്ഷൻ ഓണാണെങ്കിൽ, ഒരു ആവർത്തിച്ചുള്ള സ്കാൻ ഉപഭോക്താവിന് അവരുടെ മുൻ ഫലം കാണിക്കുന്നു (അവസാനം റിവാർഡ് / സ്ക്രീൻ കാണിച്ചത്), കൂടാതെ സ്റ്റാമ്പ് ചേർക്കില്ല. ഇത് കൗണ്ടറിലെ ആകസ്മികമായ ഇരട്ട സ്കാനുകളിൽ നിന്ന് സംരക്ഷിക്കുന്നു.
സ്ഥിരീകരണത്തിന് ശേഷം - കിയോസ്ക് സമാരംഭിക്കുന്നു.
Kiosk Mode പ്രധാന സ്ക്രീൻ
[സ്ക്രീൻഷോട്ട്: 0301_Main.png]
ടാബ്ലെറ്റിനെ സമീപിക്കുമ്പോൾ ഉപഭോക്താവ് കാണുന്നത്:
- മുകളിൽ - നിങ്ങളുടെ ബിസിനസ്സ് ലോഗോയും പേരും (കാർഡ് ക്രമീകരണങ്ങളിൽ നിന്ന് പിൻവലിച്ചത്).
- തലക്കെട്ട്: സ്റ്റാമ്പുകൾ ശേഖരിക്കൂ റിവാർഡുകൾ നേടൂ.
- ഒരു
യുവർ റിവാർഡ്കറൗസൽ — അന്തിമ സമ്മാനം കാണിക്കുന്നു (ഒപ്പം, നാഴികക്കല്ലുകൾക്കുള്ള റിവാർഡുകൾക്കൊപ്പം, എല്ലാ ഇൻ്റർമീഡിയറ്റുകളും). സ്വൈപ്പുചെയ്യാനാകും. - ഒരു വലിയ കറുപ്പ് 📱 നിങ്ങളുടെ കാർഡ് സ്കാൻ ചെയ്യുക ബട്ടൺ “കാർഡ് സ്കാൻ ചെയ്തുകൊണ്ട് നിങ്ങളുടെ അടുത്ത സ്റ്റാമ്പ് നേടുക” എന്ന ഉപലേബൽ. (അല്ലെങ്കിൽ “നിങ്ങളുടെ ഫോൺ റീഡറിന് സമീപം പിടിക്കുക” - ടെക്സ്റ്റ് പൊരുത്തപ്പെടുന്നു).
- ചുവടെ - പുതിയ ഉപഭോക്തൃ ബ്ലോക്ക്: ഇതുവരെ കാർഡ് ഇല്ലേ? “QR-കോഡ് സ്കാൻ ചെയ്ത് നിങ്ങളുടെ വാലറ്റിൽ കാർഡ് ചേർക്കുക” എന്ന പേജ് QR എന്നതിൽ ചേരുക.
Kiosk Mode-ലെ ഉപഭോക്തൃ രംഗം
- ഉപഭോക്താവ് ടാബ്ലെറ്റ് സ്റ്റാൻഡിലേക്ക് വരുന്നു.
- അവർക്ക് ഇതിനകം ഒരു കാർഡ് ഉണ്ടെങ്കിൽ → വാലറ്റ് തുറക്കുക → ടാപ്പ് നിങ്ങളുടെ കാർഡ് സ്കാൻ ചെയ്യുക → ടാബ്ലെറ്റ് ക്യാമറയിലേക്ക് വാലറ്റ് സ്ക്രീൻ പിടിക്കുക → സ്റ്റാമ്പ് ചേർത്തു.
- അവർക്ക് ഇതുവരെ ഒരു കാർഡ് ഇല്ലെങ്കിൽ → അവരുടെ ഫോൺ ക്യാമറ ഉപയോഗിച്ച് ഇതുവരെ കാർഡ് ഇല്ലേ? QR സ്കാൻ ചെയ്യുക → കാർഡ് തൽക്ഷണം വാലറ്റിൽ സംരക്ഷിക്കുന്നു → നിങ്ങളുടെ കാർഡ് സ്കാൻ ചെയ്യുക → അവരുടെ ആദ്യ സ്റ്റാമ്പ് നേടുക.
ലക്ഷ്യത്തിലെത്തുമ്പോൾ ഉപഭോക്താവ് എന്താണ് കാണുന്നത്
റിവാർഡ് = Award.
[സ്ക്രീൻഷോട്ട്: 0501_RewardUnlocked_Award.png]
സമ്മാനത്തിൻ്റെ ചിത്രവും വിവരണവും അടങ്ങിയ ഒരു പൂർണ്ണ സ്ക്രീൻ അഭിനന്ദനങ്ങൾ! സ്ക്രീൻ. ഉപഭോക്താവ് ജീവനക്കാർക്ക് സ്ക്രീൻ കാണിക്കുകയും വാഗ്ദാനം ചെയ്ത സമ്മാനം ശേഖരിക്കുകയും ചെയ്യുന്നു.
റിവാർഡ് = വൗച്ചർ.
[സ്ക്രീൻഷോട്ട്: 0502_RewardUnlocked_Voucher.png]
ഒരു അഭിനന്ദനങ്ങൾ! വൗച്ചർ അൺലോക്ക് ചെയ്തു! വൗച്ചർ കാർഡുള്ള സ്ക്രീൻ. കിയോസ്കിൽ തന്നെ ഉപഭോക്താവിന് വൗച്ചർ സ്വയം റിഡീം ചെയ്യാം** — ഉപഭോക്താവ് കാഷ്യർക്ക് കാണിക്കുന്ന Redeem Code (ടെക്സ്റ്റ് + QR + ബാർകോഡ്) ഉള്ള ഒരു സ്ക്രീൻ യൂസ് ബട്ടൺ തുറക്കുന്നു, അദ്ദേഹം കോഡ് സ്കാൻ ചെയ്യുകയോ ടിലിൽ നൽകുകയോ ചെയ്യുന്നു. റിഡീം ചെയ്തതിന് ശേഷം വൗച്ചർ `റിഡീം’ എന്നതിലേക്ക് നീങ്ങുന്നു, ഉപഭോക്താവ് ഒരു സ്ക്രീൻഷോട്ട് സൂക്ഷിച്ചിട്ടുണ്ടെങ്കിലും വീണ്ടും ഉപയോഗിക്കാൻ കഴിയില്ല.
ചുവടെ - ബട്ടണുകൾ:
- My Vouchers — എൻ്റെ എല്ലാ വൗച്ചറുകളും കാണുക.
- 12 സെക്കൻഡിനുള്ളിൽ - മെയിൻ സ്ക്രീനിലേക്ക് സ്വയമേവ മടങ്ങിവരാനുള്ള കൗണ്ട്ഡൗൺ.
ഇതൊരു പ്രധാനപ്പെട്ട കിയോസ്ക് പാറ്റേണാണ്: യാന്ത്രികമായി അടയ്ക്കുക. അതില്ലായിരുന്നെങ്കിൽ ജീവനക്കാർ ഇടപെടുന്നത് വരെ ടാബ്ലെറ്റ് ഒരു ഉപഭോക്താവിൻ്റെ സ്ക്രീനിൽ കുടുങ്ങിക്കിടക്കും. ഒരു പ്രവർത്തനത്തിന് ശേഷം 10-15 സെക്കൻഡുകൾക്കുള്ളിൽ ടാബ്ലെറ്റ് എല്ലായ്പ്പോഴും വൃത്തിയുള്ള സ്റ്റാർട്ടിംഗ് സ്ക്രീനിലേക്ക് മടങ്ങിവരുമെന്ന് കൗണ്ട്ഡൗൺ ഉറപ്പാക്കുന്നു.
റിവാർഡ് = Lottery.
[സ്ക്രീൻഷോട്ട്: 0503_RewardUnlocked_Lottery.png]
ഉപഭോക്താവ് തന്നെ സ്ക്രീനിൽ ലോട്ടറി കറക്കുന്നു - മനോഹരമായ ഒരു ഗെയിം മെക്കാനിക്ക്. ഒരു വേരിയൻ്റ് ഡ്രോപ്പുകൾക്ക് ശേഷം ([സ്ക്രീൻഷോട്ട്: 0504_RewardUnlocked_LotteryUsed.png]), സ്ക്രീൻ Award അല്ലെങ്കിൽ മുകളിലെ വൗച്ചർ പോലെ പ്രവർത്തിക്കുന്നു.
ഉപഭോക്താവിൻ്റെ വൗച്ചറുകൾ കാണുന്നു
[സ്ക്രീൻഷോട്ട്: 0601_Vouchers.png]
ഏത് നിമിഷവും ഉപഭോക്താവിന് കിയോസ്ക് പ്രധാന സ്ക്രീനിൽ My Vouchers ടാപ്പുചെയ്യാനും അവരുടെ എല്ലാ സജീവ വൗച്ചറുകളും കാണാനും കഴിയും. ഇത് സൗകര്യപ്രദമാണ്: ഉപഭോക്താവിന് മുമ്പത്തെ സന്ദർശനത്തിൽ നിന്ന് ഉപയോഗിക്കാത്ത ഒരു വൗച്ചർ ഉണ്ടെങ്കിൽ, വാലറ്റ് തുറക്കാതെ തന്നെ അത് ജീവനക്കാർക്ക് കാണിക്കാനാകും.
കിയോസ്ക് സ്റ്റാൻഡിനുള്ള സാങ്കേതിക ആവശ്യകതകൾ
- ടാബ്ലെറ്റ്: 10” അല്ലെങ്കിൽ 12” iPad / Android ടാബ്ലെറ്റ്. വലിയ സ്ക്രീൻ, ഉപഭോക്താവിന് കൂടുതൽ സൗകര്യപ്രദമാണ്. ഞങ്ങൾ ഐപാഡ് മിനി ഇഷ്ടപ്പെടുന്നു.
- സ്റ്റാൻഡ്: സ്ഥിരമായി, ഉപഭോക്താവിന് അഭിമുഖമായി. ടാബ്ലെറ്റ് ക്യാമറയ്ക്ക് മുകളിൽ വാലറ്റ് ഫോൺ പിടിക്കാൻ സ്റ്റാൻഡ് അവരെ അനുവദിക്കണം.
- പവർ: സ്ഥിരമായ മെയിൻ കണക്ഷൻ. കിയോസ്ക് ദിവസം മുഴുവൻ പ്രവർത്തിക്കുന്നു.
- ഇൻ്റർനെറ്റ്: വിശ്വസനീയമായ Wi-Fi അല്ലെങ്കിൽ മൊബൈൽ 4G.
- ഓപ്ഷണൽ — സ്റ്റാൻഡിന് അടുത്തുള്ള ഒരു ലളിതമായ നിർദ്ദേശ കാർഡ്: “1) വാലറ്റിൽ നിങ്ങളുടെ കാർഡ് തുറക്കുക. 2) ക്യാമറയിൽ പിടിക്കുക. 3) പൂർത്തിയായി!” - നിങ്ങൾക്ക് അന്താരാഷ്ട്ര അതിഥികൾ ഉണ്ടെങ്കിൽ രണ്ട് ഭാഷകളിൽ. ഞങ്ങളുടെ കിയോസ്ക് യുഐ ഉള്ള ഒരു മികച്ച ടാബ്ലെറ്റ് സാധാരണയായി ഈ റോൾ സ്വന്തമായി കൈകാര്യം ചെയ്യുന്നു.
9.6 Terminal Mode — ഒരു പേയ്മെൻ്റ് ടെർമിനലിൽ ലോയൽറ്റി
Terminal Mode നിലവിലുള്ള Android പേയ്മെൻ്റ് ടെർമിനലിൽ നേരിട്ട് ലോയൽറ്റി പ്രവർത്തിപ്പിക്കുന്നു. ഏറ്റെടുക്കുന്നവർ, പേയ്മെൻ്റ് പ്രോസസ്സറുകൾ, ISOs, കൂടാതെ ചെക്ക്ഔട്ടിൽ ടെർമിനൽ ഉള്ള, പുതിയ ഹാർഡ്വെയർ ഇല്ലാതെ ലോയൽറ്റി ആഗ്രഹിക്കുന്ന ഏതൊരു വ്യാപാരിക്കും ഇത് അനുയോജ്യമാണ്.
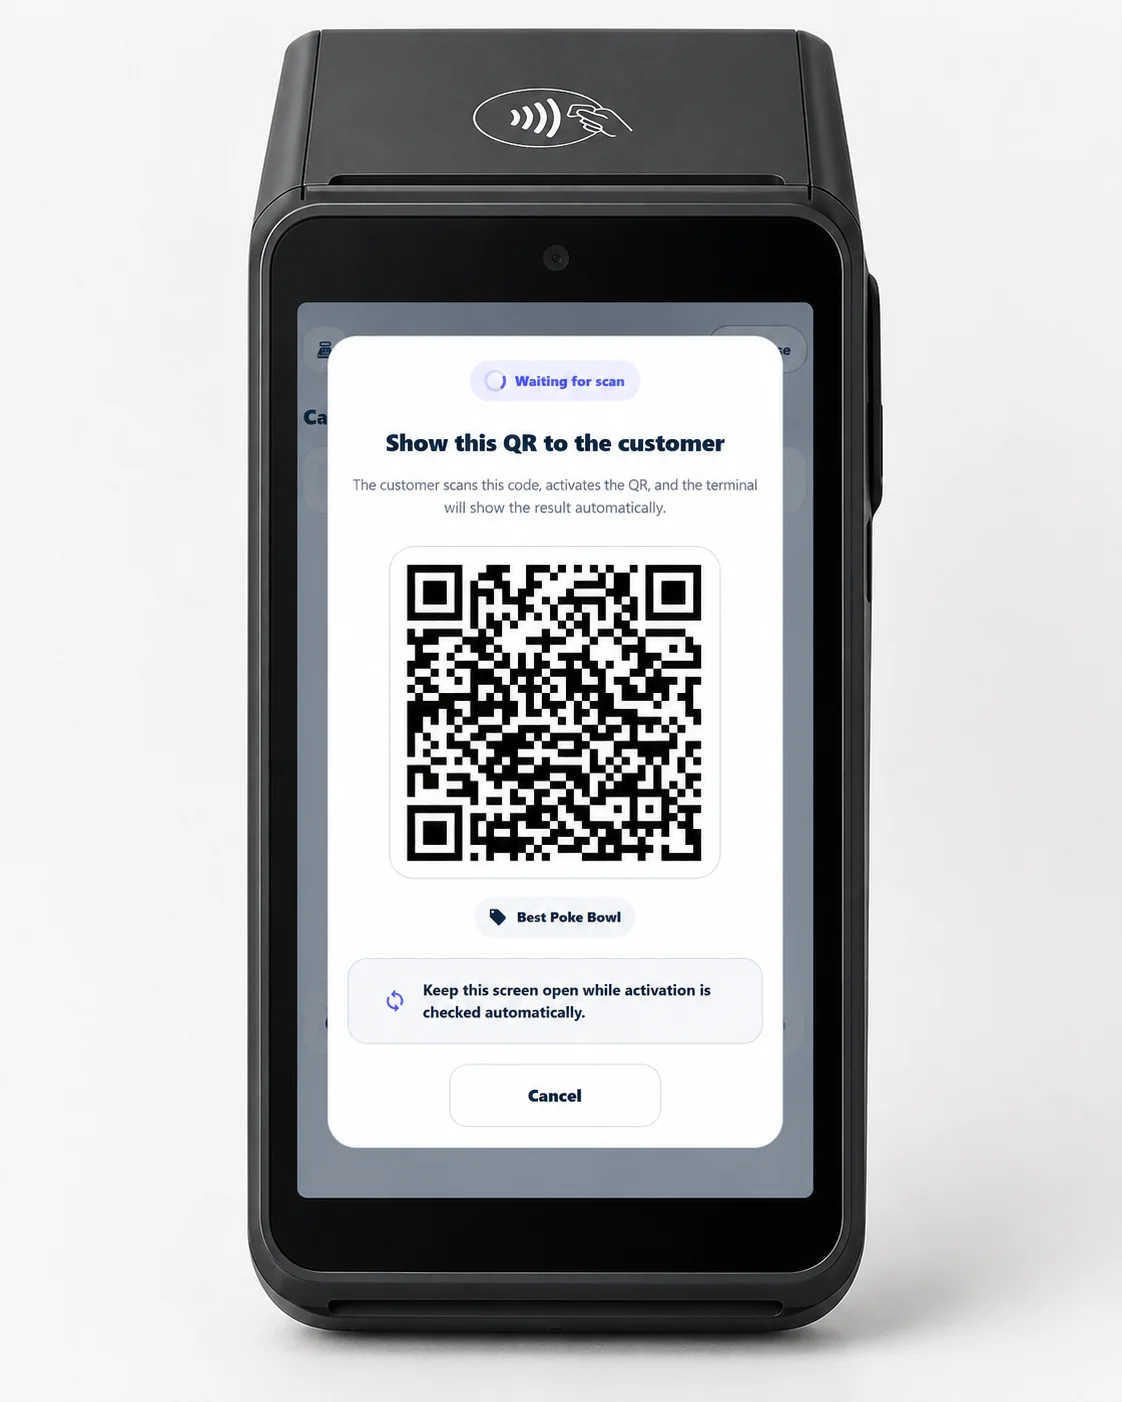
ഇത് എങ്ങനെ പ്രവർത്തിക്കുന്നു
- ഉപഭോക്താവ് പതിവുപോലെ ടെർമിനലിൽ പണമടയ്ക്കുന്നു.
- 7Stamp Scanner app തുറക്കുന്നു — പ്രകാശ സംയോജനത്തോടെയോ കാഷ്യറുടെ ഒറ്റ ടാപ്പിലൂടെയോ സ്വയമേവ.
- കാഷ്യർ Serve customer ടാപ്പുചെയ്യുന്നു; ടെർമിനൽ സ്ക്രീനിൽ ഒരു അദ്വിതീയ ഡൈനാമിക് QR കോഡ് ദൃശ്യമാകുന്നു.
- ഉപഭോക്താവ് അവരുടെ ഫോൺ ഉപയോഗിച്ച് QR സ്കാൻ ചെയ്യുന്നു. ഒരു പുതിയ കാർഡ് സൃഷ്ടിക്കുകയും വാലറ്റിൽ സംരക്ഷിക്കുകയും ചെയ്യുന്നു (ആദ്യം സ്റ്റാമ്പുകൾ ഉപയോഗിച്ച്), അല്ലെങ്കിൽ നിലവിലുള്ള കാർഡ് തൽക്ഷണം അപ്ഡേറ്റ് ചെയ്യുന്നു.
സ്റ്റാമ്പുകൾ ചേർക്കുന്നു
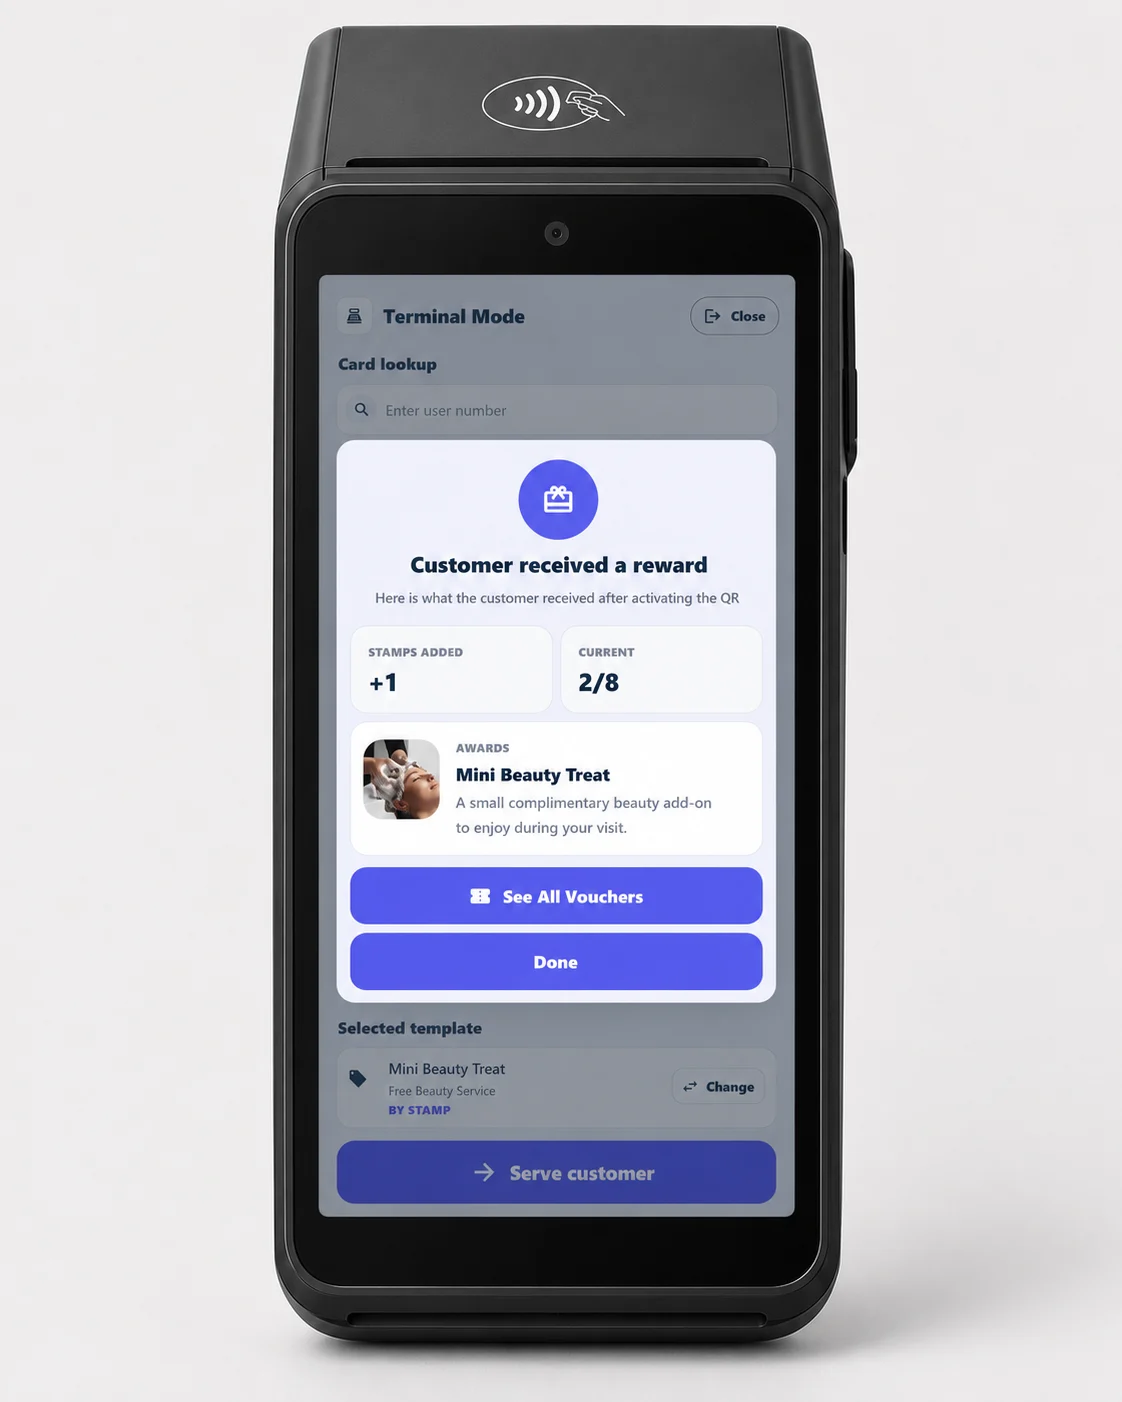
സ്റ്റാമ്പുകൾ ഒരു നിശ്ചിത തുകയായോ (ഒരു വാങ്ങലിന് ഒരെണ്ണം) അല്ലെങ്കിൽ തുകയായോ ചേർക്കാം (കാഷ്യർ ടെർമിനലിൽ ആകെ രസീത് നൽകുന്നു).
ടെർമിനലിൽ റിവാർഡുകൾ
- Award: ഒരു ലക്ഷ്യത്തിലെത്തുമ്പോൾ സമ്മാനം കൈമാറാൻ ടെർമിനൽ കാഷ്യറെ പ്രേരിപ്പിക്കുന്നു.
- Smart Voucher: പിന്നീടുള്ള സന്ദർശനത്തിൽ, കാഷ്യർ ടെർമിനലിൽ ഉപഭോക്താവിൻ്റെ വൗച്ചറുകൾ തുറക്കുന്നു (അല്ലെങ്കിൽ വൗച്ചർ നമ്പർ നൽകുക) ഒരു ടാപ്പിൽ ഒന്ന് റിഡീം ചെയ്യുന്നു.
- Lottery: ഉപഭോക്താവ് അവരുടെ ഫോണിൽ ചക്രം കറക്കുന്നു; ഫലം ടെർമിനൽ സ്ക്രീനിൽ ദൃശ്യമാകുന്നു.
ടെർമിനലിൽ ഇൻസ്റ്റാൾ ചെയ്യുന്നു
ഗൂഗിൾ പ്ലേ എന്നതിൽ നിന്ന് 7Stamp Scanner app ഇൻസ്റ്റാൾ ചെയ്യുക അല്ലെങ്കിൽ നിങ്ങളുടെ ടെർമിനൽ ഫ്ലീറ്റിൽ ഉടനീളം നേരിട്ടുള്ള APK വിന്യസിക്കുക.
വിപുലമായ സംയോജനങ്ങൾ (അഭ്യർത്ഥന പ്രകാരം)
Apple VAS, Google Smart Tap എന്നിവയിൽ കൂടുതൽ ശേഖരിക്കാൻ ടാപ്പുചെയ്യുക — ഒരു VAS/സ്മാർട്ട് ടാപ്പ്-സർട്ടിഫൈഡ് ടെർമിനലിൽ ടെർമിനലിൻ്റെ പേയ്മെൻ്റ് ആപ്ലിക്കേഷൻ വായിക്കുക - കാർഡ്-ലിങ്ക്ഡ് ലോയൽറ്റി (പ്രോസസർ തലത്തിൽ നെറ്റ്വർക്ക്-ടോക്കൺ പൊരുത്തപ്പെടുത്തൽ) എന്നിവ അഭ്യർത്ഥന പ്രകാരം ലഭ്യമായ വിപുലമായ സംയോജനങ്ങളാണ്.
പങ്കാളി, വാണിജ്യ വിശദാംശങ്ങൾക്ക്, ഏറ്റെടുക്കുന്നവരും പേയ്മെൻ്റ് നെറ്റ്വർക്കുകളും, Terminal Mode എന്നിവ കാണുക.
9.7 ഒരു മോഡ് എങ്ങനെ തിരഞ്ഞെടുക്കാം - താരതമ്യം
| പരാമീറ്റർ | Manual Mode | Autopilot Mode | Kiosk Mode | Terminal Mode |
|---|---|---|---|---|
| ആരാണ് സ്കാൻ ചെയ്യുന്നത് | ഫോൺ/ക്യാമറ വഴി ജീവനക്കാർ | ബാഹ്യ സ്കാനർ “ഒരു ബാർകോഡായി” | സ്റ്റാൻഡിൽ ഉപഭോക്താവ് തന്നെ | ഉപഭോക്താവ് ടെർമിനൽ സ്ക്രീനിൽ QR സ്കാൻ ചെയ്യുന്നു |
| ബിസിനസ്സ് തരം | പ്രീമിയം സേവനം, സലൂണുകൾ, റെസ്റ്റോറൻ്റുകൾ | കോഫി ഷോപ്പുകൾ, ഫാസ്റ്റ് ഫുഡ്, തിരക്കുള്ള കൗണ്ടറുകൾ | കോഫി ഷോപ്പുകൾ, ബേക്കറികൾ, കാർ കഴുകൽ, ചെറുകിട കച്ചവടം | പേയ്മെൻ്റ് ടെർമിനലുള്ള ഏതൊരു വ്യാപാരിയും; ഏറ്റെടുക്കുന്നയാൾ/പ്രോസസർ എസ്റ്റേറ്റുകൾ |
| ഹാർഡ്വെയർ | ഉപകരണ ക്യാമറ | ബാഹ്യ QR സ്കാനർ | 10–12” ടാബ്ലെറ്റ് + സ്റ്റാൻഡ് | നിലവിലുള്ള Android പേയ്മെൻ്റ് ടെർമിനൽ |
| അത് എവിടെയാണ് താമസിക്കുന്നത് | സ്റ്റാഫ് ഫോൺ/ടാബ്ലെറ്റ് | ലാപ്ടോപ്പ്/ടാബ്ലെറ്റ് | ഉപഭോക്താവിന് അഭിമുഖമായി നിൽക്കുന്ന സ്റ്റാൻഡിൽ ടാബ്ലെറ്റ് | ചെക്ക്ഔട്ടിലെ പേയ്മെൻ്റ് ടെർമിനൽ |
| സ്റ്റാഫ് പരിശീലന അപകടസാധ്യത | കുറഞ്ഞത് (ഒരു ടാപ്പ്) | പൂജ്യം (പശ്ചാത്തല പ്രവർത്തനം) | പൂജ്യം (ഉപഭോക്താവ് അത് ചെയ്യുന്നു) | ഏറ്റവും കുറവ് (ഒരു ടാപ്പ്: “Serve customer”) |
| Lottery | സ്റ്റാഫ് സ്ക്രീനിൽ നിന്ന് ഉപഭോക്താവ് പ്ലേ ചെയ്യുന്നു | സ്വമേധയാലുള്ള പ്രവർത്തനത്തിലൂടെ ലഭ്യമാണ് | ഉപഭോക്താവ് അത് സ്വയം കളിക്കുന്നു | ഉപഭോക്താവ് അവരുടെ ഫോണിൽ കളിക്കുന്നു; ടെർമിനലിൽ ഫലം |
** നിങ്ങൾക്ക് ഒരേസമയം നിരവധി മോഡുകൾ ഉപയോഗിക്കാം.** ഉദാഹരണത്തിന്, ഒരു റെസ്റ്റോറൻ്റും സ്പായുമുള്ള ഒരു ഹോട്ടൽ: സ്പായിൽ - Manual Mode (പ്രീമിയം, വ്യക്തിഗത കോൺടാക്റ്റ്); റെസ്റ്റോറൻ്റിൻ്റെ കഫേയിൽ - Kiosk Mode ഒരു സ്റ്റാൻഡിൽ (വേഗത, വെയിറ്റർ പങ്കാളിത്തമില്ല); റിസപ്ഷനിൽ - Autopilot പതിവുകാർക്ക്. ഒരു Staff Seat ഒരു സമയം ഒരു ലോഗിൻ പിന്തുണയ്ക്കുന്നു; നിങ്ങൾക്ക് ഒരേസമയം നിരവധി പോയിൻ്റുകൾ ആവശ്യമുണ്ടെങ്കിൽ, അഡ്മിനിൽ Staff Logins ചേർക്കുക.
9.8 സ്കാനർ സമാരംഭിക്കുന്നതിനുള്ള പ്രായോഗിക നുറുങ്ങുകൾ
- ** തുറക്കുന്നതിന് മുമ്പ് ടെസ്റ്റ് ചെയ്യുക.** ഷിഫ്റ്റിന് മുമ്പ് രാവിലെ നിങ്ങളുടെ സ്വന്തം കാർഡ് ഉപയോഗിച്ച് 5-10 ട്രയൽ സ്കാനുകൾ ചെയ്യുക - ക്യാമറ ഫോക്കസ് ചെയ്യുന്നു, ഇൻ്റർനെറ്റ് പ്രവർത്തിക്കുന്നു, സ്റ്റാമ്പുകൾ ചേർത്തിട്ടുണ്ടെന്ന് ഉറപ്പാക്കുക.
- കിയോസ്ക് ടാബ്ലെറ്റിൽ, യാന്ത്രിക ലോക്കും അറിയിപ്പുകളും പ്രവർത്തനരഹിതമാക്കുക. ആരും അബദ്ധവശാൽ OS-ലേക്ക് പുറത്തുകടക്കുകയോ വഴിതെറ്റിയ അറിയിപ്പ് ലഭിക്കുകയോ ചെയ്യരുത്. iOS-ൽ ഗൈഡഡ് ആക്സസ്, Android-ൽ സ്ക്രീൻ പിന്നിംഗ് ഉപയോഗിക്കുക.
- ഇൻ്റർനെറ്റ് തകരാറുകൾക്ക് പ്രിൻ്റ് ചെയ്ത QR ലേബലുകൾ സമീപത്ത് സൂക്ഷിക്കുക (അഡ്മിനിൽ നിന്ന് എക്സ്പോർട്ട് ചെയ്തത്) — സ്കാനർ താൽക്കാലികമായി ലഭ്യമല്ലെങ്കിൽപ്പോലും ഉപഭോക്താവ് അവ സ്വയം സ്കാൻ ചെയ്യുകയും കാർഡ് നേടുകയും ചെയ്യുന്നു.
- പുതിയ സ്റ്റാഫ് ഓൺബോർഡ്. ഓരോ പുതിയ ഷിഫ്റ്റ് അംഗവും അഞ്ച് കാര്യങ്ങൾ അറിഞ്ഞിരിക്കണം: സ്കാനറിലേക്ക് എങ്ങനെ ലോഗിൻ ചെയ്യാം, ഒരു കാർഡ് എങ്ങനെ സ്കാൻ ചെയ്യാം, ഒരു സ്റ്റാമ്പ് എങ്ങനെ ചേർക്കാം, എങ്ങനെ
Voucher Unlocked!കൈകാര്യം ചെയ്യാം,വൗച്ചറുകൾടാബിൽ നിന്ന് ഒരു വൗച്ചർ എങ്ങനെ റിഡീം ചെയ്യാം. അഞ്ച് മിനിറ്റ് പരിശീലനം. - Manual Mode എന്നതിൻ്റെ ചുവടെയുള്ള സമീപകാല ഇവൻ്റ് ലോഗ് നിങ്ങളുടെ പ്രവർത്തന രേഖയാണ്. ഉപഭോക്താവ് “സ്റ്റാമ്പ് കടന്നുപോയില്ല” എന്ന് പരാതിപ്പെട്ടാൽ, അത് പരിശോധിക്കുക: നിങ്ങൾക്ക് സമയം, കാർഡ് ഐഡി, എന്താണ് നൽകിയത് / ഉപയോഗിച്ചത് എന്നിവ കാണാനാകും.
Visual walkthrough
Use the screen sets below as a visual companion to the article. Open any image to inspect it at full size.