
참조
7Stamp Scanner은 직원, 고객, 키오스크 및 Android 결제 단말기에서 작동하는 앱입니다. 카드 스캔을 스탬프 적립, 바우처 상환, 복권 회전 및 Terminal Mode 체크아웃 충성도로 바꿉니다. One Staff 로그인을 통해 기본 스캐너 모드에 액세스할 수 있습니다. 선택은 비즈니스 속도와 서비스 시나리오에 따라 달라집니다.
9. 7Stamp Scanner 애플리케이션 - 수동 / Autopilot / 키오스크 / Terminal Mode
7Stamp Scanner은 직원, 고객, 키오스크 및 Android 결제 단말기에서 작동하는 앱입니다. 그 임무는 카드 스캔을 스탬프 적립, 바우처 상환, 복권 회전 및 Terminal Mode 체크아웃 충성도로 바꾸는 것입니다. 이는 계산대, 직원의 주머니, 고객 대면 스탠드 또는 이미 계산대에 있는 결제 단말기에 물리적으로 놓여 있는 것입니다. One Staff 로그인을 통해 기본 스캐너 모드에 액세스할 수 있습니다. 모드 선택은 비즈니스 속도와 서비스 시나리오에 따라 달라집니다.
[스크린샷: 1101_방법_To_Scanpng.png]
9.1 7Stamp Scanner이 실행되는 곳
웹 버전(모든 장치): scanner.7stamp.com
- 스마트폰, 태블릿, 컴퓨터 등 모든 최신 브라우저에서 작동합니다.
- 설치하지 않음 — 페이지를 열고 Staff Login을 입력한 후 작업을 시작하세요.
- 계산대에 있는 공유 업무용 노트북, 스탠드 위의 태블릿, 카메라가 있는 모든 Windows/Mac/Linux 장치에 이상적입니다.
- 외부 스캐너를 연결해 고객 카드를 스캔할 수 있습니다. 구성이 필요하지 않습니다.
안드로이드: 구글 플레이 · 다이렉트 APK iOS: 앱스토어
- 기본 앱 — 더 빠르게 실행되고 휴대폰 카메라를 더 잘 사용합니다.
- 자신의 전화로 작업하는 직원에게 적합합니다(프리미엄 서비스, 현장 작업, 배송).
- 외부 스캐너를 연결하여 고객 카드를 스캔할 수 있습니다(이 경우 Autopilot 모드를 고려하십시오).
- 키오스크 모드의 태블릿에서 실행할 수 있습니다.
- 직접 APK —
https://downloads.7stamp.com/7stamp-scanner.apk에서 직접 앱 패키지를 다운로드하세요. Android 결제 단말기 및 다양한 기기에 앱을 중앙 집중식으로 배포하는 데 유용합니다.
무엇을 선택해야 할까요. 계산대에 Android 태블릿이 있거나 카운터에 iPad가 있는 경우 기본 앱을 설치하세요. 다른 장치에서 작업하거나 단일 공유 컴퓨터를 사용하는 경우 웹 버전 https://scanner.7stamp.com을 사용하세요. 항목에 대한 로그인 및 비밀번호는 직원 아래의 관리자 패널에서 생성됩니다.
9.2 로그인 및 탐색
[스크린샷: 0101-Login.png]
관리자에서 생성한 것과 동일한 Staff Login(직원 → + CREATE → Staff Login 생성)으로 모든 플랫폼(웹/안드로이드/iOS)에서 로그인이 가능합니다. 로그인하면 앱이 자동으로 귀하의 비즈니스 프로필에 연결됩니다.
사이드 메뉴(왼쪽 상단의 ☰ 아이콘으로 열림):
- Manual Mode — 수동 스캔 모드(기본값).
- Kiosk Mode — 고객 셀프 서비스 모드.
- 관리자 패널 열기 — 관리자(
admin.7stamp.com)에 대한 빠른 링크입니다. - 로그아웃 — 로그아웃합니다(메뉴 하단의 빨간색 버튼).
메뉴를 통해 수동과 Autopilot 사이에서 “모드 전환”을 할 필요가 없습니다. Autopilot은 Manual Mode의 하위 모드로, 메인 화면에서 단일 스위치로 바로 전환됩니다(아래 참조).
9.3 Manual Mode — 직원이 손으로 스캔
[스크린샷: 0201-WaitingScansManualMode.png]
Manual Mode은 직원이 고객의 카드를 직접 스캔하는 기본 시나리오입니다. 스탬프 적립이 고객과의 개인적인 상호 작용의 일부인 프리미엄 서비스(미용실, 이발소, 스파, 앉아서 먹는 레스토랑)에 사용됩니다.
Manual Mode 메인화면
- 헤더 표시기: 카드 스캔 대기 중 — 앱이 스캔을 수락할 준비가 되었습니다.
- 오른쪽 상단 — Auto-Stamp (Scanner Only) 토글(수동에서는 꺼짐)
- 화면 하단 - 최근 교대근무 이벤트 로그(발급/사용/삭제된 바우처) 모든 항목을 탭할 수 있으며 세부정보가 열립니다.
- 맨 아래 - 두 개의 작업 버튼:
- 🔍 Search Customer — 이름, 이메일, 전화번호 또는 카드 번호로 고객을 찾습니다.
- 📷 Use Camera — 장치 카메라를 열고 고객 카드 QR을 스캔합니다.
고객과 스탬프 카드를 찾는 네 가지 방법
1. 장치 카메라(Use Camera)로 스캔 중입니다. 주요 작업 방법입니다.
[스크린샷: 0302-ScanByCamera.png]
직원이 Use Camera을 탭하고 휴대폰/태블릿 카메라를 고객의 카드 QR에 비추면(고객이 Apple Wallet 또는 Google Wallet에서 카드를 열고 화면을 표시함) 앱이 몇 초 안에 코드를 인식하고 즉시 고객 카드를 엽니다.
2. 외부 스캐너로 고객 카드를 스캔합니다.
스캐너를 장치에 연결하고 간단히 고객의 카드를 스캔하세요.
3. 고객 검색(Search Customer). 고객이 휴대전화를 가지고 있지 않은 경우의 대체입니다.
[스크린샷: 0301-CustomerSearch.png]
다음과 같은 경우에 유용합니다.
- 고객이 전화기를 떠나거나 방전되었습니다.
- 고객이 방금 가입했지만 아직 카드가 열리는 위치를 파악하지 못했습니다.
- 직원은 예약제로 근무하며 고객의 카드를 미리 열어줍니다.
검색은 이름, 이메일 또는 카드 번호로 이루어집니다.
4. 직접 바우처 검색(Voucher Search). 고객이 바우처(예: 인쇄된 종이 바우처)를 손에 들고 도착하여 교환을 원하는 경우. 검색창에 바우처 번호를 입력하시거나, 외부 스캐너로 스캔하시거나, 기기 카메라로 스캔하실 수 있습니다.
스캔 후 고객 카드
[스크린샷: 0401-CustomerCard.png]
카드를 찾으면 고객 카드가 두 개의 탭으로 열립니다.
- 정보 — 기본 정보(이름, 이메일, 카드 ID
#XXXXXX, 생일(수정 가능 ✏️)). - 바우처(N) — 이 고객의 모든 바우처 목록: 활성, 사용, 만료.
위쪽 영역에는 빨간색 Reset stamps 버튼이 있습니다. 이를 통해 고객의 스탬프를 재설정할 수 있습니다(예: 고객이 최종 목표를 달성하고 보상을 받았는데 새 카드를 시작하려는 경우). 참고. 카드를 재설정할 필요는 없습니다. 다음에 재설정하지 않고 최종 목표에서 카드를 스캔하면 시스템은 주기적으로 새 반복의 첫 번째 스탬프를 배치합니다.
스탬프 컨트롤
[스크린샷: 0402-Stamped.png]
화면 하단에서 스탬프는 다음을 제어합니다.
- 🟢 + (녹색) — 스탬프를 추가합니다.
- 🔴 − (빨간색) — 스탬프를 제거합니다(실수한 경우).
- − / **+**가 포함된 수량 필드 — 여러 개의 스탬프를 한 번에 추가합니다(예: 카드에서
금액 기준을 사용하고 고객이 많은 금액을 지출한 경우). - 🔍 Search Customer — 다른 고객을 개설하세요.
- 📷 — 다시 스캔하세요.
목표 달성에 대한 세 가지 시나리오
스탬프가 고객을 목표(중요 시점 또는 최종 목표 중 하나)에 이르게 하면 Scanner에서 선물이 포함된 팝업을 표시합니다. 팝업 내용은 카드에 구성된 보상 유형에 따라 다릅니다.
1. 보상 = Award(즉석 문자 선물).
[스크린샷: 0403-StampedAndGetAward.png]
화면에 - 선물 텍스트 및 이미지(“무료 커피”, “무료 페이스트리 1개” 등). 직원은 고객에게 화면을 보여주고 약속한 선물을 건네준다.
2. 보상 = 바우처(Smart Voucher과 Redeem Code).
[스크린샷: 0404-StampedAndGetVoucher.png]
바우처 잠금 해제됨! 팝업에는 이미지, 바우처 제목, 바우처 번호 #XXXXXX가 포함되어 있습니다. 세 가지 작업:
- 바우처 사용(녹색 버튼) — 스캐너에서 바로 바우처를 사용하세요. 바우처에 Redeem Code 옵션이 활성화되어 있으면 화면에 코드 텍스트 + QR + 바코드가 표시됩니다. 직원이 POS에 코드를 입력/스캔합니다. 바우처는 ‘사용됨’으로 이동되어 다시 사용할 수 없습니다.
- 모든 쿠폰 보기 — 고객의 모든 쿠폰 목록을 엽니다(예: 고객이 먼저 다른 쿠폰을 사용하려는 경우).
- 닫기 — 팝업을 닫습니다. 바우처는 활성 상태로 유지되며 고객은 나중에 사용할 수 있습니다.
3. 보상 = Lottery(무승부).
[스크린샷: 0405-StampedAndGetLottery.png]
직원의 기기에서 추첨 화면이 열립니다. 직원은 고객에게 기기를 건네주거나 화면을 보여주며 ‘Play’를 탭하라고 요청합니다. 회전 후 변형 중 하나가 실행되고 Award 또는 바우처(위 참조)로 처리됩니다.
[스크린샷: 0406-LotteryUsed.png]
수동 모드에서 바우처 자체 상환
[스크린샷: 0407-CustomerVouchers.png] [스크린샷: 0408-VoucherUsed.png]
고객이 약속된 선물을 받기 위해 나중에 도착하면(선물을 받은 직후가 아님) 직원이 카드를 열고 바우처(N) 탭으로 전환합니다. 모든 고객의 바우처가 여기에 표시됩니다. 직원이 올바른 것을 탭하고 → 바우처 사용으로 바우처가 열리고 → 확인 → ‘사용됨’ 상태로 바우처가 열립니다.
보안: 바우처 상태 시스템(‘발행됨 → 활성 → 사용됨 → 만료됨’)은 이중 사용을 방지합니다. ‘사용’ 후에는 바우처(또는 스크린샷)가 다시 작동하지 않습니다.
9.4 Autopilot Mode — 경작지에서 백그라운드 스캐닝
[스크린샷: 0101-WaitingScans_AutoPilotMode.png]
Autopilot Mode은 스탬프가 백그라운드에 추가되는 Manual Mode의 하위 모드로, 확인이나 모달이 없습니다. 커피숍, 패스트푸드, 빵집, 세차장 등 피크 시간에 줄이 있고 서비스가 느려질 수 없는 곳이면 어디든 이상적입니다.
활성화하는 방법
Manual Mode 메인 화면에서 오른쪽 상단의 Auto-Stamp (Scanner Only) 토글을 “켜짐”(녹색)으로 전환합니다. 화면이 다음과 같이 변경됩니다.
- 아이콘이 외부 스캐너 이미지로 전환됩니다.
- 기본 헤더는 Auto-Stamp 모드 활성입니다.
- 하위 헤더: “시스템 스탬프는 자동으로 스캐너 입력에만 사용됩니다.”
작동 원리
“Scanner Only”이라는 문구는 이 모드에서 스탬프가 하드웨어 스캐너의 입력을 통해서만 추가됨(컴퓨터/태블릿에 연결된 외부 USB 또는 Bluetooth 바코드 스캐너)을 의미합니다. ‘Use Camera’ 및 ‘Search Customer’ 버튼은 화면에 계속 표시되며 필요한 경우 사용할 수 있지만 일반적인 Autopilot 작업에서는 사용되지 않습니다. 즉, 백업 역할을 합니다(예: 스캐너가 고객을 픽업하지 않아 수동으로 찾아야 하는 경우).
작업 흐름:
- 평소대로 직원이 주문을 받습니다(계산대, 바 카운터, 세탁소에서).
- 결제 시 또는 결제 직후 고객이 월렛 카드를 제시합니다.
- 외부 스캐너는 QR을 “바코드로” 포착합니다.
- 7Stamp Scanner은 백그라운드에서 고객 카드에 스탬프를 추가합니다.
- 모달 없음 - 대기열이 멈추지 않습니다.
- 고객은 나중에 PUSH 알림을 통해 월렛에서 진행 상황 업데이트를 확인할 수 있습니다.
필요한 것
- 바코드 스캐너: USB 또는 Bluetooth, QR 코드를 읽을 수 있습니다. Honeywell, Zebra, Datalogic의 표준 모델이 적합합니다. 스캐너는 키보드 에뮬레이션(HID 모드)으로 설정되어야 합니다.
- 계속 사용 가능한 장치:
scanner.7stamp.com이 열려 있거나 Android/iOS 앱이 설치된 노트북이나 태블릿. - 안정적인 인터넷 — 모든 스탬프가 실시간으로 클라우드로 이동합니다.
Autopilot에서 고객이 바우처를 직접 상환합니다.
Autopilot에서는 직원이 ‘대화 모드’에서 월렛 카드를 물리적으로 스캔하지 않고 대기열에서 작업합니다. 하지만 고객은 그 자리에서 바우처를 사용할 수 있으며 모드 전환이 필요하지 않습니다. Wallet의 카드 페이지에는 고객의 바우처 링크가 있습니다. 이를 열면 고객은 다음 중 하나를 수행합니다.
- 계산원에게 Redeem Code을 불러 계산원이 계산대에 입력합니다(계산대가 프로모션 코드를 지원하는 경우) 또는
- 휴대전화 화면에 QR/바코드가 표시되고 계산원은 외부 스캐너로 이를 스캔합니다.
그 후에는 바우처가 ‘사용됨’으로 이동하여 더 이상 재사용할 수 없습니다. 대안으로 계산원은 일시적으로 Auto-Stamp 토글을 끄고 고객 카드를 수동으로 열고 바우처 사용을 통해 바우처를 사용할 수 있습니다.
수동으로 돌아가야 하는 경우
언제든지 직원은 Auto-Stamp 토글을 끄고 수동 스캔으로 돌아갈 수 있습니다. 예를 들어 고객에게 문제가 있는 경우(바우처 분실, 스탬프를 수동으로 조정하려는 경우) 이름/이메일로 고객을 찾아야 하는 경우입니다. 검색, 카메라 스캔, 수동 바우처 발행 및 교환 등 모든 Manual Mode 기능을 사용할 수 있습니다.
9.5 Kiosk Mode — 고객 셀프 서비스
Kiosk Mode은 태블릿이 고객을 향하고 고객이 자신의 카드를 스캔하는 전체 화면 셀프 서비스 모드입니다. 직원은 프로세스에 전혀 관여하지 않으므로 “직원 교육이 전혀 없습니다”. 커피숍, 빵집, 패스트 캐주얼 레스토랑, 소규모 소매점, 세차장에 이상적입니다.
[스크린샷: 키오스크_Bakery.png]
Kiosk Mode 설정
1단계. 키오스크로 전환하세요.
[스크린샷: 0101_SwitchToKioskMode.png]
사이드 메뉴(☰)에서 Kiosk Mode을 선택하세요. 앱이 설정 모드로 들어갑니다.
Make 고객이 앱을 최소화하거나 닫을 수 없도록(기기의 소위 키오스크 모드) Android 태블릿 또는 iPad에서 앱을 ‘고정’하는 방법에 대한 화면 팁을 읽어보세요. 태블릿의 시스템 기능은 다음과 같습니다. 화면에 표시되는 힌트나 장치 설명서를 읽어보세요.
2단계. 표시할 카드를 선택하세요.
[스크린샷: 0201_StartKiosk_Select_Card.png]
귀하의 비즈니스에 여러 개의 스탬프 카드(예: 커피용 카드와 페이스트리용 별도 카드)가 있는 경우 특정 태블릿에 표시될 카드를 선택하세요. 다양한 카드에 대해 여러 태블릿을 설정할 수 있습니다.
3단계. 추가 옵션.
[스크린샷: 0202_StartKiosk_Options.png]
추가 키오스크 실행 설정.
첫 번째 — 색 구성표. 카드 팔레트에서 키오스크를 실행하거나 사전 정의된 세트 중 하나를 선택할 수 있습니다. 귀하에게 가장 잘 어울리는 옵션을 시도해 보십시오!
가장 중요한 옵션은 즉시 검사 방지입니다. 동일한 고객이 연속으로 두 번 스탬프를 획득하는 것을 차단합니다. 옵션이 켜져 있는 경우 반복 스캔은 고객에게 이전 결과(마지막 보상/화면 표시)만 표시하고 스탬프는 추가되지 않습니다. 이는 카운터에서 우발적인 이중 스캔을 방지합니다.
확인 후 — 키오스크가 시작됩니다.
Kiosk Mode 메인화면
[스크린샷: 0301_Main.png]
고객이 태블릿에 접근하면 다음과 같은 내용이 표시됩니다.
- 위쪽 — 귀하의 비즈니스 로고 및 이름(카드 설정에서 가져옴)
- 헤더: 스탬프를 모아 보상을 받으세요.
- ‘Your Reward’ 캐러셀 — 최종 선물(마일스톤 보상과 함께 모든 중간 선물)을 표시합니다. 스와이프 가능.
- 큰 검정색 📱 카드 스캔 버튼과 하위 라벨이 ‘카드를 스캔하여 다음 스탬프 받기’입니다. (또는 “휴대폰을 리더기 가까이에 두세요” — 텍스트가 적응됩니다).
- 하단 — 신규 고객 블록: 아직 카드가 없습니까? 가입 페이지 QR과 함께 “QR 코드를 스캔하고 지갑에 카드를 추가하세요”.
Kiosk Mode의 고객 시나리오
- 고객이 태블릿 스탠드로 다가옵니다.
- 이미 카드가 있는 경우 → 월렛을 열고 → 카드 스캔을 탭하고 → 월렛 화면을 태블릿 카메라에 대고 → 스탬프를 추가합니다.
- 아직 카드가 없는 경우 → No Card Yet? QR을 휴대전화 카메라로 스캔 → 카드가 즉시 Wallet에 저장 → 카드 스캔 → 첫 번째 스탬프 받기를 탭합니다.
목표 달성 시 고객이 보는 것
보상 = Award.
[스크린샷: 0501_RewardUnlocked_Award.png]
선물의 이미지와 설명이 포함된 전체 화면 ‘축하합니다!’ 화면. 고객은 직원에게 화면을 보여주고 약속한 선물을 받아갑니다.
보상 = 바우처.
[스크린샷: 0502_RewardUnlocked_Voucher.png]
A 축하합니다! 바우처 잠금 해제! 바우처 카드가 표시된 화면. 고객은 키오스크에서 바로 바우처를 직접 사용할 수 있습니다. 사용 버튼을 누르면 고객이 계산원에게 보여주는 Redeem Code(텍스트 + QR + 바코드) 화면이 열리고 계산원은 코드를 스캔하거나 계산대에 입력합니다. 쿠폰을 사용한 후에는 바우처가 ‘사용됨’으로 이동하며 고객이 스크린샷을 보관했더라도 다시 사용할 수 없습니다.
하단 — 버튼:
- My Vouchers — 내 바우처를 모두 확인하세요.
- 12초 후 종료 — 자동으로 메인 화면으로 돌아가는 카운트다운입니다.
자동 종료는 중요한 키오스크 패턴입니다. 그것이 없었다면 태블릿은 직원이 개입할 때까지 한 고객의 화면에 “멈춰” 있었을 것입니다. 카운트다운을 통해 태블릿은 작업 후 10~15초 후에 항상 깨끗한 시작 화면으로 돌아갑니다.
보상 = Lottery.
[스크린샷: 0503_RewardUnlocked_Lottery.png]
고객이 화면에서 직접 복권을 돌립니다. 이는 즐거운 게임 메커니즘입니다. 변형이 삭제된 후([스크린샷: 0504_RewardUnlocked_LotteryUsed.png]) 화면은 위의 Award 또는 바우처처럼 동작합니다.
고객의 바우처 보기
[스크린샷: 0601_Vouchers.png]
언제든지 고객은 키오스크 메인 화면에서 My Vouchers을 탭하여 모든 활성 바우처를 확인할 수 있습니다. 이는 편리합니다. 고객이 이전 방문에서 사용하지 않은 바우처를 가지고 있는 경우 월렛을 열지 않고도 직원에게 바로 보여줄 수 있습니다.
키오스크 스탠드에 대한 기술 요구 사항
- 태블릿: 10인치 또는 12인치 iPad/Android 태블릿. 화면이 클수록 고객은 더욱 편리해집니다. 우리는 아이패드 미니를 좋아합니다.
- 스탠드: 고정되어 고객을 향합니다. 스탠드를 사용하면 Wallet 휴대폰을 태블릿 카메라에 고정할 수 있어야 합니다.
- 전원: 지속적인 주전원 연결. 키오스크는 하루 종일 운영됩니다.
- 인터넷: 안정적인 Wi-Fi 또는 모바일 4G.
- 선택 사항 — 스탠드 옆에 있는 간단한 지침 카드: “1) Wallet에서 카드를 엽니다. 2) 카메라에 카드를 갖다 놓습니다. 3) 완료!” — 해외 손님이 있는 경우 두 가지 언어로 제공됩니다. 키오스크 UI가 있는 잘 배치된 태블릿은 일반적으로 이 역할을 자체적으로 처리합니다.
9.6 Terminal Mode — 결제 단말기에 대한 충성도
Terminal Mode 기존 Android 결제 단말기에서 직접 충성도를 실행합니다. 이는 인수자, 결제 처리자, ISOs 및 결제 시 이미 단말기가 있고 새 하드웨어 없이 충성도를 원하는 모든 판매자에게 이상적입니다.
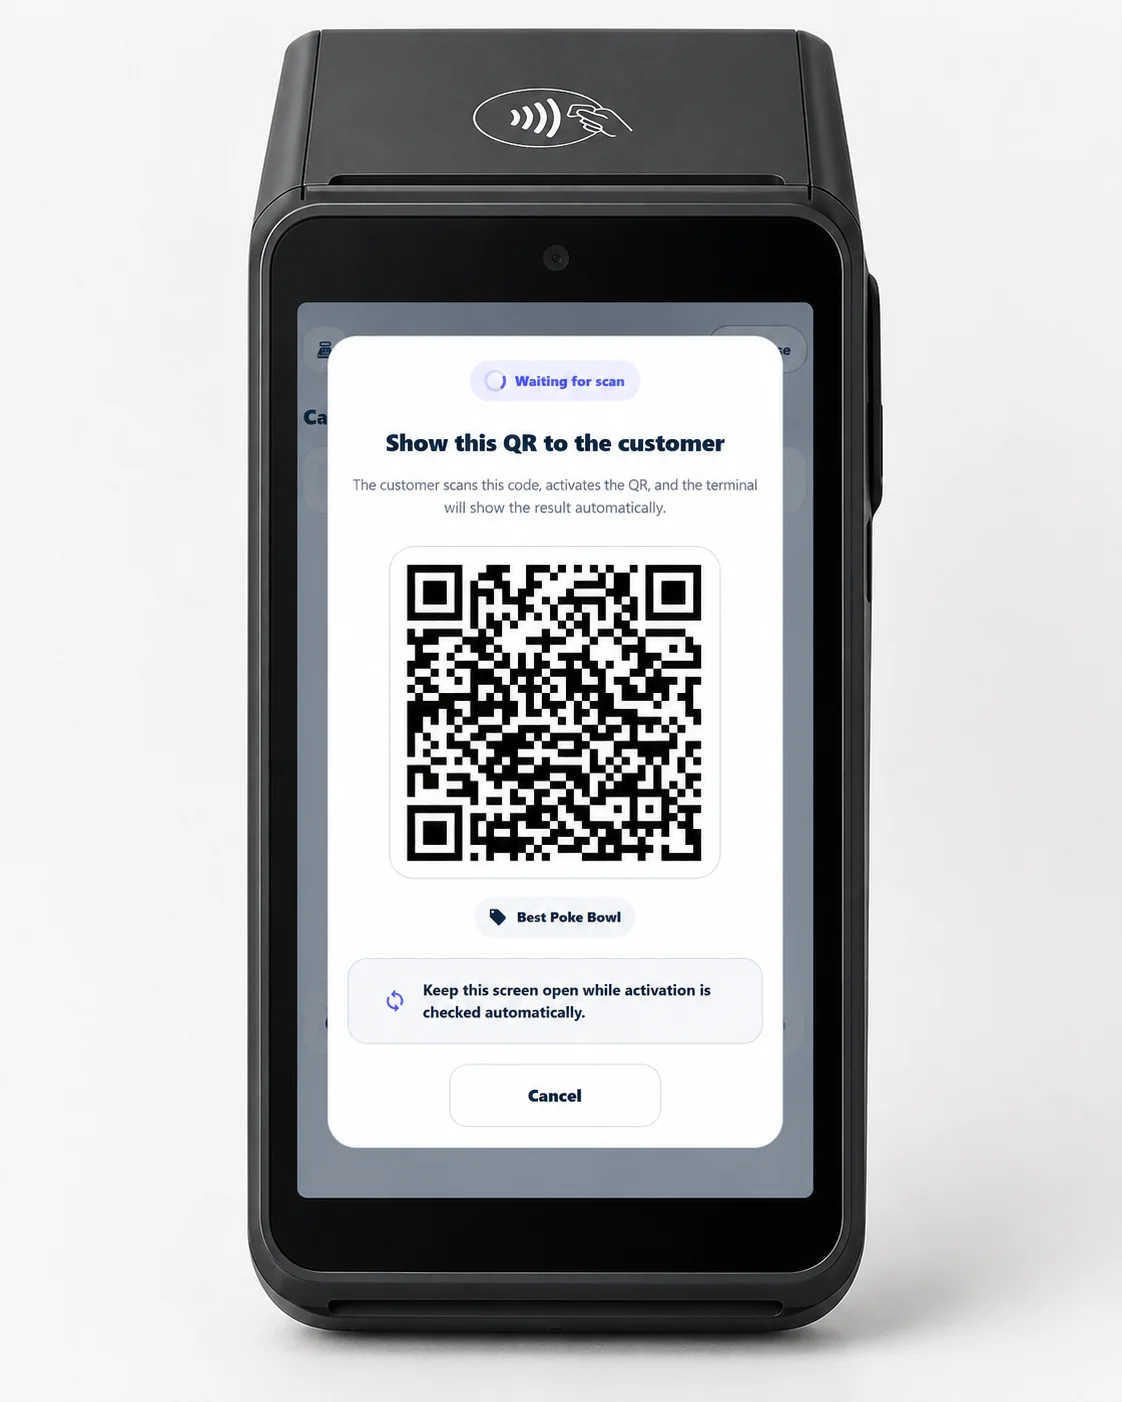
작동 원리
- 고객은 평소와 같이 단말기에서 결제를 합니다.
- 7Stamp Scanner app이 열립니다 — 가벼운 통합을 통해 자동으로 또는 계산원이 한 번 탭하면 자동으로 열립니다.
- 계산원이 Serve customer을 탭합니다. 고유한 동적 QR 코드가 터미널 화면에 나타납니다.
- 고객은 휴대폰으로 QR을 스캔합니다. 새 카드가 생성되어 지갑에 저장되거나(첫 번째 스탬프 포함) 기존 카드가 즉시 업데이트됩니다.
스탬프 추가
스탬프는 정액(구매당 1개) 또는 금액(계산원이 단말기에 영수증 총액 입력)으로 추가할 수 있습니다.
단말기 보상
- Award: 목표에 도달하면 단말기에서 계산원에게 선물을 건네라는 메시지를 표시합니다.
- Smart Voucher: 나중에 방문할 때 계산원은 단말기에서 고객의 바우처를 열고(또는 바우처 번호를 입력하고) 탭 한 번으로 쿠폰을 사용할 수 있습니다.
- Lottery: 고객이 휴대전화의 룰렛을 돌립니다. 결과가 터미널 화면에 나타납니다.
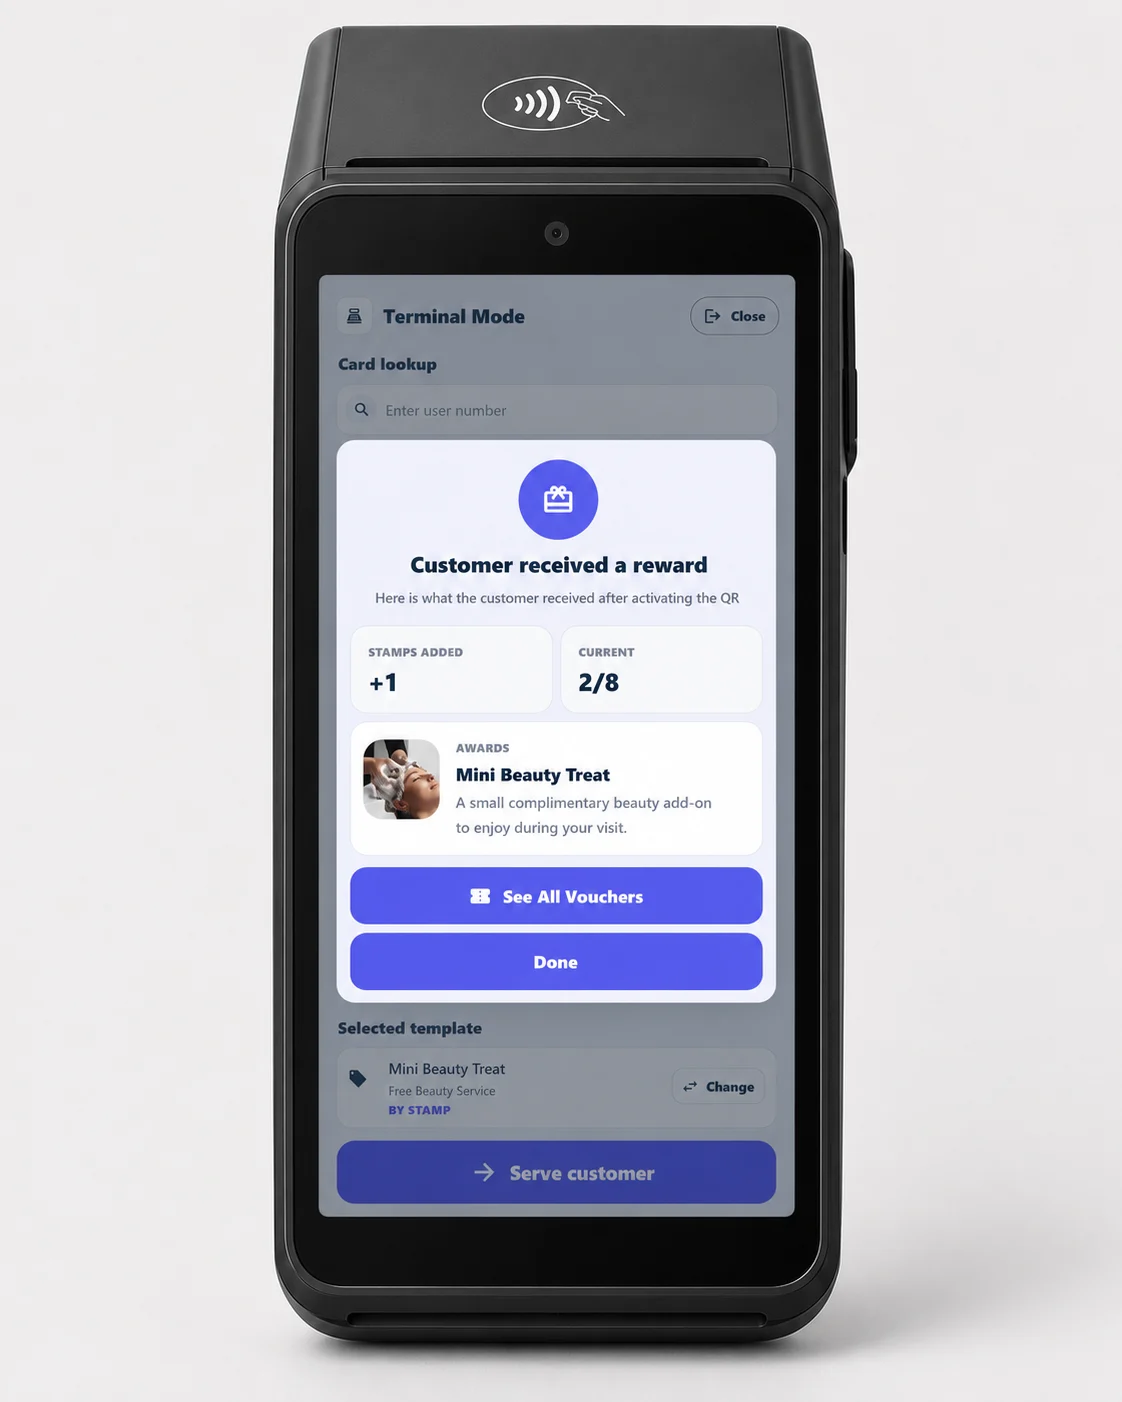
터미널에 설치
구글 플레이에서 7Stamp Scanner app을 설치하거나 터미널 전체에 직접 APK을 배포합니다.
고급 통합(요청 시)
Apple VAS 및 Google Smart Tap에 대한 탭하여 수집(VAS/Smart Tap 인증 단말기의 단말기 결제 애플리케이션에서 읽음) 및 카드 연결 충성도(프로세서 수준의 네트워크 토큰 매칭)는 요청 시 제공되는 고급 통합입니다.
파트너 및 상업 세부정보는 매입자 및 결제 네트워크 및 Terminal Mode을 참조하세요.
9.7 모드 선택 방법 - 비교
| 매개변수 | Manual Mode | Autopilot Mode | Kiosk Mode | Terminal Mode |
|---|---|---|---|---|
| 스캔하는 사람 | 전화/카메라를 통한 직원 | 외부 스캐너 “바코드” | 고객이 직접 스탠드에 서 있습니다. | 고객이 단말기 화면에서 QR을 스캔합니다. |
| 사업 유형 | 프리미엄 서비스, 살롱, 레스토랑 | 커피숍, 패스트푸드, 바쁜 카운터 | 커피숍, 빵집, 세차장, 경공업 | 결제 단말기를 갖춘 모든 판매자 인수자/처리자 자산 |
| 하드웨어 | 장치 카메라 | 외부 QR 스캐너 | 10~12인치 태블릿 + 스탠드 | 기존 안드로이드 결제단말기 |
| 그것이 사는 곳 | 직원 전화/태블릿 | 계산대에 있는 노트북/태블릿 | 고객을 향한 스탠드 위의 태블릿 | 결제 시 결제 단말기 |
| 직원 교육 위험 | 최소(탭 한 번) | 제로(백그라운드 작업) | 0(고객이 수행함) | 최소(한 번 탭: “Serve customer”) |
| Lottery | 고객이 직원 화면에서 플레이합니다. | 직접 조치를 통해 사용 가능 | 고객이 직접 플레이 | 고객이 휴대폰으로 플레이합니다. 터미널 결과 |
한 번에 여러 모드를 사용할 수 있습니다. 예를 들어 레스토랑과 스파가 있는 호텔: 스파에서 — Manual Mode(프리미엄, 개인 연락처); 레스토랑 카페 — Kiosk Mode 스탠드(빠름, 웨이터 개입 없음); 리셉션에서 — 단골의 경우 Autopilot. 하나의 Staff Seat은 한 번에 하나의 로그인을 지원합니다. 여러 개의 동시 포인트가 필요한 경우 관리자에 Staff Login을 추가하세요.
9.8 Scanner 실행을 위한 실용적인 팁
- 개봉 전 테스트. 근무 전 아침에 자신의 카드로 5~10회 시험 스캔을 수행합니다. 카메라 초점이 맞춰지고 인터넷이 작동하며 스탬프가 추가되는지 확인하세요.
- 키오스크 태블릿에서 자동 잠금 및 알림을 비활성화하세요. 누구도 실수로 OS를 종료하거나 길 잃은 알림을 받아서는 안 됩니다. iOS에서는 안내 액세스를, Android에서는 화면 고정을 사용하세요.
- 인터넷 중단의 경우 인쇄된 QR 라벨을 근처에 보관하세요(관리자에서 내보냄). 스캐너를 일시적으로 사용할 수 없더라도 고객이 직접 스캔하여 카드를 받습니다.
- 새 직원 온보딩. 모든 새 교대조 구성원은 스캐너 로그인 방법, 카드 스캔 방법, 스탬프 추가 방법,
Voucher Unlocked!처리 방법,바우처탭에서 바우처 교환 방법 등 5가지 사항을 알아야 합니다. 5분간 훈련합니다. - Manual Mode하단의 최근 이벤트 로그가 작업 로그입니다. 고객이 “스탬프가 처리되지 않았습니다”라고 불만을 제기하는 경우 확인하세요. 시간, 카드 ID, 발급/사용된 항목이 표시됩니다.
시각적 안내
아래 화면 세트를 문서의 시각적 보조 자료로 사용하세요. 이미지를 클릭하면 전체 크기로 볼 수 있습니다.