
સંદર્ભ
7Stamp Scanner એ સ્ટાફ, ગ્રાહકો, કિઓસ્ક અને એન્ડ્રોઇડ પેમેન્ટ ટર્મિનલ્સ માટે કાર્યરત એપ્લિકેશન છે. તે કાર્ડ સ્કેનને સ્ટેમ્પિંગ, વાઉચર રિડેમ્પશન, લોટરી સ્પિનિંગ અને Terminal Mode ચેકઆઉટ લોયલ્ટીમાં ફેરવે છે.
9. 7Stamp Scanner એપ્લિકેશન — મેન્યુઅલ / Autopilot / કિઓસ્ક / Terminal Mode
7Stamp Scanner એ સ્ટાફ, ગ્રાહકો, કિઓસ્ક અને એન્ડ્રોઇડ પેમેન્ટ ટર્મિનલ્સ માટે કાર્યરત એપ્લિકેશન છે. તેનું કામ કાર્ડ સ્કેનને સ્ટેમ્પિંગ, વાઉચર રિડેમ્પશન, લોટરી સ્પિનિંગ અને Terminal Mode ચેકઆઉટ લોયલ્ટીમાં ફેરવવાનું છે. તે તે છે જે શારીરિક રીતે સ્ટાફ મેમ્બરના ખિસ્સામાં, ગ્રાહક તરફના સ્ટેન્ડ પર અથવા પેમેન્ટ ટર્મિનલ પર પહેલાથી જ ચેકઆઉટ પર બેસે છે. એક સ્ટાફ લોગિન મુખ્ય સ્કેનર મોડ્સની ઍક્સેસ આપે છે - મોડની પસંદગી તમારા વ્યવસાયની ગતિ અને સેવાના દૃશ્ય પર આધારિત છે.
[સ્ક્રીનશોટ: 1101_How_To_Scanpng.png]
9.1 જ્યાં 7Stamp Scanner ચાલે છે
વેબ સંસ્કરણ (કોઈપણ ઉપકરણ): સ્કેનર.7stamp.com
- કોઈપણ આધુનિક બ્રાઉઝરમાં કાર્ય કરે છે: સ્માર્ટફોન, ટેબ્લેટ અથવા કમ્પ્યુટર પર.
- કોઈ ઇન્સ્ટોલ નથી — પૃષ્ઠ ખોલો, તમારું Staff Login દાખલ કરો, કામ પર જાઓ.
- ટિલ પર શેર કરેલ કામ લેપટોપ, સ્ટેન્ડ પર ટેબ્લેટ, કેમેરા સાથે કોઈપણ Windows/Mac/Linux ઉપકરણ માટે આદર્શ.
- તમે બાહ્ય સ્કેનરને કનેક્ટ કરી શકો છો અને તેની સાથે ગ્રાહક કાર્ડ્સ સ્કેન કરી શકો છો. કોઈ રૂપરેખાંકનની જરૂર નથી.
Android: Google Play · ડાયરેક્ટ APK iOS: એપ સ્ટોર
- મૂળ એપ્લિકેશન — ઝડપથી ચાલે છે, ફોન કેમેરાનો વધુ સારી રીતે ઉપયોગ કરે છે.
- સ્ટાફ માટે યોગ્ય છે જેઓ તેમના પોતાના ફોનથી કામ કરે છે (પ્રીમિયમ સેવા, ફિલ્ડ વર્ક, ડિલિવરી).
- તમે બાહ્ય સ્કેનરને કનેક્ટ કરી શકો છો અને તેની સાથે ગ્રાહક કાર્ડ સ્કેન કરી શકો છો (જે કિસ્સામાં Autopilot મોડને ધ્યાનમાં લો).
- કિઓસ્ક મોડમાં ટેબ્લેટ પર ચાલી શકે છે.
- ડાયરેક્ટ APK — એપ પેકેજને સીધા
https://downloads.7stamp.com/7stamp-scanner.apkપરથી ડાઉનલોડ કરો. એન્ડ્રોઇડ પેમેન્ટ ટર્મિનલ્સ માટે અને ઉપકરણોના કાફલામાં એપ્લિકેશનને કેન્દ્રિય રીતે જમાવવા માટે ઉપયોગી.
શું પસંદ કરવું. જો તમારી પાસે ટિલ પર એન્ડ્રોઇડ ટેબ્લેટ હોય અથવા કાઉન્ટર પર આઈપેડ હોય તો - નેટીવ એપ ઇન્સ્ટોલ કરો. જો તમે અલગ-અલગ ઉપકરણોથી કામ કરો છો અથવા એક જ શેર કરેલ કમ્પ્યુટરનો ઉપયોગ કરો છો - તો વેબ સંસ્કરણ https://scanner.7stamp.com સાથે જાઓ. પ્રવેશ માટે લૉગિન અને પાસવર્ડ એડમિન પેનલમાં સ્ટાફ હેઠળ બનાવવામાં આવ્યા છે.
9.2 લૉગિન અને નેવિગેશન
[સ્ક્રીનશોટ: 0101-Login.png]
તમે એડમિન (સ્ટાફ → + બનાવો → ક્રિએટિંગ Staff Login) માં બનાવેલ Staff Login સાથે કોઈપણ પ્લેટફોર્મ (વેબ / એન્ડ્રોઇડ / iOS) પરથી લૉગ ઇન કરી શકો છો. લોગિન કર્યા પછી, એપ્લિકેશન આપમેળે તમારી વ્યવસાય પ્રોફાઇલ સાથે લિંક કરે છે.
સાઇડ મેનૂ (ઉપર ડાબી બાજુએ ☰ આઇકન સાથે ખુલે છે):
- Manual Mode — મેન્યુઅલ સ્કેનિંગ મોડ (ડિફૉલ્ટ).
- Kiosk Mode — ગ્રાહક સ્વ-સેવા મોડ.
- ઓપન એડમિન પેનલ — એડમિન માટે ઝડપી લિંક (
admin.7stamp.com). - લોગ આઉટ કરો — સાઇન આઉટ કરો (મેનુના તળિયે, લાલ બટન).
તમારે મેનુ દ્વારા મેન્યુઅલ અને Autopilot વચ્ચે “મોડ સ્વિચ” કરવાની જરૂર નથી. Autopilot એ Manual Mode નો પેટા-મોડ છે, જે મુખ્ય સ્ક્રીન પર જ એક સ્વીચ સાથે ટૉગલ કરવામાં આવે છે (નીચે જુઓ).
9.3 Manual Mode — સ્ટાફ હાથથી સ્કેન કરે છે
[સ્ક્રીનશોટ: 0201-WaitingScansManualMode.png]
Manual Mode એ મૂળભૂત દૃશ્ય છે જ્યાં સ્ટાફ ગ્રાહકના કાર્ડને જાતે સ્કેન કરે છે. પ્રીમિયમ સેવામાં ઉપયોગ થાય છે (બ્યુટી સલુન્સ, હેર શોપ્સ, સ્પા, સિટ-ડાઉન રેસ્ટોરન્ટ્સ) જ્યાં સ્ટેમ્પિંગ ગ્રાહક સાથેની વ્યક્તિગત ક્રિયાપ્રતિક્રિયાનો ભાગ છે.
Manual Mode મુખ્ય સ્ક્રીન
- હેડર સૂચક: કાર્ડ સ્કેન માટે રાહ જોઈ રહ્યું છે — એપ્લિકેશન સ્કેન સ્વીકારવા માટે તૈયાર છે.
- ઉપર જમણે — Auto-Stamp (Scanner Only) ટૉગલ (મેન્યુઅલમાં બંધ).
- સ્ક્રીનની નીચે — તાજેતરનો શિફ્ટ ઇવેન્ટ લોગ (જારી/વપરાયેલ/કાઢી નાખેલ વાઉચર). દરેક એન્ટ્રી ટેપેબલ છે અને વિગતો ખોલે છે.
- ખૂબ જ તળિયે - બે ક્રિયા બટનો:
- 🔍 Search Customer — નામ, ઇમેઇલ, ફોન અથવા કાર્ડ નંબર દ્વારા ગ્રાહકને શોધો.
- 📷 Use Camera — ઉપકરણ કેમેરા ખોલો અને ગ્રાહક કાર્ડ QR સ્કેન કરો.
ગ્રાહકને શોધવાની ચાર રીતો અને સ્ટેમ્પ કાર્ડ
1. ઉપકરણ કેમેરા સાથે સ્કેનિંગ (Use Camera). કાર્ય કરવાની મુખ્ય રીત.
[સ્ક્રીનશોટ: 0302-ScanByCamera.png]
સ્ટાફ મેમ્બર Use Camera ટેપ કરે છે, ફોન/ટેબ્લેટ કેમેરાને ગ્રાહકના કાર્ડ QR પર નિર્દેશ કરે છે (ગ્રાહક તેમનું કાર્ડ Apple Wallet અથવા Google Wallet માં ખોલે છે અને સ્ક્રીન બતાવે છે), એપ્લિકેશન કોડને સેકન્ડના અપૂર્ણાંકમાં ઓળખે છે અને તરત જ ગ્રાહક કાર્ડ ખોલે છે.
2. બાહ્ય સ્કેનર વડે ગ્રાહક કાર્ડને સ્કેન કરવું.
સ્કેનરને તમારા ઉપકરણ સાથે કનેક્ટ કરો અને તેની સાથે ગ્રાહકનું કાર્ડ સ્કેન કરો.
3. ગ્રાહક શોધ (Search Customer). જ્યારે ગ્રાહક પાસે તેનો ફોન ન હોય ત્યારે ફૉલબેક.
[સ્ક્રીનશોટ: 0301-CustomerSearch.png]
ઉપયોગી જ્યારે:
- ગ્રાહકે તેમનો ફોન છોડી દીધો અથવા કાઢી નાખ્યો;
- ગ્રાહકે હમણાં જ સાઇન અપ કર્યું છે અને કાર્ડ ક્યાં ખુલે છે તે હજુ સુધી શોધી શક્યું નથી;
- સ્ટાફ મેમ્બર એપોઇન્ટમેન્ટ દ્વારા કામ કરે છે અને ગ્રાહકનું કાર્ડ અગાઉથી ખોલે છે.
શોધ નામ, ઈમેલ અથવા કાર્ડ નંબર દ્વારા કામ કરે છે.
4. ડાયરેક્ટ વાઉચર શોધ (વાઉચર શોધ). જ્યારે ગ્રાહક હાથમાં વાઉચર લઈને આવે છે (દા.ત. પ્રિન્ટેડ કાગળ) અને તેને રિડીમ કરવા માંગે છે. તમે શોધમાં વાઉચર નંબર દાખલ કરી શકો છો, તેને બાહ્ય સ્કેનર વડે સ્કૅન કરી શકો છો અથવા ઉપકરણ કૅમેરા વડે સ્કૅન કરી શકો છો.
સ્કેનિંગ પછી ગ્રાહક કાર્ડ
[સ્ક્રીનશોટ: 0401-CustomerCard.png]
એકવાર કાર્ડ મળી જાય પછી, ગ્રાહક કાર્ડ બે ટેબ સાથે ખુલે છે:
- માહિતી — મૂળભૂત માહિતી (નામ, ઇમેઇલ, કાર્ડ ID
#XXXXXX, સંપાદન સાથેનો જન્મદિવસ ✏️). - વાઉચર્સ (N) — આ તમામ ગ્રાહકના વાઉચર્સની સૂચિ: સક્રિય, રિડીમ, એક્સપાયર્ડ.
ઉપરના વિસ્તારમાં લાલ રીસેટ સ્ટેમ્પ બટન છે — તે તમને ગ્રાહકના સ્ટેમ્પને રીસેટ કરવા દે છે (દા.ત., જો તેણે અંતિમ ધ્યેય બંધ કર્યો હોય, પુરસ્કાર મળ્યો હોય અને તમે નવું કાર્ડ શરૂ કરવા માંગો છો). નોંધ. તમારે કાર્ડ રીસેટ કરવાની જરૂર નથી: જો આગલી વખતે તમે તેને રીસેટ કર્યા વિના અંતિમ ધ્યેય પર સ્કેન કરશો, તો સિસ્ટમ ચક્રીય રીતે નવા પુનરાવર્તનનો પ્રથમ સ્ટેમ્પ મૂકશે.
સ્ટેમ્પ નિયંત્રણો
[સ્ક્રીનશોટ: 0402-Stamped.png]
સ્ક્રીનના તળિયે — સ્ટેમ્પ નિયંત્રણો:
- 🟢 + (લીલો) — સ્ટેમ્પ ઉમેરો.
- 🔴 − (લાલ) — સ્ટેમ્પ દૂર કરો (જો તમે ભૂલ કરી હોય તો).
- − / + સાથેનું એક જથ્થાનું ક્ષેત્ર — એક સાથે અનેક સ્ટેમ્પ ઉમેરો (દા.ત., જો કાર્ડ
માત્રા દ્વારાનો ઉપયોગ કરે છે અને ગ્રાહકે મોટી રકમ ખર્ચી છે). - 🔍 Search Customer — એક અલગ ગ્રાહક ખોલો.
- 📷 — ફરીથી સ્કેન કરો.
લક્ષ્ય સુધી પહોંચવાના ત્રણ દૃશ્યો
જ્યારે સ્ટેમ્પ ગ્રાહકને લક્ષ્ય સુધી પહોંચાડે છે (માઇલસ્ટોન્સમાંથી એક અથવા અંતિમ લક્ષ્ય), સ્કેનર ભેટ સાથે પોપઅપ બતાવે છે. પોપઅપ સામગ્રીઓ કાર્ડ પર ગોઠવેલ પુરસ્કાર પ્રકાર પર આધારિત છે.
1. પુરસ્કાર = Award (ત્વરિત ટેક્સ્ટ ભેટ).
[સ્ક્રીનશોટ: 0403-StampedAndGetAward.png]
સ્ક્રીન પર — ભેટ ટેક્સ્ટ અને છબી (“ફ્રી કોફી”, “1 ફ્રી પેસ્ટ્રી”, વગેરે). સ્ટાફ મેમ્બર ગ્રાહકને સ્ક્રીન બતાવે છે અને વચન આપેલ ભેટ આપે છે.
2. પુરસ્કાર = વાઉચર (Smart Voucher સાથે Redeem Code).
[સ્ક્રીનશોટ: 0404-StampedAndGetVoucher.png]
છબી, વાઉચર શીર્ષક અને વાઉચર નંબર #XXXXXXX સાથેનું વાઉચર અનલૉક! પૉપઅપ. ત્રણ ક્રિયાઓ:
- વાઉચરનો ઉપયોગ કરો (લીલું બટન) — વાઉચરને સ્કેનરમાં જ રિડીમ કરો. જો વાઉચરમાં Redeem Code વિકલ્પ સક્ષમ હોય, તો સ્ક્રીન કોડ ટેક્સ્ટ + QR + બારકોડ બતાવે છે. સ્ટાફ POS માં કોડ દાખલ / સ્કેન કરે છે. વાઉચર
રિડીમપર જાય છે અને તેનો ફરી ઉપયોગ કરી શકાતો નથી. - બધા વાઉચર જુઓ — તમામ ગ્રાહકના વાઉચર્સની સૂચિ ખોલો (દા.ત., જો ગ્રાહક પહેલા કોઈ અલગ વાઉચર રિડીમ કરવા માંગે છે).
- બંધ કરો — પોપઅપ બંધ કરો; વાઉચર સક્રિય રહે છે અને ગ્રાહક પછીથી તેનો ઉપયોગ કરી શકે છે.
3. પુરસ્કાર = Lottery (ડ્રો).
[સ્ક્રીનશોટ: 0405-StampedAndGetLottery.png]
લોટરી સ્ક્રીન સ્ટાફ મેમ્બરના ઉપકરણ પર ખુલે છે. સ્ટાફ ગ્રાહકને ઉપકરણ આપે છે (અથવા સ્ક્રીન બતાવે છે) અને તેમને “પ્લે” પર ટેપ કરવાનું કહે છે. સ્પિન પછી, વેરિએન્ટ્સમાંથી એક ફાયર થાય છે અને પછી તેને Award અથવા વાઉચર તરીકે હેન્ડલ કરવામાં આવે છે (ઉપર જુઓ).
[સ્ક્રીનશોટ: 0406-LotteryUsed.png]
મેન્યુઅલ મોડમાં વાઉચરનું સ્વ-રિડેમ્પશન
[સ્ક્રીનશોટ: 0407-CustomerVouchers.png] [સ્ક્રીનશોટ: 0408-VoucherUsed.png]
જો ગ્રાહક વચન આપેલી ભેટ માટે પછીથી પહોંચે છે (તે પ્રાપ્ત કર્યા પછી બરાબર નથી), તો સ્ટાફ તેમનું કાર્ડ ખોલે છે અને વાઉચર્સ (N) ટેબ પર સ્વિચ કરે છે. ગ્રાહકના તમામ વાઉચર્સ અહીં દેખાય છે. સ્ટાફ જમણી બાજુ ટૅપ કરે છે → વાઉચર વાઉચરનો ઉપયોગ કરો → કન્ફર્મ → સ્ટેટસ રિડીમ સાથે ખુલે છે.
સુરક્ષા: વાઉચર સ્ટેટ મશીન (જારી → સક્રિય → રિડીમ → એક્સપાયર્ડ) બેવડા ઉપયોગને અટકાવે છે. રીડીમ કર્યા પછી વાઉચર (અથવા તેનો સ્ક્રીનશૉટ) ફરી કામ કરશે નહીં.
9.4 Autopilot Mode — સુધી બેકગ્રાઉન્ડ સ્કેનિંગ
[સ્ક્રીનશોટ: 0101-WaitingScans_AutoPilotMode.png]
Autopilot Mode એ Manual Mode નો પેટા-મોડ છે જેમાં સ્ટેમ્પ ઉમેરવામાં આવે છે બેકગ્રાઉન્ડમાં, કોઈ પુષ્ટિકરણ અને કોઈ મોડલ વિના. કોફી શોપ, ફાસ્ટ ફૂડ, બેકરી, કાર વોશમાં પીક અવર્સ માટે આદર્શ — ગમે ત્યાં કતાર હોય અને સેવા ધીમી ન થઈ શકે.
તેને કેવી રીતે સક્ષમ કરવું
Manual Mode મુખ્ય સ્ક્રીન પર, Auto-Stamp (Scanner Only) ઉપર જમણી બાજુએ “ચાલુ” (લીલા) પર ટૉગલ કરો. સ્ક્રીન બદલાય છે:
- આયકન બાહ્ય-સ્કેનર ઈમેજ પર સ્વિચ કરે છે.
- મુખ્ય હેડર વાંચે છે: Auto-Stamp મોડ એક્ટિવ.
- સબહેડર: “ફક્ત સ્કેનર ઇનપુટ માટે સિસ્ટમ સ્ટેમ્પ આપોઆપ.”
તે કેવી રીતે કામ કરે છે
શબ્દસમૂહ “Scanner Only” નો અર્થ છે કે આ મોડમાં સ્ટેમ્પ ફક્ત હાર્ડવેર સ્કેનરના ઇનપુટ દ્વારા ઉમેરવામાં આવે છે (કોમ્પ્યુટર/ટેબ્લેટ સાથે જોડાયેલ બાહ્ય USB અથવા બ્લૂટૂથ બારકોડ સ્કેનર). Use Camera અને Search Customer બટનો સ્ક્રીન પર દૃશ્યમાન રહે છે અને જો તમને તેમની જરૂર હોય તો ઉપલબ્ધ રહે છે, પરંતુ તે સામાન્ય Autopilot કામગીરીમાં ઉપયોગમાં લેવાતા નથી — તેઓ બેકઅપ તરીકે સેવા આપે છે (દા.ત., જો સ્કેનર ગ્રાહકને પસંદ ન કરે અને તમારે તેમને મેન્યુઅલી શોધવાની જરૂર હોય).
કાર્યપ્રવાહ:
- સ્ટાફ હંમેશની જેમ ઓર્ડર લે છે.
- ચુકવણી કરતી વખતે અથવા તરત જ, ગ્રાહક તેમનું વૉલેટ કાર્ડ બતાવે છે.
- બાહ્ય સ્કેનર QR “બારકોડ તરીકે” પકડે છે.
- 7Stamp Scanner પૃષ્ઠભૂમિમાં ગ્રાહકના કાર્ડમાં સ્ટેમ્પ ઉમેરે છે.
- કોઈ મોડલ નથી — કતાર અટકતી નથી.
- ગ્રાહક PUSH સૂચના દ્વારા તેમના વોલેટમાં પછીથી પ્રગતિ અપડેટ જુએ છે.
તમને જે જોઈએ છે
- બારકોડ સ્કેનર: યુએસબી અથવા બ્લૂટૂથ, QR કોડ વાંચવામાં સક્ષમ. હનીવેલ, ઝેબ્રા, ડેટાલોજિકના માનક મોડેલો કરશે. સ્કેનર કીબોર્ડ ઇમ્યુલેશન (HID મોડ) પર સેટ હોવું જોઈએ.
- સુધીમાં કાયમી ઉપકરણ: લેપટોપ અથવા ટેબ્લેટ
સ્કેનર.7stamp.comઓપન સાથે અથવા Android/iOS ઍપ સાથે. - સ્થિર ઇન્ટરનેટ — દરેક સ્ટેમ્પ રીઅલ ટાઇમમાં ક્લાઉડ પર જાય છે.
ગ્રાહક Autopilot માં વાઉચરનું સ્વ-રિડેમ્પશન
Autopilot માં સ્ટાફ “સંવાદ મોડ” માં વૉલેટ કાર્ડને ભૌતિક રીતે સ્કેન કરતું નથી — તેઓ કતારમાં કામ કરે છે. પરંતુ ગ્રાહક પોતાના વાઉચરનો ઉપયોગ સ્થળ પર જ કરી શકે છે, અને તેના માટે સ્વિચિંગ મોડની જરૂર નથી. વૉલેટમાં કાર્ડ પેજ પર ગ્રાહક પાસે તેમના વાઉચર્સની લિંક હોય છે. તેને ખોલીને, ગ્રાહક ક્યાં તો:
- કેશિયરને Redeem Code બોલાવે છે, જે તેને ટિલમાં દાખલ કરે છે (જો ટિલ પ્રોમો કોડને સપોર્ટ કરે છે), અથવા
- તેમના ફોન સ્ક્રીન પર QR/બારકોડ બતાવે છે, અને કેશિયર તેને બાહ્ય સ્કેનરથી સ્કેન કરે છે.
તે પછી વાઉચર રિડીમ પર જશે અને હવે તેનો ફરીથી ઉપયોગ કરી શકાશે નહીં. વિકલ્પ તરીકે, કેશિયર અસ્થાયી રૂપે Auto-Stamp ટૉગલ બંધ કરી શકે છે, ગ્રાહક કાર્ડ મેન્યુઅલી ખોલી શકે છે અને વાઉચરનો ઉપયોગ કરો સાથે વાઉચર રિડીમ કરી શકે છે.
મેન્યુઅલ પર પાછા ક્યારે આવવું
કોઈપણ ક્ષણે સ્ટાફ Auto-Stamp ટૉગલને બંધ કરી શકે છે અને મેન્યુઅલ સ્કેનિંગ પર પાછા જઈ શકે છે — દાખલા તરીકે, જો ગ્રાહક કોઈ સમસ્યા સાથે આવે (વાઉચર ગુમાવ્યું હોય, સ્ટેમ્પ મેન્યુઅલી એડજસ્ટ કરવા માંગે છે) અથવા તમારે તેને નામ/ઈમેલ દ્વારા શોધવાની જરૂર છે. તમામ Manual Mode સુવિધાઓ ઉપલબ્ધ છે — શોધ, કૅમેરા સ્કૅન, મેન્યુઅલ વાઉચર ઇશ્યૂ અને રિડેમ્પશન.
9.5 Kiosk Mode — ગ્રાહક સ્વ-સેવા
Kiosk Mode એ પૂર્ણ-સ્ક્રીન સ્વ-સેવા મોડ છે જેમાં ટેબ્લેટ ગ્રાહકનો સામનો કરે છે અને ગ્રાહક પોતાનું કાર્ડ સ્કેન કરે છે. સ્ટાફ પ્રક્રિયામાં બિલકુલ સામેલ નથી — તેથી “શૂન્ય સ્ટાફ તાલીમ”. તે કોફી શોપ, બેકરી, ઝડપી કેઝ્યુઅલ રેસ્ટોરન્ટ્સ, લાઇટ રિટેલ, કાર ધોવા માટે આદર્શ છે.
[સ્ક્રીનશોટ: Kiosk_Bakery.png]
Kiosk Mode સેટઅપ
પગલું 1. કિઓસ્ક પર સ્વિચ કરો.
[સ્ક્રીનશોટ: 0101_SwitchToKioskMode.png]
બાજુના મેનૂમાં (☰) Kiosk Mode પસંદ કરો. એપ્લિકેશન સેટઅપ મોડમાં પ્રવેશે છે.
Make Android ટેબ્લેટ અથવા iPad પર એપ્લિકેશનને કેવી રીતે “પિન” કરવી તે વિશેની ઑન-સ્ક્રીન ટીપ્સ વાંચવાની ખાતરી કરો જેથી ગ્રાહક તેને ઘટાડી અથવા બંધ ન કરી શકે (ઉપકરણનો કહેવાતો કિઓસ્ક મોડ). આ તમારા ટેબ્લેટની સિસ્ટમ સુવિધાઓ છે — અમારી સ્ક્રીન પરનો સંકેત અથવા તમારા ઉપકરણ માટે મેન્યુઅલ વાંચો.
પગલું 2. પ્રદર્શિત કરવા માટે કાર્ડ ચૂંટો.
[સ્ક્રીનશોટ: 0201_StartKiosk_Select_Card.png]
જો તમારા વ્યવસાય પાસે ઘણા સ્ટેમ્પ કાર્ડ્સ છે (દા.ત., કોફી માટે એક અલગ કાર્ડ અને બીજું પેસ્ટ્રી માટે), તો આ ચોક્કસ ટેબ્લેટ પર બતાવવામાં આવશે તે એક પસંદ કરો. તમે વિવિધ કાર્ડ્સ માટે ઘણી ગોળીઓ સેટ કરી શકો છો.
પગલું 3. વધારાના વિકલ્પો.
[સ્ક્રીનશોટ: 0202_StartKiosk_Options.png]
વધારાની કિઓસ્ક લોંચ સેટિંગ્સ.
પ્રથમ — રંગ યોજના. તમે તમારા કાર્ડની પેલેટમાં કિઓસ્ક લોંચ કરી શકો છો અથવા અમારા પૂર્વ નિર્ધારિત સેટમાંથી એક પસંદ કરી શકો છો. તમને શ્રેષ્ઠ લાગે તે વિકલ્પ અજમાવી જુઓ!
સૌથી મહત્વપૂર્ણ વિકલ્પ છે તત્કાલ સ્કેન અટકાવો. તે સમાન ગ્રાહકને સતત બે વાર સ્ટેમ્પ કમાવવાથી અવરોધે છે: જો વિકલ્પ ચાલુ હોય, તો પુનરાવર્તિત સ્કેન ગ્રાહકને તેમનું પાછલું પરિણામ બતાવે છે (છેલ્લું પુરસ્કાર / સ્ક્રીન બતાવેલ), અને કોઈ સ્ટેમ્પ ઉમેરવામાં આવતું નથી. આ કાઉન્ટર પર આકસ્મિક ડબલ સ્કેન સામે રક્ષણ આપે છે.
પુષ્ટિકરણ પછી — કિઓસ્ક લોન્ચ થાય છે.
Kiosk Mode મુખ્ય સ્ક્રીન
[સ્ક્રીનશોટ: 0301_Main.png]
ટેબ્લેટની નજીક આવતા ગ્રાહક શું જુએ છે:
- ઉપર - તમારા વ્યવસાયનો લોગો અને નામ (કાર્ડ સેટિંગ્સમાંથી ખેંચાયેલ).
- મથાળું: સ્ટૅમ્પ્સ એકત્રિત કરો પુરસ્કારો મેળવો.
- એક
તમારો પુરસ્કારકેરોયુઝલ — અંતિમ ભેટ (અને, માઇલસ્ટોન પુરસ્કારો સાથે, તમામ મધ્યવર્તી) દર્શાવે છે. સ્વાઇપ કરવા યોગ્ય. - “કાર્ડને સ્કેન કરીને તમારું આગલું સ્ટેમ્પ મેળવો.” (અથવા “તમારો ફોન રીડર પાસે રાખો” — ટેક્સ્ટ અનુકૂલન કરે છે).
- તળિયે — નવો-ગ્રાહક બ્લોક: હજી સુધી કોઈ કાર્ડ નથી? જોડાવા પૃષ્ઠ QR સાથે “QR-કોડ સ્કેન કરો અને તમારા વૉલેટમાં કાર્ડ ઉમેરો”.
Kiosk Mode માં ગ્રાહકનું દૃશ્ય
- ગ્રાહક ટેબલેટ સ્ટેન્ડ સુધી આવે છે.
- જો તેમની પાસે પહેલેથી જ કાર્ડ છે → ઓપન વૉલેટ → ટેપ કરો તમારું કાર્ડ સ્કેન કરો → વૉલેટ સ્ક્રીનને ટેબ્લેટ કૅમેરામાં પકડી રાખો → સ્ટેમ્પ ઉમેર્યું.
- જો તેમની પાસે હજુ સુધી કાર્ડ નથી → હજી સુધી કોઈ કાર્ડ નથી? QR સ્કેન કરો → કાર્ડ તરત જ Wallet પર સાચવે છે → તમારું કાર્ડ સ્કેન કરો ટેપ કરો → તેમનું પ્રથમ સ્ટેમ્પ મેળવો.
ગ્રાહક લક્ષ્ય સુધી પહોંચવા પર શું જુએ છે
પુરસ્કાર = Award.
[સ્ક્રીનશોટ: 0501_RewardUnlocked_Award.png]
ભેટની છબી અને વર્ણન સાથે પૂર્ણ-સ્ક્રીન અભિનંદન! સ્ક્રીન. ગ્રાહક સ્ટાફને સ્ક્રીન બતાવે છે અને વચન આપેલ ભેટ એકત્રિત કરે છે.
પુરસ્કાર = વાઉચર.
[સ્ક્રીનશોટ: 0502_RewardUnlocked_Voucher.png]
A અભિનંદન! વાઉચર અનલૉક! વાઉચર કાર્ડ સાથે સ્ક્રીન. ગ્રાહક કિઓસ્કમાં જ વાઉચરને જાતે જ રીડીમ કરી શકે છે — ઉપયોગ બટન Redeem Code (ટેક્સ્ટ + QR + બારકોડ) સાથેની સ્ક્રીન ખોલે છે જે ગ્રાહક કેશિયરને બતાવે છે, જે કોડ સ્કેન કરે છે અથવા ટિલમાં કોડ દાખલ કરે છે. રિડેમ્પશન પછી વાઉચર રિડીમ પર જાય છે અને ગ્રાહકે સ્ક્રીનશૉટ રાખ્યો હોય તો પણ તેનો ફરી ઉપયોગ કરી શકાતો નથી.
તળિયે - બટનો:
- My Vouchers — મારા બધા વાઉચર જુઓ.
- 12 સેકન્ડમાં બંધ થઈ રહ્યું છે — મુખ્ય સ્ક્રીન પર સ્વચાલિત વળતર માટે કાઉન્ટડાઉન.
આ એક મહત્વપૂર્ણ કિઓસ્ક પેટર્ન છે: ઓટો-ક્લોઝ. તેના વિના ટેબ્લેટ એક ગ્રાહકની સ્ક્રીન પર “અટકી” રહેશે જ્યાં સુધી સ્ટાફ દરમિયાનગીરી ન કરે. કાઉન્ટડાઉન એ સુનિશ્ચિત કરે છે કે ટેબ્લેટ હંમેશા ક્રિયા પછી 10-15 સેકન્ડ પછી સ્વચ્છ પ્રારંભિક સ્ક્રીન પર પાછું આવે છે.
પુરસ્કાર = Lottery.
[સ્ક્રીનશોટ: 0503_RewardUnlocked_Lottery.png]
ગ્રાહક જાતે જ સ્ક્રીન પર લોટરી સ્પિન કરે છે - એક સુખદ ગેમ મિકેનિક. વેરિઅન્ટ ઘટી ગયા પછી ([સ્ક્રીનશોટ: 0504_RewardUnlocked_LotteryUsed.png]), સ્ક્રીન Award અથવા ઉપરના વાઉચરની જેમ વર્તે છે.
ગ્રાહકના વાઉચર જોવું
[સ્ક્રીનશોટ: 0601_Vouchers.png]
કોઈપણ સમયે ગ્રાહક કિઓસ્કની મુખ્ય સ્ક્રીન પર My Vouchers પર ટેપ કરી શકે છે અને તેમના તમામ સક્રિય વાઉચર જોઈ શકે છે. આ અનુકૂળ છે: જો ગ્રાહક પાસે અગાઉની મુલાકાતનું વણવપરાયેલ વાઉચર હોય, તો તેઓ તેને વૉલેટ ખોલ્યા વિના તરત જ સ્ટાફને બતાવી શકે છે.
કિઓસ્ક સ્ટેન્ડ માટે તકનીકી આવશ્યકતાઓ
- ટેબ્લેટ: 10” અથવા 12” iPad / Android ટેબ્લેટ. મોટી સ્ક્રીન, ગ્રાહક માટે વધુ અનુકૂળ. અમને આઈપેડ મિની ગમે છે.
- સ્ટેન્ડ: સ્થિર, ગ્રાહકની સામે. સ્ટેન્ડે તેમને વૉલેટ ફોનને ટેબ્લેટ કેમેરા સુધી પકડી રાખવા દેવો જોઈએ.
- પાવર: સતત મુખ્ય જોડાણ. કિઓસ્ક આખો દિવસ ચાલે છે.
- ઇન્ટરનેટ: વિશ્વસનીય Wi-Fi અથવા મોબાઇલ 4G.
- વૈકલ્પિક — સ્ટેન્ડની બાજુમાં એક સરળ સૂચના કાર્ડ: “1) તમારું કાર્ડ વૉલેટમાં ખોલો. 2) તેને કૅમેરા સુધી પકડી રાખો. 3) થઈ ગયું!” - જો તમારી પાસે આંતરરાષ્ટ્રીય મહેમાનો હોય તો બે ભાષાઓમાં. જો કે અમારા કિઓસ્ક UI સાથે સારી રીતે મૂકવામાં આવેલ ટેબ્લેટ સામાન્ય રીતે આ ભૂમિકાને તેની જાતે સંભાળે છે.
9.6 Terminal Mode — ચુકવણી ટર્મિનલ પર વફાદારી
Terminal Mode વર્તમાન Android પેમેન્ટ ટર્મિનલ પર સીધું લોયલ્ટી ચલાવે છે. તે હસ્તગત કરનારાઓ, પેમેન્ટ પ્રોસેસર્સ, ISOs અને એવા કોઈપણ વેપારી માટે આદર્શ છે કે જેમની પાસે પહેલાથી જ ચેકઆઉટ વખતે ટર્મિનલ હોય અને નવા હાર્ડવેર વિના વફાદારી ઈચ્છે છે.
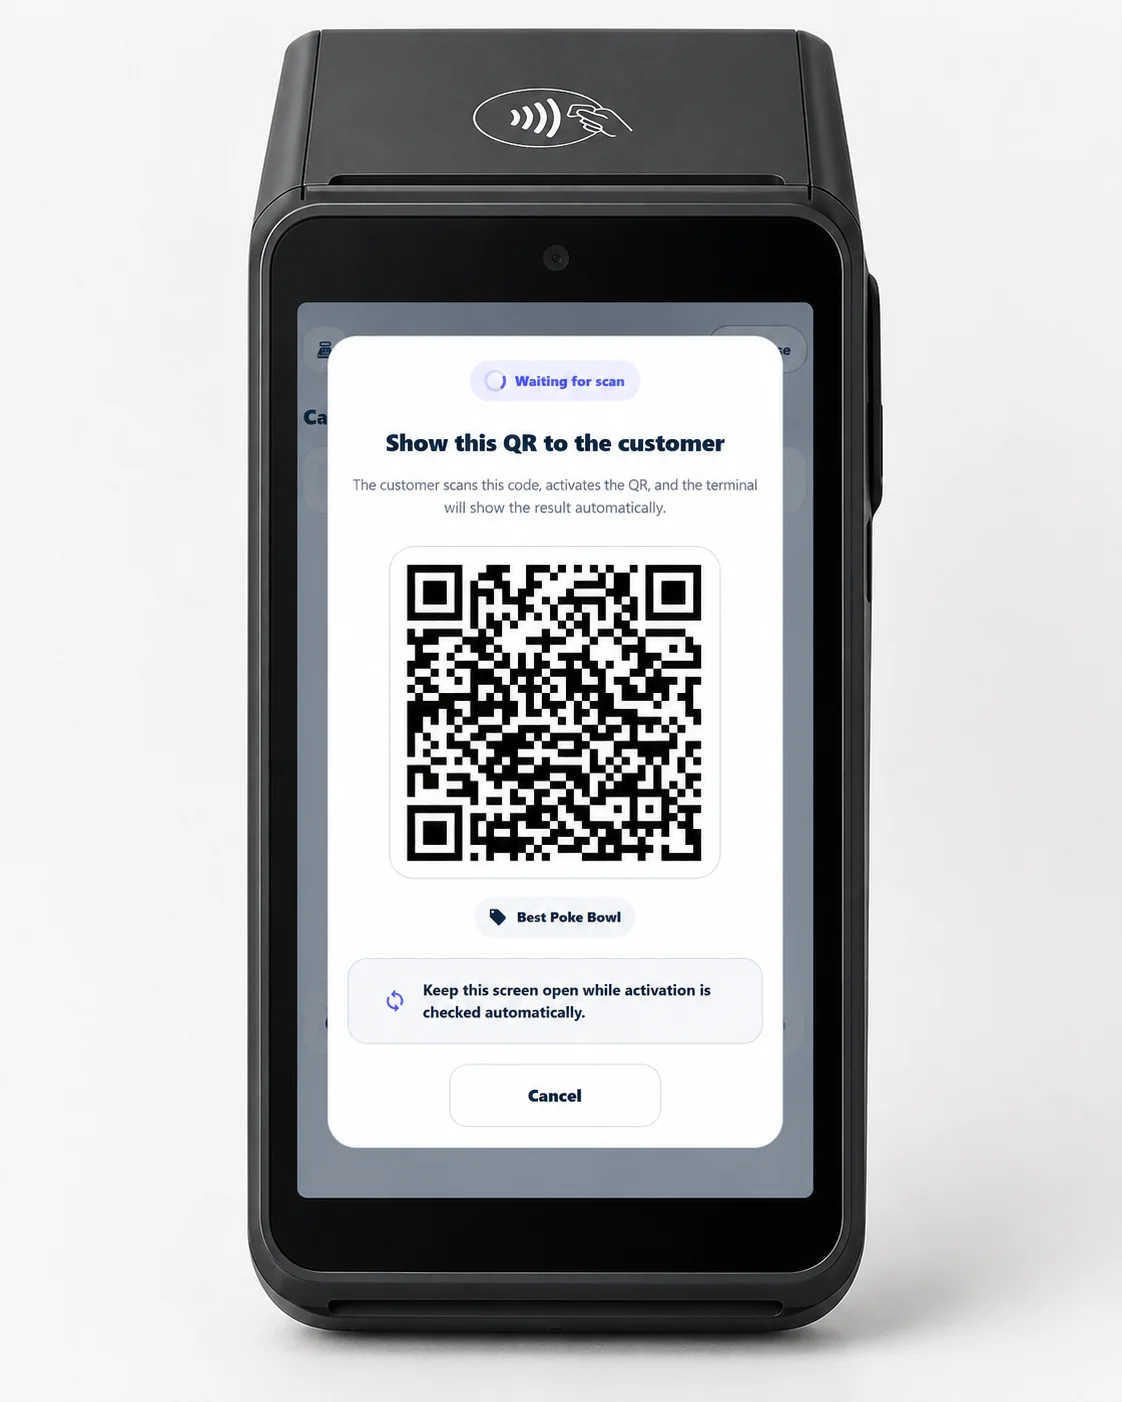
તે કેવી રીતે કામ કરે છે
- ગ્રાહક હંમેશની જેમ ટર્મિનલ પર ચૂકવણી કરે છે.
- 7Stamp Scanner app ખુલે છે — પ્રકાશ સંકલન સાથે અથવા કેશિયર દ્વારા એક ટેપ સાથે આપોઆપ.
- કેશિયર ટેપ કરે છે Serve customer; ટર્મિનલ સ્ક્રીન પર એક અનન્ય ડાયનેમિક QR કોડ દેખાય છે.
- ગ્રાહક તેમના ફોન વડે QR સ્કેન કરે છે. નવું કાર્ડ બનાવવામાં આવે છે અને વૉલેટમાં સાચવવામાં આવે છે (પ્રથમ સ્ટેમ્પ સાથે), અથવા અસ્તિત્વમાંનું કાર્ડ તરત જ અપડેટ થાય છે.
સ્ટેમ્પ ઉમેરી રહ્યા છીએ
સ્ટેમ્પ્સ નિશ્ચિત રકમ (ખરીદી દીઠ એક) અથવા રકમ દ્વારા ઉમેરી શકાય છે (કેશિયર ટર્મિનલ પર કુલ રસીદ દાખલ કરે છે).
ટર્મિનલ પર પુરસ્કારો
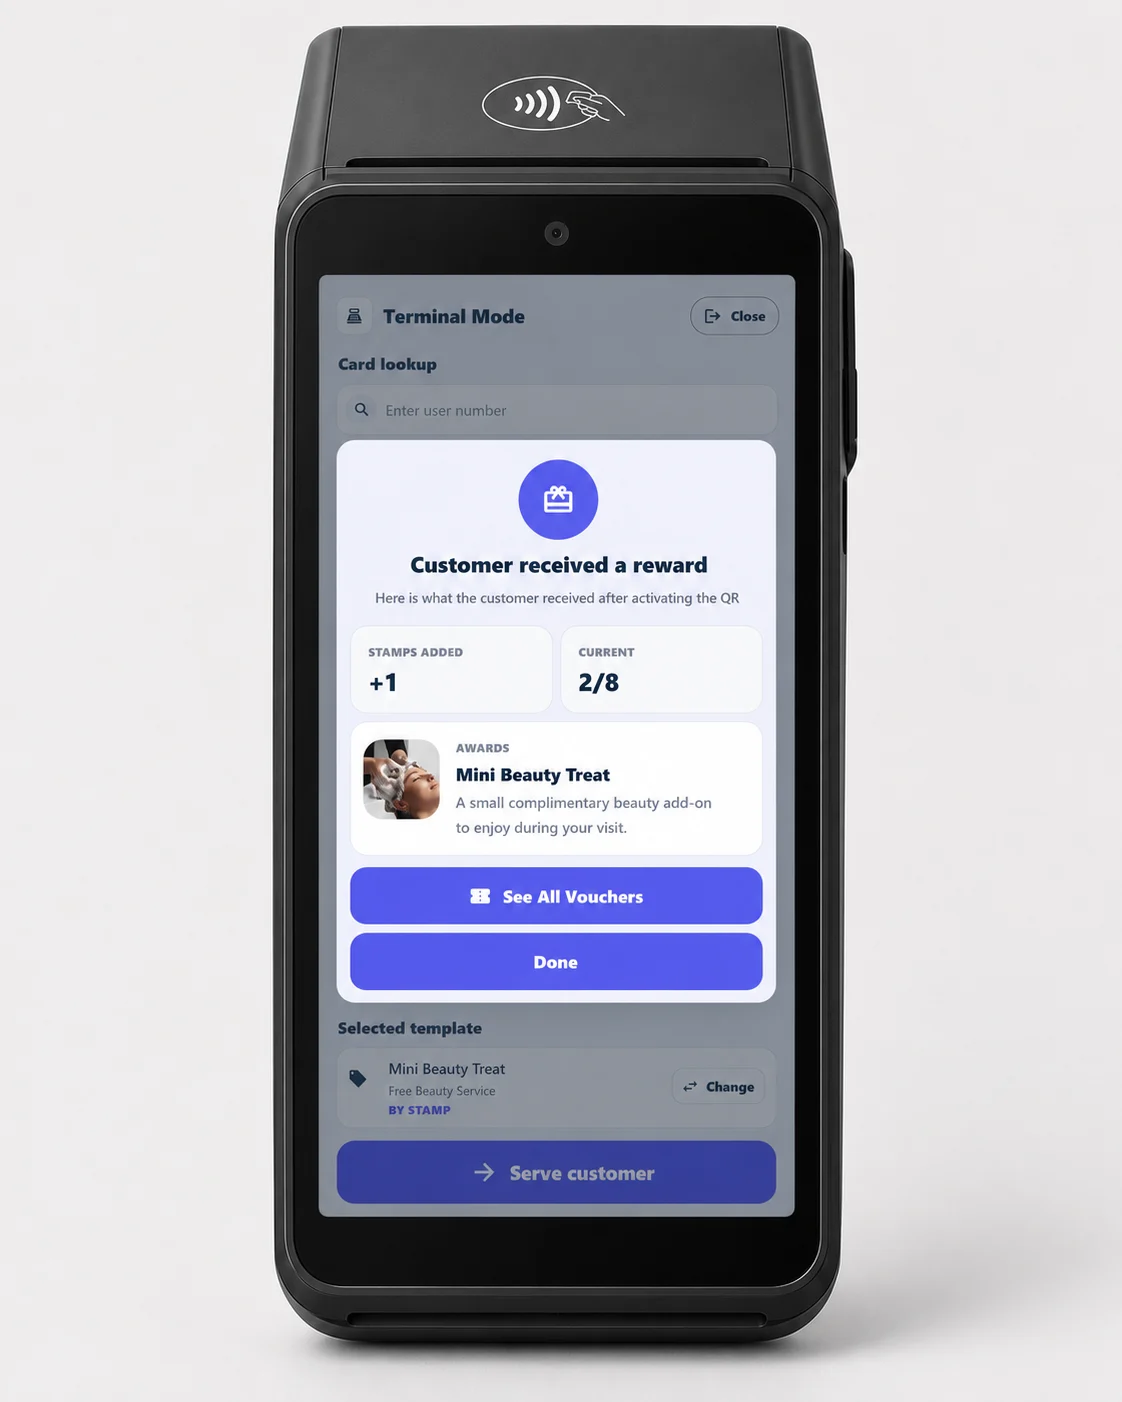
- Award: જ્યારે લક્ષ્ય પ્રાપ્ત થાય ત્યારે ટર્મિનલ કેશિયરને ભેટ સોંપવા માટે સંકેત આપે છે.
- Smart Voucher: પછીની મુલાકાત પર, કેશિયર ટર્મિનલ પર ગ્રાહકના વાઉચર ખોલે છે (અથવા વાઉચર નંબર દાખલ કરે છે) અને એક ટૅપમાં એકને રિડીમ કરે છે.
- Lottery: ગ્રાહક તેમના ફોન પર વ્હીલ ફેરવે છે; પરિણામ ટર્મિનલ સ્ક્રીન પર દેખાય છે.
ટર્મિનલ પર ઇન્સ્ટોલ કરી રહ્યું છે
Google Play થી 7Stamp Scanner app ઇન્સ્ટોલ કરો અથવા તમારા ટર્મિનલ ફ્લીટમાં ડાયરેક્ટ APK ને જમાવો.
અદ્યતન એકીકરણ (વિનંતી પર)
Apple VAS અને Google Smart Tap પર ટેપ-ટુ-કલેક્ટ કરો — VAS/Smart Tap–પ્રમાણિત ટર્મિનલ પર ટર્મિનલની ચુકવણી એપ્લિકેશન દ્વારા વાંચો — અને કાર્ડ-લિંક્ડ લોયલ્ટી (પ્રોસેસર સ્તરે નેટવર્ક-ટોકન મેચિંગ), વિનંતી પર ઉપલબ્ધ અદ્યતન એકીકરણ છે.
ભાગીદાર અને વ્યાપારી વિગતો માટે, પ્રાપ્તકર્તા અને ચુકવણી નેટવર્ક્સ અને Terminal Mode જુઓ.
9.7 મોડ કેવી રીતે પસંદ કરવું — સરખામણી
| પરિમાણ | Manual Mode | Autopilot Mode | Kiosk Mode | Terminal Mode |
|---|---|---|---|---|
| કોણ સ્કેન કરે છે | ફોન/કેમેરા દ્વારા સ્ટાફ | બાહ્ય સ્કેનર “બારકોડ તરીકે” | ગ્રાહક પોતે સ્ટેન્ડ પર છે | ગ્રાહક ટર્મિનલ સ્ક્રીન પર QR સ્કેન કરે છે |
| વ્યવસાય પ્રકાર | પ્રીમિયમ સેવા, સલુન્સ, રેસ્ટોરાં | કોફી શોપ, ફાસ્ટ ફૂડ, વ્યસ્ત કાઉન્ટર્સ | કોફી શોપ, બેકરી, કાર વોશ, લાઇટ રિટેલ | ચુકવણી ટર્મિનલ સાથે કોઈપણ વેપારી; હસ્તગત કરનાર/પ્રોસેસર એસ્ટેટ |
| હાર્ડવેર | ઉપકરણ કેમેરા | બાહ્ય QR સ્કેનર | 10-12” ટેબ્લેટ + સ્ટેન્ડ | હાલનું એન્ડ્રોઇડ પેમેન્ટ ટર્મિનલ |
| જ્યાં તે રહે છે | સ્ટાફ ફોન/ટેબ્લેટ | સુધી લેપટોપ/ટેબ્લેટ | ગ્રાહકની સામે સ્ટેન્ડ પર ટેબ્લેટ | ચેકઆઉટ વખતે પેમેન્ટ ટર્મિનલ |
| સ્ટાફ તાલીમ જોખમ | ન્યૂનતમ (એક ટેપ) | શૂન્ય (બેકગ્રાઉન્ડ વર્ક) | શૂન્ય (ગ્રાહક તે કરે છે) | ન્યૂનતમ (એક ટેપ: “Serve customer”) |
| Lottery | ગ્રાહક સ્ટાફ સ્ક્રીન પરથી રમે છે | મેન્યુઅલ એક્શન દ્વારા ઉપલબ્ધ | ગ્રાહક પોતે જ રમે છે | ગ્રાહક તેમના ફોન પર રમે છે; ટર્મિનલ પર પરિણામ |
તમે એક સાથે અનેક મોડ્સનો ઉપયોગ કરી શકો છો. ઉદાહરણ તરીકે, રેસ્ટોરન્ટ અને સ્પા સાથેની હોટલ: સ્પામાં — Manual Mode (પ્રીમિયમ, વ્યક્તિગત સંપર્ક); રેસ્ટોરન્ટના કેફેમાં — સ્ટેન્ડ પર Kiosk Mode (ઝડપી, વેઈટરની સંડોવણી નહીં); રિસેપ્શન પર — નિયમિત માટે Autopilot. એક Staff Seat એક સમયે એક લોગિનને સપોર્ટ કરે છે; જો તમને એક સાથે અનેક પોઈન્ટની જરૂર હોય, તો એડમિન માં Staff Logins ઉમેરો.
9.8 સ્કેનર શરૂ કરવા માટે વ્યવહારુ ટિપ્સ
- ખુલતાં પહેલાં પરીક્ષણ કરો. શિફ્ટ પહેલાં સવારે તમારા પોતાના કાર્ડ વડે 5-10 ટ્રાયલ સ્કેન કરો — ખાતરી કરો કે કૅમેરા ફોકસ કરે છે, ઇન્ટરનેટ કામ કરે છે, સ્ટેમ્પ ઉમેરવામાં આવે છે.
- કિયોસ્ક ટેબ્લેટ પર, ઓટો-લૉક અને સૂચનાઓને અક્ષમ કરો. કોઈએ આકસ્મિક રીતે OSમાંથી બહાર નીકળવું જોઈએ નહીં અથવા છૂટાછવાયા સૂચના મેળવવી જોઈએ નહીં. iOS પર માર્ગદર્શિત ઍક્સેસનો ઉપયોગ કરો, Android પર સ્ક્રીન પિનિંગ.
- ઇન્ટરનેટ આઉટેજ માટે પ્રિન્ટેડ QR લેબલ્સ નજીકમાં રાખો (એડમિન તરફથી નિકાસ કરેલ) — ગ્રાહક તેને જાતે સ્કેન કરે છે અને સ્કેનર અસ્થાયી રૂપે અનુપલબ્ધ હોય તો પણ કાર્ડ મેળવે છે.
- ઓનબોર્ડ નવા સ્ટાફ. દરેક નવા શિફ્ટ સભ્યને પાંચ બાબતો જાણવી જોઈએ: સ્કેનરમાં કેવી રીતે લોગ ઇન કરવું, કાર્ડ કેવી રીતે સ્કેન કરવું, સ્ટેમ્પ કેવી રીતે ઉમેરવું,
Voucher Unlocked!કેવી રીતે હેન્ડલ કરવું,વાઉચરટેબમાંથી વાઉચર કેવી રીતે રિડીમ કરવું. પાંચ મિનિટની તાલીમ. - Manual Mode ની નીચેનો તાજેતરનો ઇવેન્ટ લોગ એ તમારો કાર્યકારી લોગ છે. જો ગ્રાહક ફરિયાદ કરે છે કે “સ્ટેમ્પ પસાર થયું નથી”, તો તેને તપાસો: તમે સમય, કાર્ડ ID અને શું જારી/વપરવામાં આવ્યું હતું તે જોશો.
Visual walkthrough
Use the screen sets below as a visual companion to the article. Open any image to inspect it at full size.