
रेफ़रेंस
7Stamp Scanner कर्मचारियों, ग्राहकों, कियोस्क और एंड्रॉइड भुगतान टर्मिनलों के लिए काम करने वाला ऐप है। यह कार्ड स्कैन को स्टैम्पिंग, वाउचर रिडेम्प्शन, लॉटरी स्पिनिंग और Terminal Mode चेकआउट लॉयल्टी में बदल देता है। वन स…
9. 7Stamp Scanner एप्लीकेशन - मैनुअल / Autopilot / कियॉस्क / Terminal Mode
7Stamp Scanner कर्मचारियों, ग्राहकों, कियोस्क और एंड्रॉइड भुगतान टर्मिनलों के लिए काम करने वाला ऐप है। इसका काम कार्ड स्कैन को स्टैम्पिंग, वाउचर रिडेम्पशन, लॉटरी स्पिनिंग और Terminal Mode चेकआउट लॉयल्टी में बदलना है। यह वह है जो भौतिक रूप से स्टाफ सदस्य की जेब में, ग्राहक-सामना वाले स्टैंड पर, या चेकआउट पर पहले से ही बैठे भुगतान टर्मिनल पर बैठता है। वन स्टाफ लॉगिन मुख्य स्कैनर मोड तक पहुंच प्रदान करता है - मोड का चुनाव आपके व्यवसाय की गति और सेवा परिदृश्य पर निर्भर करता है।
[स्क्रीनशॉट: 1101_कैसे_स्कैनpng.png]
9.1 जहां 7Stamp Scanner चलता है
वेब संस्करण (कोई भी उपकरण): स्कैनर.7stamp.com
- किसी भी आधुनिक ब्राउज़र में काम करता है: स्मार्टफोन, टैबलेट या कंप्यूटर पर।
- कोई इंस्टॉल नहीं - पेज खोलें, अपना Staff Login दर्ज करें, काम पर लग जाएं।
- साझा कार्य लैपटॉप, स्टैंड पर टैबलेट, कैमरे के साथ किसी भी विंडोज/मैक/लिनक्स डिवाइस के लिए आदर्श।
- आप एक बाहरी स्कैनर कनेक्ट कर सकते हैं और उससे ग्राहक कार्ड स्कैन कर सकते हैं। किसी कॉन्फ़िगरेशन की आवश्यकता नहीं है.
एंड्रॉइड: गूगल प्ले · डायरेक्ट एपीके आईओएस: ऐप स्टोर
- नेटिव ऐप - तेज़ चलता है, फ़ोन कैमरे का बेहतर उपयोग करता है।
- उन कर्मचारियों के लिए उपयुक्त जो अपने फ़ोन से काम करते हैं (प्रीमियम सेवा, फ़ील्ड कार्य, डिलीवरी)।
- आप एक बाहरी स्कैनर कनेक्ट कर सकते हैं और उससे ग्राहक कार्ड स्कैन कर सकते हैं (इस स्थिति में Autopilot मोड पर विचार करें)।
- कियोस्क मोड में टैबलेट पर चल सकता है।
- डायरेक्ट एपीके - ऐप पैकेज को सीधे
https://downloads.7stamp.com/7stamp-scanner.apkसे डाउनलोड करें। एंड्रॉइड भुगतान टर्मिनलों के लिए और डिवाइसों के बेड़े में ऐप को केंद्रीय रूप से तैनात करने के लिए उपयोगी है।
क्या चुनें। यदि आपके पास टिल पर एक एंड्रॉइड टैबलेट या काउंटर पर एक आईपैड है - मूल ऐप इंस्टॉल करें। यदि आप विभिन्न उपकरणों से काम करते हैं या एक ही साझा कंप्यूटर का उपयोग करते हैं - तो वेब संस्करण https://scanner.7stamp.com चुनें। प्रविष्टि के लिए लॉगिन और पासवर्ड कर्मचारी के अंतर्गत व्यवस्थापक पैनल में बनाए जाते हैं।
9.2 लॉगिन और नेविगेशन
[स्क्रीनशॉट: 0101-लॉगिन.पीएनजी]
आप किसी भी प्लेटफ़ॉर्म (वेब / एंड्रॉइड / आईओएस) से उसी Staff Login से लॉग इन कर सकते हैं जिसे आपने एडमिन में बनाया था (स्टाफ → + क्रिएट → Staff Login बनाना)। लॉग इन करने के बाद ऐप स्वचालित रूप से आपके बिजनेस प्रोफाइल से लिंक हो जाता है।
साइड मेनू (ऊपर बाईं ओर ☰ आइकन के साथ खुलता है):
- Manual Mode — मैनुअल स्कैनिंग मोड (डिफ़ॉल्ट)।
- Kiosk Mode — ग्राहक स्वयं-सेवा मोड।
- एडमिन पैनल खोलें — एडमिन के लिए त्वरित लिंक (
admin.7stamp.com)। - लॉग आउट — साइन आउट करें (मेनू के नीचे, लाल बटन)।
आपको मेनू के माध्यम से मैन्युअल और Autopilot के बीच “मोड स्विच” करने की आवश्यकता नहीं है। Autopilot Manual Mode का एक उप-मोड है, जो मुख्य स्क्रीन पर सीधे एक स्विच के साथ टॉगल किया जाता है (नीचे देखें)।
9.3 Manual Mode — कर्मचारी हाथ से स्कैन कर रहा है
[स्क्रीनशॉट: 0201-वेटिंगस्कैन्समैनुअलमोड.पीएनजी]
Manual Mode वह आधार परिदृश्य है जहां कर्मचारी ग्राहक के कार्ड को स्वयं स्कैन करते हैं। प्रीमियम सेवा (ब्यूटी सैलून, नाई की दुकान, स्पा, सिट-डाउन रेस्तरां) में उपयोग किया जाता है जहां स्टैम्पिंग ग्राहक के साथ व्यक्तिगत बातचीत का हिस्सा है।
Manual Mode मुख्य स्क्रीन
- हेडर संकेतक: कार्ड स्कैन की प्रतीक्षा में - ऐप स्कैन स्वीकार करने के लिए तैयार है।
- ऊपर दाईं ओर - Auto-Stamp (Scanner Only) टॉगल (मैन्युअल में बंद)।
- स्क्रीन के नीचे - हालिया शिफ्ट इवेंट लॉग (जारी/प्रयुक्त/हटाए गए वाउचर)। प्रत्येक प्रविष्टि टैप करने योग्य है और विवरण खोलती है।
- सबसे नीचे - दो एक्शन बटन:
- 🔍 Search Customer - नाम, ईमेल, फोन या कार्ड नंबर से ग्राहक ढूंढें।
- 📷 Use Camera - डिवाइस का कैमरा खोलें और ग्राहक कार्ड QR को स्कैन करें।
ग्राहक ढूंढने के चार तरीके और स्टैम्प कार्ड
1. डिवाइस कैमरे से स्कैन करना (Use Camera). काम करने का मुख्य तरीका।
[स्क्रीनशॉट: 0302-ScanByCamera.png]
स्टाफ सदस्य Use Camera टैप करता है, फोन/टैबलेट कैमरे को ग्राहक के कार्ड QR पर इंगित करता है (ग्राहक अपना कार्ड Apple Wallet या Google Wallet में खोलता है और स्क्रीन दिखाता है), ऐप एक सेकंड के एक अंश में कोड को पहचान लेता है, और तुरंत ग्राहक कार्ड खोलता है।
2. बाहरी स्कैनर से ग्राहक कार्ड को स्कैन करना।
स्कैनर को अपने डिवाइस से कनेक्ट करें और बस उससे ग्राहक का कार्ड स्कैन करें।
3. ग्राहक खोज (Search Customer). एक फ़ॉलबैक जब ग्राहक के पास अपना फ़ोन नहीं होता है।
[स्क्रीनशॉट: 0301-CustomerSearch.png]
उपयोगी जब:
- ग्राहक ने अपना फ़ोन छोड़ दिया या ख़त्म कर दिया;
- ग्राहक ने अभी साइन अप किया है और अभी तक यह पता नहीं लगाया है कि कार्ड कहाँ खुलता है;
- स्टाफ सदस्य अपॉइंटमेंट लेकर काम करता है और ग्राहक का कार्ड पहले ही खोल देता है।
खोज नाम, ईमेल या कार्ड नंबर के आधार पर काम करती है।
4. प्रत्यक्ष वाउचर खोज (वाउचर खोज)। जब ग्राहक हाथ में वाउचर (उदाहरण के लिए, एक मुद्रित कागज वाला) लेकर आता है और उसे भुनाना चाहता है। आप खोज में वाउचर नंबर दर्ज कर सकते हैं, इसे बाहरी स्कैनर से स्कैन कर सकते हैं, या डिवाइस कैमरे से स्कैन कर सकते हैं।
स्कैन करने के बाद ग्राहक कार्ड
[स्क्रीनशॉट: 0401-CustomerCard.png]
एक बार कार्ड मिल जाने पर, ग्राहक कार्ड दो टैब के साथ खुलता है:
- जानकारी - बुनियादी जानकारी (नाम, ईमेल, कार्ड आईडी
#XXXXXX, संपादन के साथ जन्मदिन ✏️)। - वाउचर (एन) - इस ग्राहक के सभी वाउचर की सूची: सक्रिय, भुनाया हुआ, समाप्त।
ऊपरी क्षेत्र में एक लाल रीसेट स्टैम्प बटन है - यह आपको ग्राहक के स्टैम्पों को रीसेट करने देता है (उदाहरण के लिए, यदि उन्होंने अंतिम लक्ष्य बंद कर दिया है, इनाम प्राप्त किया है, और आप एक नया कार्ड शुरू करना चाहते हैं)। ध्यान दें। आपको कार्ड को रीसेट करने की आवश्यकता नहीं है: यदि अगली बार जब आप इसे रीसेट किए बिना अंतिम लक्ष्य पर स्कैन करते हैं, तो सिस्टम चक्रीय रूप से एक नए पुनरावृत्ति का पहला स्टैम्प डाल देगा।
स्टैम्प नियंत्रण
[स्क्रीनशॉट: 0402-स्टैम्प्ड.पीएनजी]
स्क्रीन के नीचे - स्टैम्प नियंत्रण:
- 🟢 + (हरा) - स्टैम्प जोड़ें।
- 🔴 − (लाल) - स्टैम्प हटाएं (यदि आपने कोई गलती की है)।
- − / + के साथ एक मात्रा फ़ील्ड - एक साथ कई स्टैम्प जोड़ें (उदाहरण के लिए, यदि कार्ड
राशि के अनुसारका उपयोग करता है और ग्राहक ने बड़ी राशि खर्च की है)। - 🔍 Search Customer — एक अलग ग्राहक खोलें।
- 📷- दोबारा स्कैन करें.
एक लक्ष्य तक पहुँचने पर तीन परिदृश्य
जब स्टैम्प ग्राहक को एक लक्ष्य (एक मील का पत्थर या अंतिम लक्ष्य) पर लाता है, तो स्कैनर उपहार के साथ एक पॉपअप दिखाता है। पॉपअप सामग्री कार्ड पर कॉन्फ़िगर किए गए पुरस्कार प्रकार पर निर्भर करती है।
1. इनाम = Award (तत्काल पाठ उपहार).
[स्क्रीनशॉट: 0403-स्टैम्प्डएंडगेटAward.पीएनजी]
स्क्रीन पर - उपहार टेक्स्ट और छवि (“मुफ़्त कॉफी”, “1 मुफ़्त पेस्ट्री”, आदि)। स्टाफ सदस्य ग्राहक को स्क्रीन दिखाता है और वादा किया गया उपहार सौंप देता है।
2. इनाम = वाउचर (Smart Voucher के साथ Redeem Code).
[स्क्रीनशॉट: 0404-स्टैम्प्डएंडगेटवाउचर.पीएनजी]
वाउचर अनलॉक! छवि, वाउचर शीर्षक और वाउचर नंबर #XXXXXX के साथ पॉपअप। तीन क्रियाएँ:
- वाउचर का उपयोग करें (हरा बटन) - वाउचर को सीधे स्कैनर में भुनाएं। यदि वाउचर में Redeem Code विकल्प सक्षम है, तो स्क्रीन कोड टेक्स्ट + QR + बारकोड दिखाती है। कर्मचारी कोड को POS में दर्ज/स्कैन करता है। वाउचर ‘रिडीम’ में चला जाता है और दोबारा उपयोग नहीं किया जा सकता।
- सभी वाउचर देखें - ग्राहक के सभी वाउचर की सूची खोलें (उदाहरण के लिए, यदि ग्राहक पहले एक अलग वाउचर भुनाना चाहता है)।
- बंद करें — पॉपअप बंद करें; वाउचर सक्रिय रहता है और ग्राहक इसे बाद में उपयोग कर सकता है।
3. इनाम = Lottery (एक ड्रा).
[स्क्रीनशॉट: 0405-स्टैम्प्डएंडगेटLottery.पीएनजी]
लॉटरी स्क्रीन स्टाफ सदस्य के डिवाइस पर खुलती है। कर्मचारी ग्राहक को डिवाइस सौंपता है (या स्क्रीन दिखाता है) और उन्हें “प्ले” पर टैप करने के लिए कहता है। स्पिन के बाद, वेरिएंट में से एक चालू हो जाता है और फिर इसे Award या वाउचर (ऊपर देखें) के रूप में संभाला जाता है।
[स्क्रीनशॉट: 0406-LotteryUsed.png]
मैन्युअल मोड में वाउचर का स्व-मोचन
[स्क्रीनशॉट: 0407-CustomerVouchers.png] [स्क्रीनशॉट: 0408-VoucherUsed.png]
यदि ग्राहक वादा किए गए उपहार के लिए बाद में आता है (इसे प्राप्त करने के ठीक बाद नहीं), तो कर्मचारी अपना कार्ड खोलते हैं और वाउचर (एन) टैब पर स्विच करते हैं। यहां ग्राहकों के सभी वाउचर दिखाई दे रहे हैं. कर्मचारी दाईं ओर टैप करता है → वाउचर वाउचर का उपयोग करें के साथ खुलता है → पुष्टि करें → स्थिति ‘रिडीम्ड’।
सुरक्षा: वाउचर स्थिति मशीन (जारी → सक्रिय → भुनाया गया → समाप्त) दोहरे उपयोग को रोकती है। ‘रिडीम’ के बाद वाउचर (या उसका स्क्रीनशॉट) दोबारा काम नहीं करेगा।
9.4 Autopilot Mode — अंत में पृष्ठभूमि स्कैनिंग
[स्क्रीनशॉट: 0101-वेटिंगस्कैन्स_ऑटोपायलटमोड.पीएनजी]
Autopilot Mode Manual Mode का एक उप-मोड है जिसमें स्टैम्पों को पृष्ठभूमि में जोड़ा जाता है, बिना किसी पुष्टिकरण और बिना किसी मोडल के। कॉफ़ी शॉप, फ़ास्ट फ़ूड, बेकरी, कार वॉश में चरम घंटों के लिए आदर्श - कहीं भी कतार हो और सेवा धीमी नहीं हो सकती।
इसे कैसे इनेबल करें
Manual Mode मुख्य स्क्रीन पर, ऊपर दाईं ओर Auto-Stamp (Scanner Only) टॉगल को “चालू” (हरा) पर पलटें। स्क्रीन बदलती है:
- आइकन बाहरी-स्कैनर छवि पर स्विच हो जाता है।
- मुख्य हेडर में लिखा है: Auto-Stamp मोड सक्रिय।
- उपशीर्षक: “सिस्टम स्टैम्प केवल स्कैनर इनपुट के लिए स्वचालित रूप से।“
यह काम किस प्रकार करता है
वाक्यांश “Scanner Only” का अर्थ है कि इस मोड में स्टैम्प केवल हार्डवेयर स्कैनर (कंप्यूटर/टैबलेट से जुड़ा एक बाहरी यूएसबी या ब्लूटूथ बारकोड स्कैनर) से इनपुट के माध्यम से जोड़े जाते हैं। Use Camera' और Search Customer’ बटन स्क्रीन पर दिखाई देते हैं और यदि आपको उनकी आवश्यकता है तो उपलब्ध हैं, लेकिन उनका उपयोग सामान्य Autopilot ऑपरेशन में नहीं किया जाता है - वे बैकअप के रूप में काम करते हैं (उदाहरण के लिए, यदि स्कैनर ग्राहक को नहीं उठाता है और आपको उन्हें मैन्युअल रूप से ढूंढने की आवश्यकता है)।
कार्यप्रवाह:
- कर्मचारी हमेशा की तरह ऑर्डर लेते हैं (टिल, बार काउंटर, वॉश पर)।
- भुगतान के समय या उसके ठीक बाद, ग्राहक अपना वॉलेट कार्ड दिखाता है।
- बाहरी स्कैनर QR को “बारकोड के रूप में” पकड़ता है।
- 7Stamp Scanner पृष्ठभूमि में ग्राहक के कार्ड में स्टैम्प जोड़ता है।
- कोई मोडल नहीं - कतार नहीं रुकती।
- ग्राहक प्रगति अपडेट को बाद में PUSH अधिसूचना के माध्यम से अपने वॉलेट में देखता है।
जिसकी आपको जरूरत है
- बारकोड स्कैनर: यूएसबी या ब्लूटूथ, QR कोड पढ़ने में सक्षम। हनीवेल, ज़ेबरा, डेटालॉजिक के मानक मॉडल उपयुक्त होंगे। स्कैनर को कीबोर्ड इम्यूलेशन (HID मोड) पर सेट किया जाना चाहिए।
- एक स्थायी उपकरण: एक लैपटॉप या टैबलेट जिसमें
scanner.7stamp.comखुला हो या Android/iOS ऐप हो। - स्थिर इंटरनेट - प्रत्येक स्टैम्प वास्तविक समय में क्लाउड पर जाता है।
Autopilot में वाउचर का ग्राहक स्व-मोचन
Autopilot में कर्मचारी “डायलॉग मोड” में वॉलेट कार्ड को भौतिक रूप से स्कैन नहीं करते हैं - वे कतार में काम करते हैं। लेकिन ग्राहक अपने वाउचर का उपयोग मौके पर ही कर सकता है, और इसके लिए स्विचिंग मोड की आवश्यकता नहीं है। वॉलेट में कार्ड पेज पर ग्राहक के पास उनके वाउचर का एक लिंक होता है। इसे खोलने पर, ग्राहक या तो:
- कैशियर को Redeem Code बुलाता है, जो इसे टिल में दर्ज करता है (यदि टिल प्रोमो कोड का समर्थन करता है), या
- उनके फ़ोन स्क्रीन पर QR/बारकोड दिखाता है, और कैशियर इसे बाहरी स्कैनर से स्कैन करता है।
उसके बाद वाउचर ‘रिडीम्ड’ में चला जाता है और अब इसका पुन: उपयोग नहीं किया जा सकता है। वैकल्पिक रूप से, कैशियर अस्थायी रूप से Auto-Stamp टॉगल को बंद कर सकता है, ग्राहक कार्ड को मैन्युअल रूप से खोल सकता है, और वाउचर का उपयोग करें के साथ वाउचर को भुना सकता है।
मैनुअल पर कब वापस आना है
किसी भी समय कर्मचारी Auto-Stamp टॉगल को बंद कर सकते हैं और मैन्युअल स्कैनिंग पर वापस जा सकते हैं - उदाहरण के लिए, यदि ग्राहक कोई समस्या लेकर आता है (वाउचर खो गया है, स्टैम्पों को मैन्युअल रूप से समायोजित करना चाहता है) या आपको नाम/ईमेल द्वारा उन्हें देखने की आवश्यकता है। सभी Manual Mode सुविधाएँ उपलब्ध हैं - खोज, कैमरा स्कैन, मैन्युअल वाउचर जारी करना और मोचन।
9.5 Kiosk Mode — ग्राहक स्व-सेवा
Kiosk Mode एक पूर्ण-स्क्रीन स्व-सेवा मोड है जिसमें टैबलेट ग्राहक के सामने होता है और ग्राहक अपना कार्ड स्कैन करता है। कर्मचारी इस प्रक्रिया में बिल्कुल भी शामिल नहीं है - इसलिए “शून्य कर्मचारी प्रशिक्षण”। यह कॉफ़ी शॉप, बेकरी, फ़ास्ट कैज़ुअल रेस्तरां, लाइट रिटेल, कार वॉश के लिए आदर्श है।
[स्क्रीनशॉट: कियॉस्क_बेकरी.png]
Kiosk Mode सेटअप
स्टेप 1\। कियोस्क पर स्विच करें।
[स्क्रीनशॉट: 0101_SwitchToKioskMode.png]
साइड मेनू में (☰) Kiosk Mode चुनें। ऐप सेटअप मोड में प्रवेश करता है।
Make एंड्रॉइड टैबलेट या आईपैड पर ऐप को “पिन” करने के तरीके के बारे में ऑन-स्क्रीन युक्तियों को अवश्य पढ़ें ताकि ग्राहक इसे छोटा या बंद न कर सके (डिवाइस का तथाकथित कियोस्क मोड)। ये आपके टेबलेट की सिस्टम विशेषताएं हैं - हमारी स्क्रीन पर संकेत, या अपने डिवाइस के लिए मैनुअल पढ़ें।
चरण दो\। प्रदर्शित करने के लिए कार्ड चुनें।
[स्क्रीनशॉट: 0201_स्टार्टकियोस्क_Select_Card.png]
यदि आपके व्यवसाय के पास कई स्टैम्प कार्ड हैं (उदाहरण के लिए, कॉफी के लिए एक अलग कार्ड और पेस्ट्री के लिए दूसरा), तो वह चुनें जो इस विशिष्ट टैबलेट पर दिखाया जाएगा। आप अलग-अलग कार्ड के लिए कई टैबलेट सेट कर सकते हैं.
चरण 3. अतिरिक्त विकल्प.
[स्क्रीनशॉट: 0202_स्टार्टकियोस्क_ऑप्शंस.पीएनजी]
अतिरिक्त कियॉस्क लॉन्च सेटिंग्स.
पहला - रंग योजना। आप अपने कार्ड के पैलेट में कियोस्क लॉन्च कर सकते हैं या हमारे पूर्वनिर्धारित सेटों में से एक चुन सकते हैं। वह विकल्प आज़माएं जो आपको सबसे अच्छा लगे!
सबसे महत्वपूर्ण विकल्प है तत्काल स्कैन रोकें। यह एक ही ग्राहक को लगातार दो बार स्टैम्प अर्जित करने से रोकता है: यदि विकल्प चालू है, तो एक दोहराव स्कैन ग्राहक को केवल उनका पिछला परिणाम दिखाता है (अंतिम पुरस्कार / स्क्रीन दिखाया गया है), और कोई स्टैम्प नहीं जोड़ा जाता है। यह काउंटर पर आकस्मिक डबल स्कैन से बचाता है।
पुष्टि के बाद - कियॉस्क लॉन्च हुआ।
Kiosk Mode मुख्य स्क्रीन
[स्क्रीनशॉट: 0301_मेन.पीएनजी]
टैबलेट के पास जाने पर ग्राहक क्या देखता है:
- ऊपर - आपके व्यवसाय का लोगो और नाम (कार्ड सेटिंग्स से लिया गया)।
- शीर्षलेख: स्टैम्प एकत्र करें पुरस्कार पाएं।
- एक ‘आपका पुरस्कार’ हिंडोला - अंतिम उपहार दिखाता है (और, मील के पत्थर के पुरस्कारों के साथ, सभी मध्यवर्ती पुरस्कार)। स्वाइप करने योग्य.
- एक बड़ा काला 📱अपना कार्ड स्कैन करें बटन जिस पर उपलेबल है “कार्ड स्कैन करके अपना अगला स्टैम्प प्राप्त करें।” (या “अपना फोन रीडर के पास रखें” - पाठ अनुकूलित होता है)।
- सबसे नीचे - नया-ग्राहक ब्लॉक: अभी तक कोई कार्ड नहीं? “QR-कोड को स्कैन करें और अपने वॉलेट में कार्ड जोड़ें” ज्वाइन पेज QR के साथ।
Kiosk Mode में ग्राहक परिदृश्य
- ग्राहक टैबलेट स्टैंड तक आता है.
- यदि उनके पास पहले से ही एक कार्ड है → वॉलेट खोलें → अपना कार्ड स्कैन करें टैप करें → वॉलेट स्क्रीन को टैबलेट कैमरे पर दबाए रखें → स्टैम्प जोड़ा गया।
- यदि उनके पास अभी तक कोई कार्ड नहीं है → अभी तक कोई कार्ड नहीं है? QR को अपने फोन कैमरे से स्कैन करें → कार्ड तुरंत वॉलेट में सेव हो जाता है → अपने कार्ड को स्कैन करें पर टैप करें → उनका पहला स्टैम्प प्राप्त करें।
लक्ष्य तक पहुंचने पर ग्राहक क्या देखता है
इनाम = Award.
[स्क्रीनशॉट: 0501_RewardUnlocked_Award.png]
उपहार की छवि और विवरण के साथ एक पूर्ण-स्क्रीन बधाई हो! स्क्रीन। ग्राहक कर्मचारियों को स्क्रीन दिखाता है और वादा किया गया उपहार ले लेता है।
इनाम = वाउचर.
[स्क्रीनशॉट: 0502_RewardUnlocked_Voucher.png]
एक बधाई! वाउचर अनलॉक! वाउचर कार्ड के साथ स्क्रीन। ग्राहक कियोस्क में ही वाउचर को स्वयं भुना सकता है - उपयोग बटन Redeem Code (टेक्स्ट + QR + बारकोड) के साथ एक स्क्रीन खोलता है जिसे ग्राहक कैशियर को दिखाता है, जो कोड को स्कैन करता है या टिल में दर्ज करता है। रिडेम्पशन के बाद वाउचर ‘रिडीम्ड’ में चला जाता है और दोबारा इस्तेमाल नहीं किया जा सकता, भले ही ग्राहक ने स्क्रीनशॉट रखा हो।
सबसे नीचे - बटन:
- My Vouchers — मेरे सभी वाउचर देखें।
- 12 सेकंड में समापन — मुख्य स्क्रीन पर स्वचालित वापसी की उलटी गिनती।
यह एक महत्वपूर्ण कियोस्क पैटर्न है: स्वत:-बंद। इसके बिना टैबलेट एक ग्राहक की स्क्रीन पर तब तक “फँसा” रहेगा जब तक कि कर्मचारी हस्तक्षेप नहीं करते। उलटी गिनती यह सुनिश्चित करती है कि टैबलेट किसी कार्रवाई के 10-15 सेकंड बाद हमेशा एक साफ शुरुआती स्क्रीन पर लौट आए।
इनाम = Lottery.
[स्क्रीनशॉट: 0503_RewardUnlocked_Lottery.png]
ग्राहक स्वयं स्क्रीन पर लॉटरी घुमाता है - एक सुखद गेम मैकेनिक। वेरिएंट ड्रॉप होने के बाद ([स्क्रीनशॉट: 0504_RewardUnlocked_LotteryUsed.png]), स्क्रीन Award या उपरोक्त वाउचर की तरह व्यवहार करती है।
ग्राहक के वाउचर देखना
[स्क्रीनशॉट: 0601_वाउचर.पीएनजी]
किसी भी समय ग्राहक कियोस्क मुख्य स्क्रीन पर My Vouchers टैप कर सकता है और अपने सभी सक्रिय वाउचर देख सकता है। यह सुविधाजनक है: यदि ग्राहक के पास पिछली यात्रा का अप्रयुक्त वाउचर है, तो वे वॉलेट खोले बिना इसे तुरंत कर्मचारियों को दिखा सकते हैं।
कियोस्क स्टैंड के लिए तकनीकी आवश्यकताएँ
- टैबलेट: 10” या 12” आईपैड/एंड्रॉइड टैबलेट। स्क्रीन जितनी बड़ी होगी, ग्राहक के लिए यह उतना ही सुविधाजनक होगा। हमें आईपैड मिनी पसंद है।
- स्टैंड: स्थिर, ग्राहक की ओर मुंह करके। स्टैंड को उन्हें टैबलेट कैमरे तक वॉलेट फोन रखने देना चाहिए।
- पावर: निरंतर मुख्य कनेक्शन। कियॉस्क पूरे दिन चलता है.
- इंटरनेट: विश्वसनीय वाई-फाई या मोबाइल 4जी।
- वैकल्पिक - एक सरल निर्देश कार्ड स्टैंड के बगल में: “1) अपना कार्ड वॉलेट में खोलें। 2) इसे कैमरे के सामने पकड़ें। 3) हो गया!” — यदि आपके पास अंतरराष्ट्रीय मेहमान हैं तो दो भाषाओं में। हालाँकि हमारे कियॉस्क यूआई के साथ एक अच्छी तरह से रखा गया टैबलेट आमतौर पर इस भूमिका को स्वयं ही संभाल लेता है।
9.6 Terminal Mode — भुगतान टर्मिनल पर वफादारी
Terminal Mode सीधे मौजूदा एंड्रॉइड भुगतान टर्मिनल पर लॉयल्टी चलाता है। यह अधिग्रहणकर्ताओं, भुगतान प्रोसेसर, ISOs, और किसी भी व्यापारी के लिए आदर्श है जिसके पास चेकआउट के समय पहले से ही एक टर्मिनल है और वह नए हार्डवेयर के बिना वफादारी चाहता है।
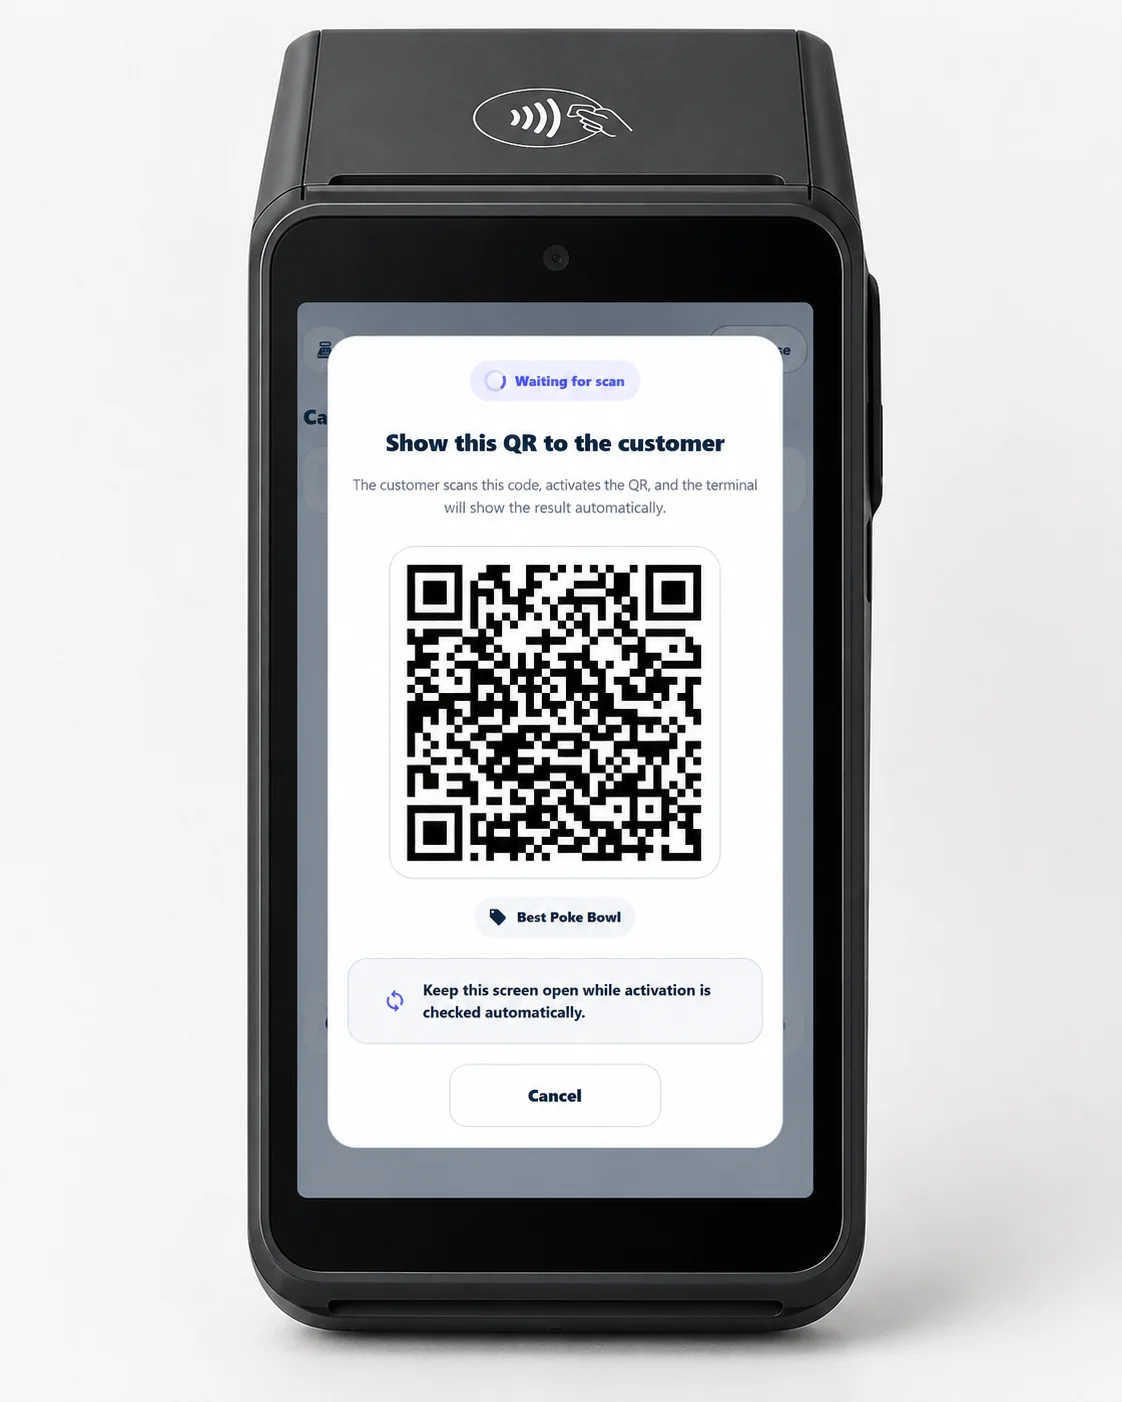
यह काम किस प्रकार करता है
- ग्राहक हमेशा की तरह टर्मिनल पर भुगतान करता है।
- 7Stamp Scanner app खुलता है - स्वचालित रूप से प्रकाश एकीकरण के साथ, या कैशियर द्वारा एक टैप के साथ।
- कैशियर Serve customer टैप करता है; टर्मिनल स्क्रीन पर एक अद्वितीय डायनामिक QR कोड दिखाई देता है।
- ग्राहक अपने फोन से QR को स्कैन करता है। एक नया कार्ड बनाया जाता है और वॉलेट में सहेजा जाता है (पहले स्टैम्पों के साथ), या मौजूदा कार्ड तुरंत अपडेट हो जाता है।
स्टैम्प जोड़ा जा रहा है
स्टैम्पों को एक निश्चित राशि (प्रति खरीद एक) या राशि के अनुसार जोड़ा जा सकता है (खजांची टर्मिनल पर कुल रसीद दर्ज करता है)।
टर्मिनल पर पुरस्कार
- Award: लक्ष्य पूरा होने पर टर्मिनल कैशियर को उपहार सौंपने के लिए संकेत देता है।
- Smart Voucher: बाद की यात्रा पर, कैशियर टर्मिनल पर ग्राहक के वाउचर खोलता है (या वाउचर नंबर दर्ज करता है) और एक टैप में एक को भुना लेता है।
- Lottery: ग्राहक अपने फ़ोन पर पहिया घुमाता है; परिणाम टर्मिनल स्क्रीन पर दिखाई देता है।
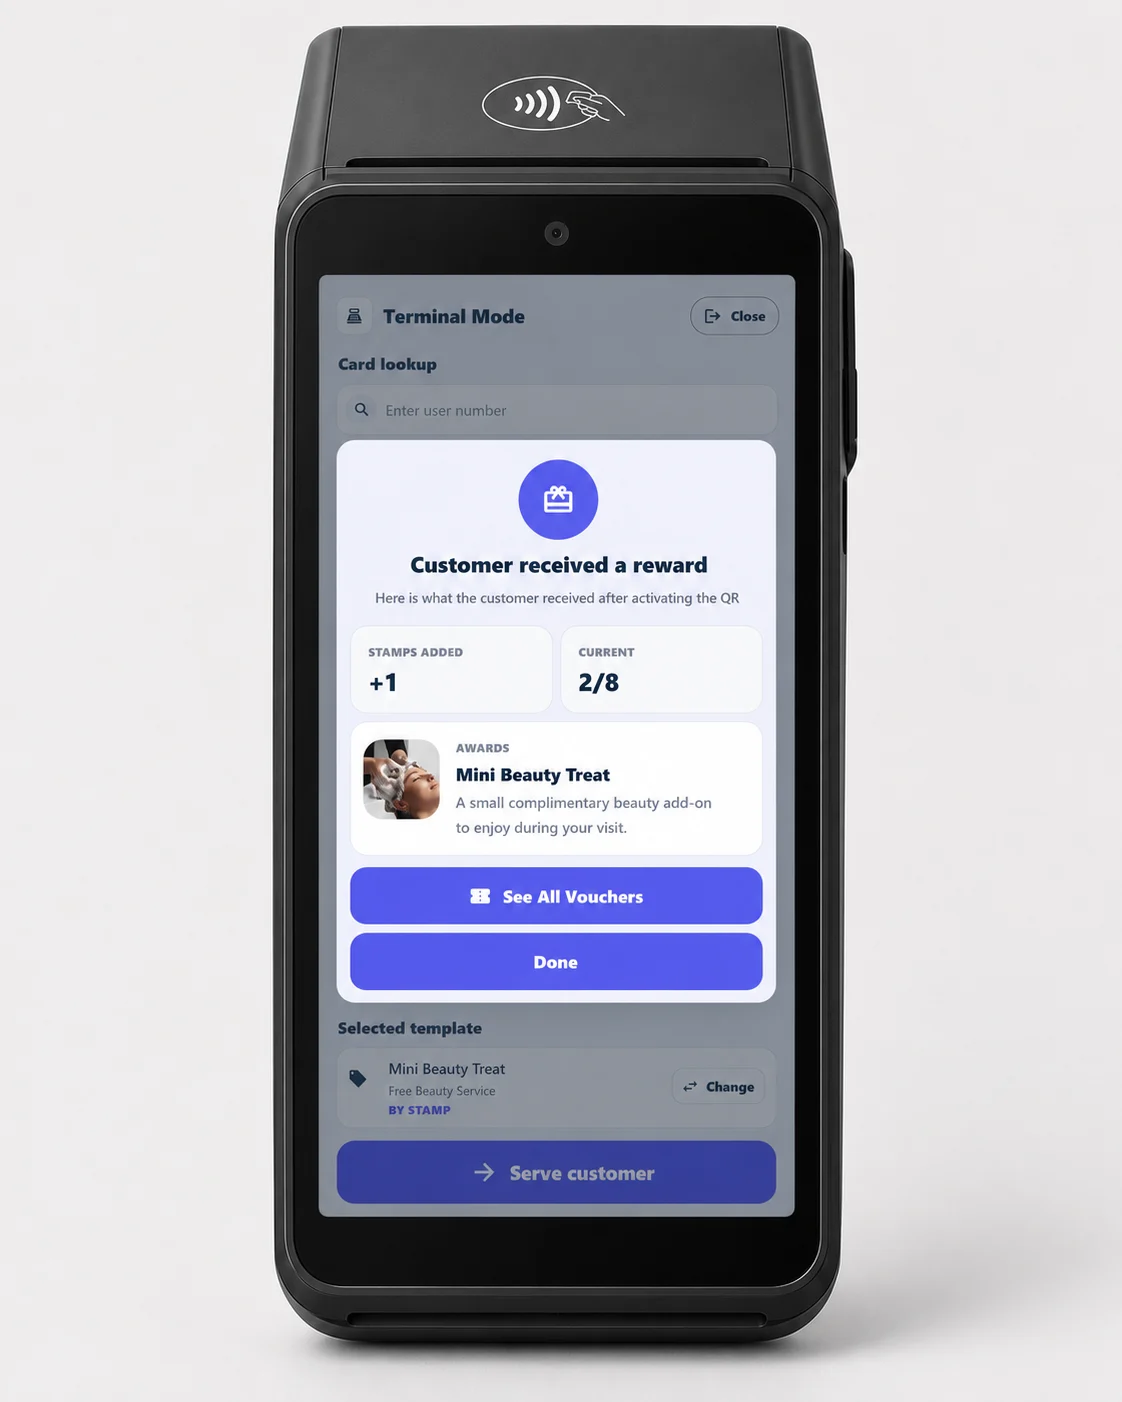
टर्मिनल पर स्थापित करना
गूगल प्ले से 7Stamp Scanner app स्थापित करें या अपने टर्मिनल बेड़े में प्रत्यक्ष एपीके तैनात करें।
उन्नत एकीकरण (अनुरोध पर)
Apple VAS और Google Smart Tap पर टैप-टू-कलेक्ट - वीएएस/स्मार्ट टैप-प्रमाणित टर्मिनल पर टर्मिनल के भुगतान एप्लिकेशन द्वारा पढ़ा जाता है - और कार्ड-लिंक्ड लॉयल्टी (प्रोसेसर स्तर पर नेटवर्क-टोकन मिलान), अनुरोध पर उपलब्ध उन्नत एकीकरण हैं।
भागीदार और व्यावसायिक विवरण के लिए, अधिग्रहणकर्ता और भुगतान नेटवर्क और Terminal Mode देखें।
9.7 मोड कैसे चुनें - तुलना
| पैरामीटर | Manual Mode | Autopilot Mode | Kiosk Mode | Terminal Mode |
|---|---|---|---|---|
| कौन स्कैन करता है | फ़ोन/कैमरे के माध्यम से कर्मचारी | बाहरी स्कैनर “एक बारकोड के रूप में” | ग्राहक स्वयं स्टैंड पर | ग्राहक टर्मिनल स्क्रीन पर QR स्कैन करता है |
| व्यापार के प्रकार | प्रीमियम सेवा, सैलून, रेस्तरां | कॉफी की दुकानें, फास्ट फूड, व्यस्त काउंटर | कॉफ़ी शॉप, बेकरी, कार वॉश, लाइट रिटेल | भुगतान टर्मिनल वाला कोई भी व्यापारी; अधिग्रहणकर्ता/प्रोसेसर सम्पदा |
| हार्डवेयर | डिवाइस कैमरा | बाहरी QR स्कैनर | 10-12” टैबलेट + स्टैंड | मौजूदा एंड्रॉइड भुगतान टर्मिनल |
| यह कहाँ रहता है | स्टाफ फ़ोन/टैबलेट | लैपटॉप/टैबलेट तक | ग्राहक के सामने स्टैंड पर टेबलेट | चेकआउट पर भुगतान टर्मिनल |
| स्टाफ प्रशिक्षण जोखिम | न्यूनतम (एक टैप) | शून्य (पृष्ठभूमि कार्य) | शून्य (ग्राहक यह करता है) | न्यूनतम (एक टैप: “Serve customer”) |
| Lottery | ग्राहक स्टाफ स्क्रीन से खेलता है | मैन्युअल कार्रवाई के माध्यम से उपलब्ध है | ग्राहक इसे स्वयं खेलता है | ग्राहक अपने फ़ोन पर खेलता है; टर्मिनल पर परिणाम |
आप एक साथ कई मोड का उपयोग कर सकते हैं। उदाहरण के लिए, एक रेस्तरां और स्पा वाला होटल: स्पा में - Manual Mode (प्रीमियम, व्यक्तिगत संपर्क); रेस्तरां के कैफे में - Kiosk Mode एक स्टैंड पर (तेज़, वेटर की कोई भागीदारी नहीं); रिसेप्शन पर - Autopilot नियमित लोगों के लिए। एक Staff Seat एक समय में एक लॉगिन का समर्थन करता है; यदि आपको एक साथ कई बिंदुओं की आवश्यकता है, तो व्यवस्थापक में Staff Login जोड़ें।
9.8 स्कैनर लॉन्च करने के लिए व्यावहारिक सुझाव
- खोलने से पहले परीक्षण करें। शिफ्ट से पहले सुबह अपने कार्ड से 5-10 ट्रायल स्कैन करें - सुनिश्चित करें कि कैमरा फोकस करता है, इंटरनेट काम करता है, स्टैम्प जोड़े गए हैं।
- कियोस्क टैबलेट पर, ऑटो-लॉक और नोटिफिकेशन अक्षम करें। किसी को भी गलती से ओएस से बाहर नहीं निकलना चाहिए या कोई आवारा सूचना नहीं मिलनी चाहिए। आईओएस पर गाइडेड एक्सेस का उपयोग करें, एंड्रॉइड पर स्क्रीन पिनिंग का उपयोग करें।
- इंटरनेट आउटेज के लिए प्रिंट किए गए QR लेबल पास में रखें (एडमिन से निर्यातित) - ग्राहक उन्हें स्वयं स्कैन करता है और स्कैनर अस्थायी रूप से अनुपलब्ध होने पर भी कार्ड प्राप्त कर लेता है।
- नए स्टाफ को शामिल करें। प्रत्येक नए शिफ्ट सदस्य को पांच बातें पता होनी चाहिए: स्कैनर में कैसे लॉग इन करें, कार्ड को कैसे स्कैन करें, स्टैम्प कैसे जोड़ें,
Voucher Unlocked!को कैसे संभालें,वाउचरटैब से वाउचर को कैसे भुनाएं। पाँच मिनट का प्रशिक्षण। - Manual Mode के नीचे हालिया ईवेंट लॉग आपका कामकाजी लॉग है। यदि ग्राहक शिकायत करता है “स्टैम्प नहीं हुआ”, तो इसकी जांच करें: आप समय, कार्ड आईडी, और क्या जारी/उपयोग किया गया था, देखेंगे।
दृश्य मार्गदर्शिका
Use the screen sets below as a visual companion to the लेख. खोलें any image to inspect it at full size.