
עיון
7Stamp Scanner היא האפליקציה הפועלת לצוות, לקוחות, קיוסקים ומסופי תשלום אנדרואיד. זה הופך סריקת כרטיס ל-stamping, מימוש שובר, ספינינג לוטו ו-Terminal Mode נאמנות לקופה. כניסה של צוות אחד נותנת גישה למצבי הסורק העיקריים
9. 7Stamp Scanner יישום — ידני / Autopilot / קיוסק / Terminal Mode
7Stamp Scanner היא האפליקציה הפועלת לצוות, לקוחות, קיוסקים ומסופי תשלום אנדרואיד. תפקידו להפוך סריקת כרטיסים ל-stamping, מימוש שובר, ספינינג לוטו ו-Terminal Mode נאמנות לקופה. זה מה שיושב פיזית ליד הקופה, בכיס של איש צוות, על עמדה הפונה ללקוח, או על מסוף התשלום שכבר יושב בקופה. כניסה של צוות אחד נותנת גישה למצבי הסורק העיקריים - בחירת המצב תלויה בקצב העסק שלך ובתרחיש השירות.
[צילום מסך: 1101_How_To_Scanpng.png]
9.1 היכן פועל 7Stamp Scanner
גרסת אינטרנט (כל מכשיר): סורק.7stamp.com
- עובד בכל דפדפן מודרני: בסמארטפון, טאבלט או מחשב.
- ללא התקנה - פתח את הדף, הזן את Staff Login שלך, התחל לעבוד.
- אידיאלי עבור מחשב נייד עבודה משותף בקופה, טאבלט על מעמד, כל מכשיר Windows/Mac/Linux עם מצלמה.
- ניתן לחבר סורק חיצוני ולסרוק איתו כרטיסי לקוחות. אין צורך בתצורה.
אנדרואיד: Google Play · APK ישיר iOS: App Store
- אפליקציה מקורית - פועלת מהר יותר, משתמשת במצלמת הטלפון בצורה טובה יותר.
- התאמה טובה לצוות שעובד מהטלפונים שלהם (שירות פרימיום, עבודת שטח, משלוחים).
- ניתן לחבר סורק חיצוני ולסרוק איתו כרטיסי לקוחות (במקרה כזה שקול מצב Autopilot).
- יכול לפעול בטאבלט במצב קיוסק.
- APK ישיר - הורד את חבילת האפליקציה ישירות מ-
https://downloads.7stamp.com/7stamp-scanner.apk. שימושי עבור מסופי תשלום אנדרואיד ולפריסה מרכזית של האפליקציה על פני צי מכשירים.
מה לבחור. אם יש לך טאבלט אנדרואיד בקופה או אייפד על דלפק - התקן את האפליקציה המקורית. אם אתה עובד ממכשירים שונים או משתמש במחשב משותף בודד בקופה - עבור עם גרסת האינטרנט https://scanner.7stamp.com. התחברות והסיסמה לכניסה נוצרות בפאנל הניהול תחת סֶגֶל.
9.2 כניסה וניווט
[צילום מסך: 0101-Login.png]
אתה יכול להיכנס מכל פלטפורמה (אינטרנט / אנדרואיד / iOS) עם אותו Staff Login שיצרת במנהל המערכת (צוות → + CREATE → יצירת Staff Login). לאחר הכניסה, האפליקציה מקשרת אוטומטית לפרופיל העסק שלך.
תפריט צד (נפתח עם הסמל ☰ בפינה השמאלית העליונה):
- Manual Mode — מצב סריקה ידנית (ברירת מחדל).
- Kiosk Mode — מצב שירות עצמי ללקוח.
- פתח את לוח הניהול - קישור מהיר למנהל המערכת (
admin.7stamp.com). - יציאה — צא (בתחתית התפריט, כפתור אדום).
אינך צריך “להחליף מצבים” בין ידני ל-Autopilot דרך התפריט. Autopilot הוא תת-מצב של Manual Mode, המופעל באמצעות מתג יחיד ישירות במסך הראשי (ראה להלן).
9.3 Manual Mode — צוות סורק ביד
[צילום מסך: 0201-WaitingScansManualMode.png]
Manual Mode הוא התרחיש הבסיסי שבו הצוות סורק את כרטיס הלקוח בעצמו. משמש בשירות פרימיום (מכוני יופי, מספרות, ספא, מסעדות ישיבה) כאשר ההחתמה הוא חלק מהאינטראקציה האישית עם הלקוח.
Manual Mode מסך ראשי
- מחוון כותרת: מחכה לסריקת הכרטיס - האפליקציה מוכנה לקבל סריקה.
- למעלה מימין - הלחצן Auto-Stamp (Scanner Only) (כבוי במדריך).
- תחתית המסך - יומן אירועי המשמרת האחרונה (שוברים שהונפקו / השתמשו / נמחקו). כל כניסה ניתנת להקשה ופותחת פרטים.
- ממש בתחתית - שני לחצני פעולה:
- 🔍 Search Customer — מצא לקוח לפי שם, דוא”ל, טלפון או מספר כרטיס.
- 📷 Use Camera — פתח את מצלמת המכשיר וסרוק כרטיס לקוח QR.
ארבע דרכים למצוא לקוח ולהחתים את הכרטיס
1. סריקה עם מצלמת המכשיר (Use Camera). הדרך העיקרית לעבודה.
[צילום מסך: 0302-ScanByCamera.png]
איש הצוות מקיש על Use Camera, מכוון את מצלמת הטלפון/טאבלט לכרטיס הלקוח QR (הלקוח פותח את הכרטיס שלו ב-Apple Wallet או Google Wallet ומציג את המסך), האפליקציה מזהה את הקוד בשבריר שנייה ומיד פותחת את כרטיס הלקוח.
2. סריקת כרטיס הלקוח עם סורק חיצוני.
חבר את הסורק למכשיר שלך ופשוט סרוק איתו את כרטיס הלקוח.
3. חיפוש לקוחות (Search Customer). פתרון נפילה כאשר ללקוח אין את הטלפון שלו בהישג יד.
[צילום מסך: 0301-CustomerSearch.png]
שימושי כאשר:
- הלקוח עזב או רוקן את הטלפון שלו;
- הלקוח פשוט נרשם וטרם הבין היכן הכרטיס נפתח;
- איש הצוות עובד בתיאום מראש ופותח את כרטיס הלקוח מראש.
החיפוש פועל לפי שם, דוא”ל או מספר כרטיס.
4. חיפוש שובר ישיר (חיפוש שוברים). כאשר הלקוח מגיע עם שובר ביד (למשל, נייר מודפס) ורוצה לממשו. ניתן להזין את מספר השובר בחיפוש, לסרוק אותו בסורק חיצוני או לסרוק אותו במצלמת המכשיר.
כרטיס הלקוח לאחר סריקה
[צילום מסך: 0401-CustomerCard.png]
ברגע שהכרטיס נמצא, כרטיס הלקוח נפתח בשתי לשוניות:
- מידע — מידע בסיסי (שם, אימייל, מזהה כרטיס
#XXXXXX, יום הולדת עם עריכה ✏️). - שוברים (N) — רשימה של כל השוברים של לקוח זה: פעילים, מומשו, פג תוקף.
באזור העליון יש כפתור אדום אפס חותמות - הוא מאפשר לך לאפס את ה-stamps של הלקוח (למשל, אם הוא סגר את המטרה הסופית, קיבל את הפרס ואתה רוצה להתחיל כרטיס חדש). הערה. אין צורך לאפס את הכרטיס: אם בפעם הבאה תסרוק אותו על היעד הסופי מבלי לאפס, המערכת תכניס באופן מחזורי את ה-stamp הראשון של איטרציה חדשה.
בקרות חותמות
[צילום מסך: 0402-Stamped.png]
בתחתית המסך - פקדי החותמות:
- 🟢 + (ירוק) — הוסף חותמת.
- 🔴 − (אדום) - הסר חותמת (אם עשית טעות).
- שדה כמות עם − / + - הוסף מספר חותמות בבת אחת (לדוגמה, אם הכרטיס משתמש ב’לפי סכום’ והלקוח הוציא סכום גדול).
- 🔍 Search Customer — פתח לקוח אחר.
- 📷 - סרוק שוב.
שלושה תרחישים להשגת מטרה
כאשר חותמת מביאה את הלקוח ליעד (אחת מאבני הדרך או המטרה הסופית), סורק מציג חלון קופץ עם המתנה. התוכן הקופץ תלוי בסוג התגמול שהוגדר בכרטיס.
1. פרס = Award (מתנה מיידית בטקסט).
[צילום מסך: 0403-StampedAndGetAward.png]
על המסך - הטקסט והתמונה של המתנה (“קפה חינם”, “מאפה אחד חינם” וכו’). איש הצוות מציג את המסך ללקוח ומעביר את המתנה המובטחת.
2. פרס = שובר (Smart Voucher עם Redeem Code).
[צילום מסך: 0404-StampedAndGetVoucher.png]
החלון הקופץ שובר לא נעול! עם תמונה, כותרת שובר ומספר שובר ‘#XXXXXXX’. שלוש פעולות:
- השתמש בשובר (כפתור ירוק) - מימוש השובר ישירות בסורק. אם השובר מופעלת האפשרות Redeem Code, המסך מציג את טקסט הקוד + QR + ברקוד. הצוות מזין / סורק את הקוד לתוך POS. השובר עובר ל’מומש’ ולא ניתן להשתמש בו שוב.
- ראה את כל השוברים - פתח את רשימת כל השוברים של הלקוח (למשל, אם הלקוח רוצה לממש קודם שובר אחר).
- סגור - סגור את החלון הקופץ; השובר נשאר פעיל והלקוח יכול להשתמש בו מאוחר יותר.
3. פרס = Lottery (תיקו).
[צילום מסך: 0405-StampedAndGetLottery.png]
מסך ההגרלה נפתח במכשיר של איש הצוות. הצוות מוסר את המכשיר ללקוח (או מציג את המסך) ומבקש ממנו להקיש על “הפעל”. לאחר הספין, אחת מהוריאנטים מופעלת ולאחר מכן מטופלת בתור Award או שובר (ראה למעלה).
[צילום מסך: 0406-LotteryUsed.png]
מימוש עצמי של שובר במצב ידני
[צילום מסך: 0407-CustomerVouchers.png] [צילום מסך: 0408-VoucherUsed.png]
אם הלקוח מגיע למתנה שהובטחה מאוחר יותר (לא מיד לאחר קבלתה), הצוות פותח את הכרטיס ועובר ללשונית שוברים (N). כל השוברים של הלקוח גלויים כאן. הצוות מקיש על הימני ← השובר נפתח עם השתמש בשובר ← אישור ← מצב ‘מומש’.
אבטחה: מכונת מצב השובר (מונפקת → פעילה → מומשה → פג תוקפו) מונעת שימוש כפול. לאחר ‘מימוש’ השובר (או צילום המסך שלו) לא יפעל שוב.
9.4 Autopilot Mode - סריקת רקע בקופה
[צילום מסך: 0101-WaitingScans_AutoPilotMode.png]
Autopilot Mode הוא תת-מצב של Manual Mode בו מוסיפים חותמות ברקע, ללא אישורים וללא מודלים. אידיאלי לשעות השיא בבית קפה, מזון מהיר, מאפייה, שטיפת מכוניות - בכל מקום שיש תור והשירות לא יכול להאט.
איך להפעיל את זה
במסך הראשי Manual Mode, הפוך את המתג Auto-Stamp (Scanner Only) בפינה השמאלית העליונה ל”פועל” (ירוק). המסך משתנה:
- הסמל עובר לתמונת סורק חיצוני.
- הכותרת הראשית היא: Auto-Stamp מצב פעיל.
- כותרת המשנה: “המערכת מוסיפה חותמות אוטומטית רק עבור קלט סורק.”
איך זה עובד
הביטוי “Scanner Only” אומר שבמצב זה חותמות מתווספות רק באמצעות קלט מסורק חומרה (סורק ברקוד USB או Bluetooth חיצוני המחובר למחשב/טאבלט). הלחצנים Use Camera ו-Search Customer נשארים גלויים על המסך וזמינים אם אתה צריך אותם, אך הם אינם משמשים בפעולת Autopilot רגילה - הם משמשים כגיבוי (למשל, אם הסורק לא אסף את הלקוח ואתה צריך למצוא אותם באופן ידני).
זרימת עבודה:
- הצוות לוקח את ההזמנה כרגיל (בקופה, דלפק הבר, הכביסה).
- בעת התשלום או מיד לאחר מכן, הלקוח מציג את כרטיס הארנק שלו.
- הסורק החיצוני תופס את ה-QR “כברקוד”.
- 7Stamp Scanner מוסיף את החותמת לכרטיס הלקוח ברקע.
- אין מודאלי — התור לא עוצר.
- הלקוח רואה את עדכון ההתקדמות מאוחר יותר בארנק שלו באמצעות הודעת PUSH.
מה שאתה צריך
- סורק ברקוד: USB או Bluetooth, מסוגל לקרוא קודי QR. דגמים סטנדרטיים של Honeywell, Zebra, Datalogic יצליחו. יש להגדיר את הסורק לאמולציית מקלדת (מצב HID).
- מכשיר קבוע בקופה: מחשב נייד או טאבלט עם
scanner.7stamp.comפתוח או עם אפליקציית Android/iOS. - אינטרנט יציב — כל חותמת עוברת לענן בזמן אמת.
מימוש עצמי של שובר ב-Autopilot
ב-Autopilot הצוות לא סורק פיזית את כרטיס הארנק ב”מצב דיאלוג” - הם עובדים בתור. אבל הלקוח יכול להשתמש בשובר שלו במקום, וזה לא מצריך החלפת מצבים. בעמוד הכרטיס בארנק יש ללקוח קישור לתלושיו. בפתיחתו, הלקוח או:
- קורא את Redeem Code לקופאית, שמכניסה אותו לקופה (אם הקופה תומכת בקודי קידום), או
- מציג את QR/ברקוד על מסך הטלפון שלהם, והקופאית סורקת אותו עם הסורק החיצוני.
לאחר מכן השובר עובר ל’מומש’ ולא ניתן עוד לעשות בו שימוש חוזר. לחלופין, הקופאי יכול לכבות זמנית את הלחצן Auto-Stamp, לפתוח את כרטיס הלקוח באופן ידני ולממש את השובר באמצעות השתמש בשובר.
מתי לחזור ל-Manual
בכל רגע הצוות יכול לכבות את המתג Auto-Stamp ולחזור לסריקה ידנית - למשל, אם הלקוח מגיע עם בעיה (איבד שובר, רוצה להתאים את החותמות באופן ידני) או שאתה צריך לחפש אותם לפי שם/אימייל. כל התכונות Manual Mode זמינות - חיפוש, סריקת מצלמה, הנפקה ידנית של שובר ומימוש.
9.5 Kiosk Mode — שירות עצמי ללקוח
Kiosk Mode הוא מצב שירות עצמי במסך מלא שבו הטאבלט פונה אל הלקוח והלקוח סורק את הכרטיס שלו. הצוות אינו מעורב בתהליך כלל - ומכאן “אפס הכשרת צוות”. זה אידיאלי לבתי קפה, מאפיות, מסעדות מזדמנות מהירות, קמעונאות קלה, שטיפת מכוניות.
[צילום מסך: Kiosk_Bakery.png]
Kiosk Mode הגדרה
שלב 1. עבור לקיוסק.
[צילום מסך: 0101_SwitchToKioskMode.png]
בתפריט הצד (☰) בחר Kiosk Mode. האפליקציה נכנסת למצב הגדרה.
Make הקפידו לקרוא את הטיפים על המסך כיצד “להצמיד” את האפליקציה בטאבלט אנדרואיד או אייפד כך שהלקוח לא יוכל למזער או לסגור אותה (מה שנקרא מצב קיוסק של המכשיר). אלו הן תכונות המערכת של הטאבלט שלך - קרא את הרמז על המסך שלנו, או את המדריך למכשיר שלך.
שלב 2. בחר את הכרטיס להצגה.
[צילום מסך: 0201_StartKiosk_Select_Card.png]
אם לעסק שלך יש מספר כרטיסי חותמת (למשל, כרטיס נפרד לקפה ואחר למאפה), בחר את הכרטיס שיוצג בטאבלט הספציפי הזה. אתה יכול להגדיר מספר טאבלטים עבור כרטיסים שונים.
שלב 3. אפשרויות נוספות.
[צילום מסך: 0202_StartKiosk_Options.png]
הגדרות השקת קיוסק נוספות.
ראשית - ערכת הצבעים. אתה יכול להפעיל את Kiosk בלוח הצבעים של הכרטיס שלך או לבחור אחד מהסטים המוגדרים מראש שלנו. נסה את האפשרות שנראית לך הכי טוב!
האפשרות החשובה ביותר היא מנע סריקות מיידיות. זה חוסם את אותו לקוח מלהרוויח חותמת פעמיים ברציפות: אם האפשרות מופעלת, סריקה חוזרת רק מראה ללקוח את התוצאה הקודמת שלו (התגמול/המסך האחרון שמוצג), ולא מוסיפים stamp. זה מגן מפני סריקות כפולות בשוגג בדלפק.
לאחר אישור - קיוסק מופעל.
Kiosk Mode מסך ראשי
[צילום מסך: 0301_Main.png]
מה הלקוח רואה כשניגש לטאבלט:
- למעלה - לוגו ושם העסק שלך (שלוף מהגדרות הכרטיס).
- כותרת: איסוף חותמות קבל פרסים.
- קרוסלת ‘התגמול שלך’ - מציגה את המתנה הסופית (ועם תגמולי אבני דרך, כולם ביניים). ניתן להחליק.
- כפתור שחור גדול 📱 סרוק את הכרטיס שלך עם תווית המשנה “קבל את החותמת הבאה שלך על ידי סריקת הכרטיס.” (או “החזק את הטלפון ליד הקורא” - הטקסט מותאם).
- בתחתית - בלוק הלקוח החדש: אין כרטיס עדיין? “סרוק QR-קוד והוסף כרטיס לארנק שלך” עם דף ההצטרפות QR.
תרחיש לקוח ב-Kiosk Mode
- הלקוח מגיע למעמד הטאבלט.
- אם כבר יש להם כרטיס ← פתח את הארנק ← הקש על סרוק את הכרטיס שלך ← החזק את מסך הארנק למצלמת הטאבלט ← חותמת נוספת.
- אם אין להם עדיין כרטיס ← סרוק את ה-No Card Yet? QR עם מצלמת הטלפון שלהם ← הכרטיס נשמר בארנק באופן מיידי ← הקש על סרוק את הכרטיס שלך ← קבל את החותמת הראשונה שלהם.
מה הלקוח רואה בהגעה למטרה
פרס = Award.
[צילום מסך: 0501_RewardUnlocked_Award.png]
מסך מזל טוב! במסך מלא עם תמונת המתנה ותיאורה. הלקוח מראה את המסך לצוות ואוסף את המתנה המובטחת.
פרס = שובר.
[צילום מסך: 0502_RewardUnlocked_Voucher.png]
א מזל טוב! שובר לא נעול! מסך עם כרטיס השובר. הלקוח יכול לממש את השובר בעצמו ישירות בקיוסק - כפתור השימוש פותח מסך עם Redeem Code (טקסט + QR + ברקוד) שהלקוח מראה לקופאית, שסורקת או מכניסה את הקוד לקופה. לאחר מימוש השובר עובר ל’מומש’ ולא ניתן להשתמש בו שוב, גם אם הלקוח שמר צילום מסך.
בתחתית - כפתורים:
- My Vouchers — ראה את כל השוברים שלי.
- נסגר בעוד 12 שניות - ספירה לאחור לחזרה אוטומטית למסך הראשי.
זהו דפוס קיוסק חשוב: סגירה אוטומטית. בלעדיו הטאבלט היה “תקוע” על מסך של לקוח אחד עד שהצוות יתערב. הספירה לאחור מבטיחה שהטאבלט יחזור תמיד למסך התחלה נקי 10-15 שניות לאחר פעולה.
פרס = Lottery.
[צילום מסך: 0503_RewardUnlocked_Lottery.png]
הלקוח מסובב את ההגרלה על המסך בעצמו - מכונאי משחק נעים. לאחר ירידת וריאנט ([צילום מסך: 0504_RewardUnlocked_LotteryUsed.png]), המסך מתנהג כמו Award או שובר למעלה.
צפייה בשוברים של הלקוח
[צילום מסך: 0601_Vouchers.png]
בכל רגע הלקוח יכול להקיש על My Vouchers במסך הראשי של קיוסק ולראות את כל השוברים הפעילים שלו. זה נוח: אם ללקוח יש שובר שלא נעשה בו שימוש מביקור קודם, הוא יכול להראות אותו לצוות מיד מבלי לפתוח את הארנק.
דרישות טכניות לדוכן קיוסק
- טאבלט: 10 אינץ’ או 12 אינץ’ אייפד / טאבלט אנדרואיד. ככל שהמסך גדול יותר, כך נוח יותר ללקוח. אנחנו אוהבים את האייפד מיני.
- מעמד: קבוע, מול הלקוח. המעמד אמור לאפשר להם להחזיק טלפון ארנק עד מצלמת הטאבלט.
- כוח: חיבור קבוע לרשת החשמל. קיוסק פועל כל היום.
- אינטרנט: Wi-Fi אמין או 4G נייד.
- אופציונלי — כרטיס הוראות פשוט ליד המעמד: “1) פתח את הכרטיס שלך בארנק. 2) החזק אותו אל המצלמה. 3) בוצע!” - בשתי שפות אם יש לך אורחים בינלאומיים. אם כי טאבלט הממוקם היטב עם ממשק המשתמש של הקיוסק שלנו בדרך כלל מטפל בתפקיד זה בעצמו.
9.6 Terminal Mode — נאמנות במסוף תשלום
Terminal Mode מפעיל נאמנות ישירות על מסוף תשלום קיים של Android. זה אידיאלי עבור רוכשים, מעבדי תשלומים, ISOs, וכל סוחר שכבר יש לו מסוף בקופה ורוצה נאמנות ללא חומרה חדשה.
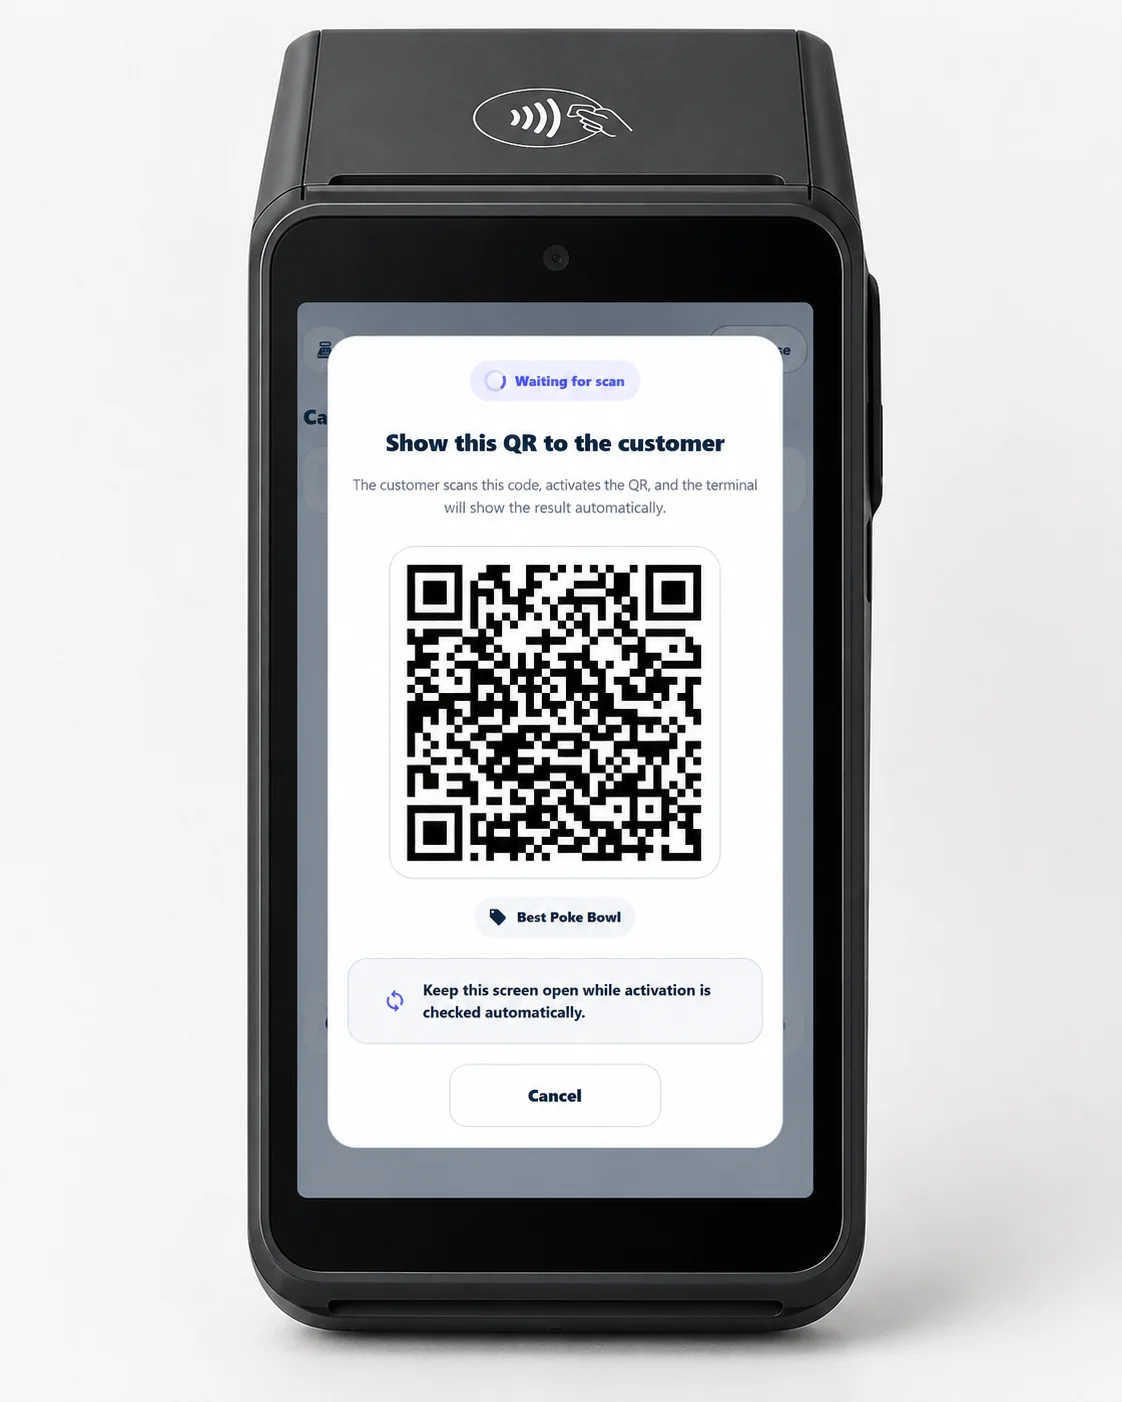
איך זה עובד
- הלקוח משלם במסוף כרגיל.
- 7Stamp Scanner app נפתח - אוטומטית עם אינטגרציה קלה, או בהקשה אחת על ידי הקופאית.
- הקופאי מקיש Serve customer; קוד QR דינמי ייחודי מופיע על מסך המסוף.
- הלקוח סורק את QR עם הטלפון שלו. נוצר כרטיס חדש ונשמר בארנק (עם ה-stamps הראשון), או שכרטיס קיים מתעדכן באופן מיידי.
מוסיף חותמות
ניתן להוסיף חותמות כסכום קבוע (אחד לקנייה) או לפי סכום (הקופאית מכניסה את סך הקבלות במסוף).
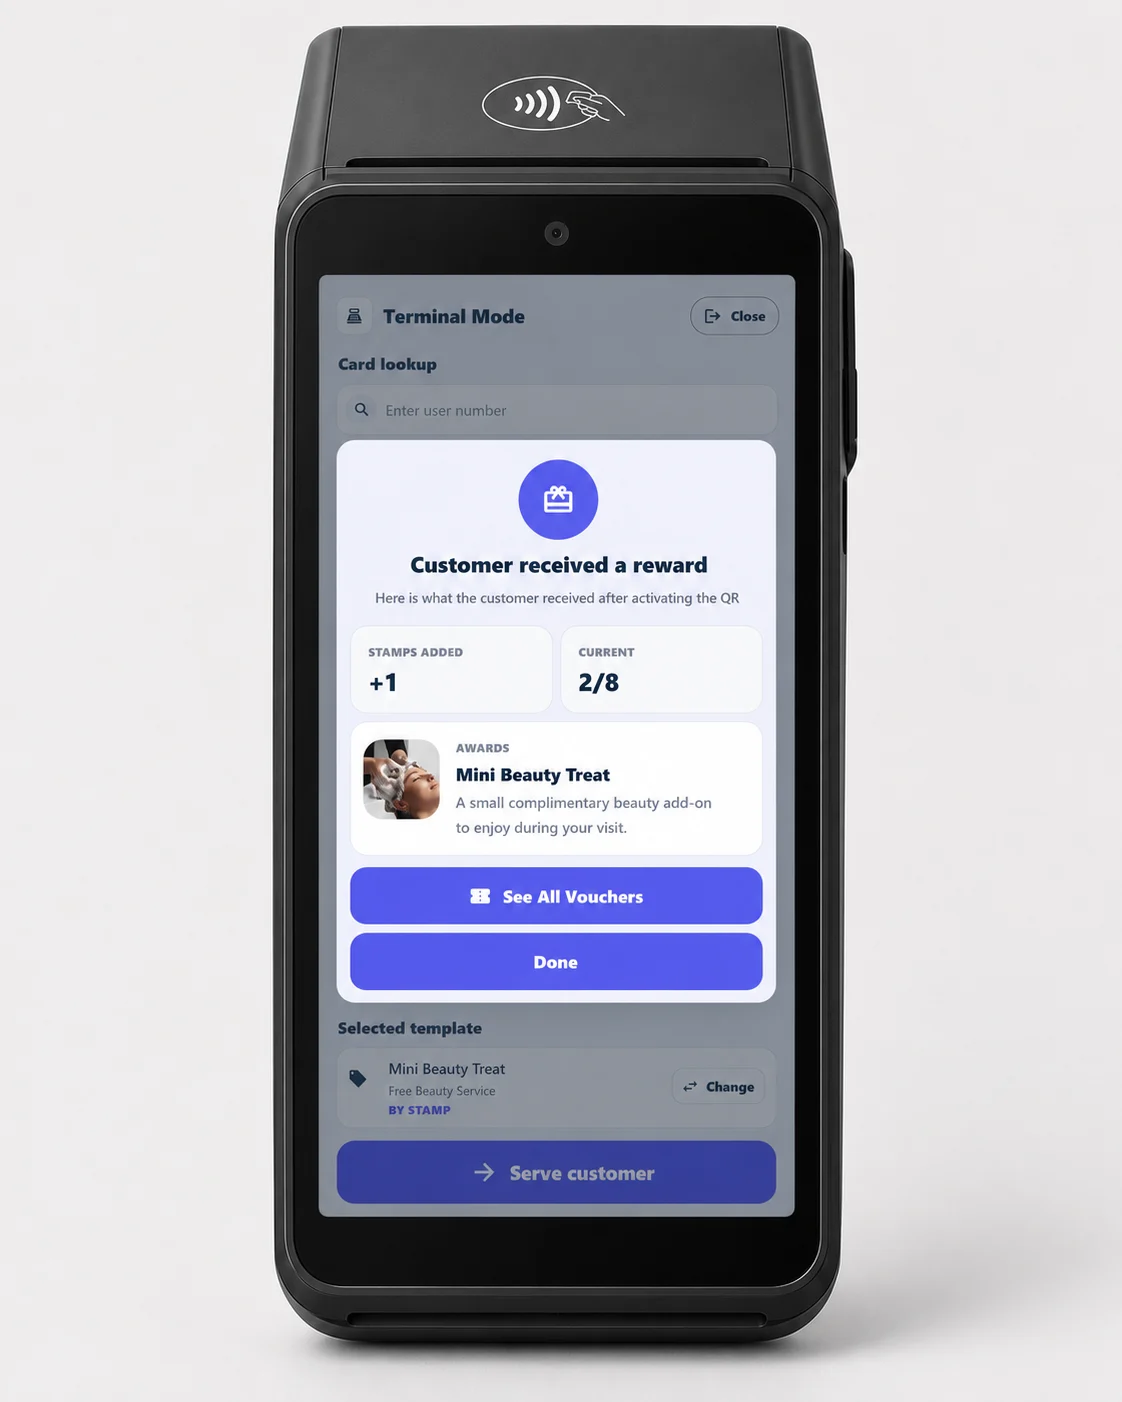
תגמולים בטרמינל
- Award: הטרמינל מבקש מהקופאי למסור את המתנה כאשר המטרה מושגת.
- Smart Voucher: בביקור מאוחר יותר, הקופאית פותחת את השוברים של הלקוח בטרמינל (או מכניסה את מספר השובר) ומממשת אחד בהקשה.
- Lottery: הלקוח מסובב את ההגה בטלפון שלו; התוצאה מופיעה במסך הטרמינל.
התקנה על הטרמינל
התקן את ה-7stamp Scanner app מ-Google Play או פרוס את ה-APK ישיר בצי המסופים שלך.
אינטגרציות מתקדמות (על פי בקשה)
הקשה לאיסוף מעל Apple VAS ו-Google Smart Tap - הנקראת על ידי אפליקציית התשלום של הטרמינל במסוף מוסמך VAS/Smart Tap - ונאמנות מקושרת לכרטיס (התאמת אסימון רשת ברמת המעבד), הן אינטגרציות מתקדמות הזמינות לפי בקשה.
לפרטים שותפים ומסחריים, ראה רוכשים ורשתות תשלום ו-Terminal Mode.
9.7 כיצד לבחור מצב - השוואה
| פָּרָמֶטֶר | Manual Mode | Autopilot Mode | Kiosk Mode | Terminal Mode |
|---|---|---|---|---|
| מי סורק | צוות באמצעות טלפון/מצלמה | סורק חיצוני “כבברקוד” | הלקוח עצמו על הדוכן | הלקוח סורק QR במסך המסוף |
| סוג העסק | שירות פרימיום, סלונים, מסעדות | בתי קפה, מזון מהיר, דלפקים עמוסים | בתי קפה, מאפיות, שטיפת מכוניות, קמעונאות קלה | כל סוחר עם מסוף תשלום; עזבונות רוכש/מעבד |
| חוּמרָה | מצלמת מכשיר | סורק QR חיצוני | טאבלט בגודל 10–12 אינץ’ + מעמד | מסוף תשלום אנדרואיד קיים |
| איפה זה חי | טלפון/טאבלט לצוות | מחשב נייד/טאבלט בקופה | טאבלט על מעמד מול הלקוח | מסוף התשלום בקופה |
| סיכון הכשרת צוות | מינימלי (הקשה אחת) | אפס (עבודת רקע) | אפס (הלקוח עושה את זה) | מינימלי (הקשה אחת: “Serve customer”) |
| Lottery | הלקוח משחק ממסך הצוות | זמין באמצעות פעולה ידנית | הלקוח משחק את זה בעצמו | הלקוח משחק בטלפון שלו; תוצאה במסוף |
ניתן להשתמש במספר מצבים בו-זמנית. לדוגמה, מלון עם מסעדה וספא: בספא — Manual Mode (פרימיום, קשר אישי); בבית הקפה של המסעדה - Kiosk Mode על דוכן (מהיר, ללא מעורבות מלצר); בקבלה - Autopilot לקבועים. Staff Seat אחד תומך בכניסה אחת בכל פעם; אם אתה צריך כמה נקודות בו זמנית, הוסף Staff Logins במנהל המערכת.
9.8 טיפים מעשיים להפעלת סורק
- בדוק לפני הפתיחה. בצע 5-10 סריקות ניסיון עם כרטיס משלך בבוקר לפני המשמרת - וודא שהמצלמה מתמקדת, שהאינטרנט עובד, והחותמות מתווספות.
- ** בטאבלט Kiosk, השבת את הנעילה האוטומטית ואת ההתראות.** אף אחד לא צריך לצאת בטעות למערכת ההפעלה או לקבל התראה תועה. ב-iOS השתמש ב-גישה מודרכת, ב-Android הצמדת מסך.
- עבור הפסקות אינטרנט שמור תוויות QR מודפסות בקרבת מקום (מיצוא מהמנהל) - הלקוח סורק אותן בעצמו ומקבל את הכרטיס גם אם סורק אינו זמין באופן זמני.
- בצוות חדש. כל חבר משמרת חדש צריך לדעת חמישה דברים: כיצד להיכנס ל-Scanner, כיצד לסרוק כרטיס, כיצד להוסיף חותמת, כיצד לטפל ב-
Voucher Unlocked!, כיצד לממש שובר מהכרטיסייהשוברים. חמש דקות אימון. - יומן האירועים האחרון בתחתית Manual Mode הוא יומן העבודה שלך. אם הלקוח מתלונן “ה-stamp לא עבר”, בדוק את זה: תראה את השעה, תעודת הזהות של הכרטיס ומה הונפק / נעשה בו שימוש.
הדרכה חזותית
השתמשו במערכות המסכים למטה כמדריך חזותי למאמר. פתחו כל תמונה כדי לבחון אותה בגודל מלא.