
రెఫరెన్స్
7Stamp Scanner అనేది సిబ్బంది, కస్టమర్లు, కియోస్క్లు మరియు ఆండ్రాయిడ్ చెల్లింపు టెర్మినల్స్ కోసం పని చేసే యాప్.
9. 7Stamp Scanner అప్లికేషన్ — మాన్యువల్ / Autopilot / కియోస్క్ / Terminal Mode
7Stamp Scanner అనేది సిబ్బంది, కస్టమర్లు, కియోస్క్లు మరియు ఆండ్రాయిడ్ చెల్లింపు టెర్మినల్స్ కోసం పని చేసే యాప్. కార్డ్ స్కాన్ను స్టాంపింగ్, వోచర్ రిడెంప్షన్, లాటరీ స్పిన్నింగ్ మరియు Terminal Mode చెక్అవుట్ లాయల్టీగా మార్చడం దీని పని. ఇది భౌతికంగా వరకు, సిబ్బంది జేబులో, కస్టమర్-ఫేసింగ్ స్టాండ్లో లేదా ఇప్పటికే చెక్అవుట్లో కూర్చున్న చెల్లింపు టెర్మినల్లో కూర్చుంటుంది. ఒక స్టాఫ్ లాగిన్ ప్రధాన స్కానర్ మోడ్లకు యాక్సెస్ ఇస్తుంది - మోడ్ ఎంపిక మీ వ్యాపారం యొక్క వేగం మరియు సేవా దృష్టాంతంపై ఆధారపడి ఉంటుంది.
[స్క్రీన్షాట్: 1101_How_To_Scanpng.png]
9.1 ఎక్కడ 7Stamp Scanner నడుస్తుంది
వెబ్ వెర్షన్ (ఏదైనా పరికరం): స్కానర్.7stamp.com
- ఏదైనా ఆధునిక బ్రౌజర్లో పని చేస్తుంది: స్మార్ట్ఫోన్, టాబ్లెట్ లేదా కంప్యూటర్లో.
- ఇన్స్టాల్ చేయవద్దు — పేజీని తెరిచి, మీ Staff Loginని నమోదు చేయండి, పనిని ప్రారంభించండి.
- టిల్లో షేర్డ్ వర్క్ ల్యాప్టాప్, స్టాండ్పై టాబ్లెట్, కెమెరాతో ఏదైనా Windows/Mac/Linux పరికరానికి అనువైనది.
- మీరు బాహ్య స్కానర్ను కనెక్ట్ చేయవచ్చు మరియు దానితో కస్టమర్ కార్డ్లను స్కాన్ చేయవచ్చు. కాన్ఫిగరేషన్ అవసరం లేదు.
Android: Google Play · డైరెక్ట్ APK iOS: యాప్ స్టోర్
- స్థానిక యాప్ — వేగంగా నడుస్తుంది, ఫోన్ కెమెరాను మెరుగ్గా ఉపయోగిస్తుంది.
- వారి స్వంత ఫోన్ల నుండి పని చేసే సిబ్బందికి (ప్రీమియం సర్వీస్, ఫీల్డ్ వర్క్, డెలివరీ) బాగా సరిపోతుంది.
- మీరు బాహ్య స్కానర్ని కనెక్ట్ చేయవచ్చు మరియు దానితో కస్టమర్ కార్డ్లను స్కాన్ చేయవచ్చు (ఇందులో Autopilot మోడ్ను పరిగణించండి).
- కియోస్క్ మోడ్లో టాబ్లెట్లో రన్ చేయవచ్చు.
- డైరెక్ట్ APK — యాప్ ప్యాకేజీని నేరుగా
https://downloads.7stamp.com/7stamp-scanner.apkనుండి డౌన్లోడ్ చేయండి. Android చెల్లింపు టెర్మినల్ల కోసం మరియు అనేక పరికరాల్లో యాప్ని కేంద్రంగా అమలు చేయడం కోసం ఉపయోగపడుతుంది.
ఏమి ఎంచుకోవాలి. మీకు టిల్ వద్ద Android టాబ్లెట్ లేదా కౌంటర్లో iPad ఉంటే — స్థానిక యాప్ను ఇన్స్టాల్ చేయండి. మీరు వివిధ పరికరాల నుండి పని చేస్తున్నట్లయితే లేదా ఒకే భాగస్వామ్య కంప్యూటర్ను ఈ సమయంలో ఉపయోగిస్తుంటే — వెబ్ వెర్షన్ https://scanner.7stamp.comతో వెళ్లండి. సిబ్బంది కింద అడ్మిన్ ప్యానెల్లో ప్రవేశానికి లాగిన్ మరియు పాస్వర్డ్ సృష్టించబడతాయి.
9.2 లాగిన్ మరియు నావిగేషన్
[స్క్రీన్షాట్: 0101-Login.png]
మీరు అడ్మిన్లో సృష్టించిన అదే Staff Loginతో మీరు ఏదైనా ప్లాట్ఫారమ్ (వెబ్ / ఆండ్రాయిడ్ / iOS) నుండి లాగిన్ చేయవచ్చు (సిబ్బంది → + సృష్టించు → Staff Login సృష్టిస్తోంది). లాగిన్ అయిన తర్వాత, యాప్ ఆటోమేటిక్గా మీ బిజినెస్ ప్రొఫైల్కి లింక్ చేస్తుంది.
** సైడ్ మెను (ఎగువ ఎడమవైపు ☰ చిహ్నంతో తెరవబడుతుంది):**
- Manual Mode — మాన్యువల్ స్కానింగ్ మోడ్ (డిఫాల్ట్).
- Kiosk Mode — కస్టమర్ స్వీయ-సేవ మోడ్.
- అడ్మిన్ ప్యానెల్ తెరవండి — అడ్మిన్కి శీఘ్ర లింక్ (
admin.7stamp.com). - లాగ్ అవుట్ — సైన్ అవుట్ చేయండి (మెను దిగువన, ఎరుపు బటన్).
మీరు మెను ద్వారా మాన్యువల్ మరియు Autopilot మధ్య “మోడ్లను మార్చాల్సిన అవసరం లేదు”. Autopilot అనేది Manual Mode యొక్క ఉప-మోడ్, ప్రధాన స్క్రీన్పై నేరుగా ఒకే స్విచ్తో టోగుల్ చేయబడింది (క్రింద చూడండి).
9.3 Manual Mode — సిబ్బంది చేతితో స్కాన్ చేస్తున్నారు
[స్క్రీన్షాట్: 0201-WaitingScansManualMode.png]
Manual Mode అనేది సిబ్బంది స్వయంగా కస్టమర్ కార్డ్ని స్కాన్ చేసే ప్రాథమిక దృశ్యం. ప్రీమియం సేవలో (బ్యూటీ సెలూన్లు, బార్బర్షాప్లు, స్పా, సిట్-డౌన్ రెస్టారెంట్లు) ఉపయోగించబడుతుంది, ఇక్కడ స్టాంపింగ్ కస్టమర్తో వ్యక్తిగత పరస్పర చర్యలో భాగం.
Manual Mode ప్రధాన స్క్రీన్
- హెడర్ సూచిక: కార్డ్ స్కాన్ కోసం వేచి ఉంది — యాప్ స్కాన్ని ఆమోదించడానికి సిద్ధంగా ఉంది.
- ఎగువ కుడి — Auto-Stamp (Scanner Only) టోగుల్ (మాన్యువల్లో ఆఫ్).
- స్క్రీన్ దిగువన — ఇటీవలి షిఫ్ట్ ఈవెంట్ లాగ్ (జారీ చేయబడిన / ఉపయోగించిన / తొలగించబడిన వోచర్లు). ప్రతి ఎంట్రీ ట్యాప్ చేయదగినది మరియు వివరాలను తెరుస్తుంది.
- చాలా దిగువన — రెండు చర్య బటన్లు:
- 🔍 Search Customer — పేరు, ఇమెయిల్, ఫోన్ లేదా కార్డ్ నంబర్ ద్వారా కస్టమర్ని కనుగొనండి.
- 📷 Use Camera — పరికర కెమెరాను తెరిచి, కస్టమర్ కార్డ్ QRని స్కాన్ చేయండి.
కస్టమర్ని మరియు స్టాంప్ కార్డ్ని కనుగొనడానికి నాలుగు మార్గాలు
1. పరికరం కెమెరాతో స్కాన్ చేస్తోంది (Use Camera). పని చేయడానికి ప్రధాన మార్గం.
[స్క్రీన్షాట్: 0302-ScanByCamera.png]
స్టాఫ్ మెంబర్ Use Cameraని నొక్కి, ఫోన్/టాబ్లెట్ కెమెరాను కస్టమర్ కార్డ్ QR (కస్టమర్ Apple Wallet లేదా Google Walletలో తెరిచి స్క్రీన్ను చూపుతుంది) వద్దకు పాయింట్ చేస్తాడు, యాప్ ఒక సెకనులో కోడ్ని గుర్తించి, వెంటనే కస్టమర్ కార్డ్ని తెరుస్తుంది.
2. బాహ్య స్కానర్తో కస్టమర్ కార్డ్ని స్కాన్ చేస్తోంది.
మీ పరికరానికి స్కానర్ని కనెక్ట్ చేయండి మరియు దానితో కస్టమర్ కార్డ్ని స్కాన్ చేయండి.
3. కస్టమర్ శోధన (Search Customer). కస్టమర్ చేతిలో తమ ఫోన్ లేనప్పుడు ఫాల్బ్యాక్.
[స్క్రీన్షాట్: 0301-CustomerSearch.png]
ఎప్పుడు ఉపయోగపడుతుంది:
- కస్టమర్ వారి ఫోన్ను విడిచిపెట్టడం లేదా ఖాళీ చేయడం;
- కస్టమర్ ఇప్పుడే సైన్ అప్ చేసారు మరియు కార్డ్ ఎక్కడ తెరవబడుతుందో ఇంకా గుర్తించలేదు;
- సిబ్బంది నియామకం ద్వారా పని చేస్తారు మరియు కస్టమర్ కార్డును ముందుగానే తెరుస్తారు.
శోధన పేరు, ఇమెయిల్ లేదా కార్డ్ నంబర్ ద్వారా పని చేస్తుంది.
4. ప్రత్యక్ష వోచర్ శోధన (వోచర్ శోధన). కస్టమర్ చేతిలో వోచర్తో (ఉదా., ముద్రించిన కాగితం) వచ్చి దానిని రీడీమ్ చేయాలనుకున్నప్పుడు. మీరు శోధనలో వోచర్ నంబర్ను నమోదు చేయవచ్చు, బాహ్య స్కానర్తో స్కాన్ చేయవచ్చు లేదా పరికర కెమెరాతో స్కాన్ చేయవచ్చు.
స్కాన్ చేసిన తర్వాత కస్టమర్ కార్డ్
[స్క్రీన్షాట్: 0401-CustomerCard.png]
కార్డ్ కనుగొనబడిన తర్వాత, కస్టమర్ కార్డ్ రెండు ట్యాబ్లతో తెరవబడుతుంది:
- సమాచారం — ప్రాథమిక సమాచారం (పేరు, ఇమెయిల్, కార్డ్ ID
#XXXXXX, సవరణతో పుట్టినరోజు ✏️). - వోచర్లు (N) — ఈ మొత్తం కస్టమర్ వోచర్ల జాబితా: సక్రియం, రీడీమ్ చేయబడింది, గడువు ముగిసింది.
ఎగువ ప్రాంతంలో ఎరుపు రంగు రీసెట్ స్టాంపులు బటన్ ఉంది — ఇది కస్టమర్ యొక్క స్టాంపులను రీసెట్ చేయడానికి మిమ్మల్ని అనుమతిస్తుంది (ఉదా., వారు తుది లక్ష్యాన్ని మూసివేసినట్లయితే, రివార్డ్ పొంది, మీరు కొత్త కార్డ్ని ప్రారంభించాలనుకుంటున్నారు). గమనిక. మీరు కార్డ్ని రీసెట్ చేయనవసరం లేదు: మీరు తదుపరిసారి రీసెట్ చేయకుండా తుది లక్ష్యంపై స్కాన్ చేస్తే, సిస్టమ్ కొత్త పునరావృతం యొక్క మొదటి స్టాంప్ను చక్రీయంగా ఉంచుతుంది.
స్టాంప్ నియంత్రణలు
[స్క్రీన్షాట్: 0402-Stamped.png]
స్క్రీన్ దిగువన — స్టాంప్ నియంత్రణలు:
- 🟢 + (ఆకుపచ్చ) — స్టాంప్ జోడించండి.
- 🔴 − (ఎరుపు) — స్టాంప్ (మీరు పొరపాటు చేస్తే) తొలగించండి.
- − / + ఉన్న పరిమాణ ఫీల్డ్ — ఒకేసారి అనేక స్టాంపులు జోడించండి (ఉదా., కార్డ్ `మొత్తం ద్వారా“ని ఉపయోగిస్తే మరియు కస్టమర్ పెద్ద మొత్తాన్ని వెచ్చిస్తే).
- 🔍 Search Customer — వేరే కస్టమర్ని తెరవండి.
- 📷 — మళ్లీ స్కాన్ చేయండి.
లక్ష్యాన్ని చేరుకోవడానికి మూడు దృశ్యాలు
స్టాంప్ కస్టమర్ను ఒక లక్ష్యానికి (మైలురాళ్లలో ఒకటి లేదా చివరి లక్ష్యం) తీసుకువచ్చినప్పుడు, స్కానర్ బహుమతితో కూడిన పాప్అప్ను చూపుతుంది. పాప్అప్ కంటెంట్లు కార్డ్పై కాన్ఫిగర్ చేయబడిన రివార్డ్ రకంపై ఆధారపడి ఉంటాయి.
1. రివార్డ్ = Award (తక్షణ వచన బహుమతి).
[స్క్రీన్షాట్: 0403-StampedAndGetAward.png]
తెరపై — బహుమతి వచనం మరియు చిత్రం (“ఉచిత కాఫీ”, “1 ఉచిత పేస్ట్రీ” మొదలైనవి). స్టాఫ్ మెంబర్ కస్టమర్కు స్క్రీన్ని చూపి, వాగ్దానం చేసిన బహుమతిని అందజేస్తారు.
2. రివార్డ్ = వోచర్ (Smart Voucherతో Redeem Code).
[స్క్రీన్షాట్: 0404-StampedAndGetVoucher.png]
చిత్రం, వోచర్ శీర్షిక మరియు వోచర్ నంబర్ #XXXXXXXతో వోచర్ అన్లాక్ చేయబడింది! పాప్అప్. మూడు చర్యలు:
- వోచర్ ఉపయోగించండి (ఆకుపచ్చ బటన్) — స్కానర్లోనే వోచర్ను రీడీమ్ చేయండి. వోచర్లో Redeem Code ఎంపిక ప్రారంభించబడి ఉంటే, స్క్రీన్ కోడ్ టెక్స్ట్ + QR + బార్కోడ్ను చూపుతుంది. సిబ్బంది కోడ్ను POSలోకి ప్రవేశిస్తారు / స్కాన్ చేస్తారు. వోచర్
రిడీమ్ చేయబడిందికి తరలించబడింది మరియు మళ్లీ ఉపయోగించబడదు. - అన్ని వోచర్లను చూడండి — అన్ని కస్టమర్ వోచర్ల జాబితాను తెరవండి (ఉదా., కస్టమర్ ముందుగా వేరే వోచర్ని రీడీమ్ చేయాలనుకుంటే).
- మూసివేయి — పాపప్ను మూసివేయండి; వోచర్ సక్రియంగా ఉంటుంది మరియు కస్టమర్ దానిని తర్వాత ఉపయోగించవచ్చు.
3. రివార్డ్ = Lottery (డ్రా).
[స్క్రీన్షాట్: 0405-StampedAndGetLottery.png]
సిబ్బంది సభ్యుని పరికరంలో లాటరీ స్క్రీన్ తెరుచుకుంటుంది. సిబ్బంది పరికరాన్ని కస్టమర్కు అందజేస్తారు (లేదా స్క్రీన్ని చూపుతారు) మరియు “ప్లే చేయి”ని నొక్కమని వారిని అడుగుతారు. స్పిన్ తర్వాత, వేరియంట్లలో ఒకటి కాల్చబడుతుంది మరియు Award లేదా వోచర్గా నిర్వహించబడుతుంది (పైన చూడండి).
[స్క్రీన్షాట్: 0406-LotteryUsed.png]
మాన్యువల్ మోడ్లో వోచర్ యొక్క స్వీయ-విముక్తి
[స్క్రీన్షాట్: 0407-CustomerVouchers.png] [స్క్రీన్షాట్: 0408-VoucherUsed.png]
కస్టమర్ వాగ్దానం చేసిన బహుమతి కోసం తర్వాత వచ్చినట్లయితే (అది స్వీకరించిన తర్వాత సరైనది కాదు), సిబ్బంది వారి కార్డ్ని తెరిచి, వోచర్లు (N) ట్యాబ్కు మారతారు. కస్టమర్ యొక్క అన్ని వోచర్లు ఇక్కడ కనిపిస్తాయి. సిబ్బంది కుడివైపు నొక్కారు → వోచర్ వోచర్ని ఉపయోగించండి → నిర్ధారించండి → స్థితి రిడీమ్ చేయబడిందితో తెరవబడుతుంది.
భద్రత: వోచర్ స్టేట్ మెషీన్ (జారీ చేయబడింది → సక్రియం → రీడీమ్ చేయబడింది → గడువు ముగిసింది) రెండుసార్లు ఉపయోగించడాన్ని నిరోధిస్తుంది. రీడీమ్ చేసిన తర్వాత వోచర్ (లేదా దాని స్క్రీన్షాట్) మళ్లీ పని చేయదు.
9.4 Autopilot Mode — వరకు బ్యాక్గ్రౌండ్ స్కానింగ్
[స్క్రీన్షాట్: 0101-వెయిటింగ్స్కాన్లు_AutoPilotMode.png]
Autopilot Mode అనేది Manual Mode యొక్క ఉప-మోడ్, దీనిలో స్టాంపులు జోడించబడింది నేపథ్యంలో, నిర్ధారణలు మరియు మోడల్లు లేవు. కాఫీ షాప్, ఫాస్ట్ ఫుడ్, బేకరీ, కార్ వాష్ వంటి వాటిలో పీక్ అవర్స్ కోసం అనువైనది — ఎక్కడైనా క్యూలో ఉండి సర్వీస్ నెమ్మదించదు.
దీన్ని ఎలా ఎనేబుల్ చేయాలి
Manual Mode ప్రధాన స్క్రీన్పై, ఎగువ కుడివైపున ఉన్న Auto-Stamp (Scanner Only) టోగుల్ను “ఆన్” (ఆకుపచ్చ)కి తిప్పండి. స్క్రీన్ మారుతుంది:
- ఐకాన్ బాహ్య-స్కానర్ ఇమేజ్కి మారుతుంది.
- ప్రధాన శీర్షిక ఇలా ఉంటుంది: Auto-Stamp మోడ్ యాక్టివ్.
- ఉపశీర్షిక: “సిస్టమ్ స్టాంపులు స్వయంచాలకంగా స్కానర్ ఇన్పుట్ కోసం మాత్రమే.”
ఇది ఎలా పనిచేస్తుంది
“Scanner Only” అనే పదబంధం అంటే ఈ మోడ్లో స్టాంపులు హార్డ్వేర్ స్కానర్ (కంప్యూటర్/టాబ్లెట్కి కనెక్ట్ చేయబడిన బాహ్య USB లేదా బ్లూటూత్ బార్కోడ్ స్కానర్) నుండి ఇన్పుట్ ద్వారా మాత్రమే జోడించబడతాయి. Use Camera మరియు Search Customer బటన్లు స్క్రీన్పై కనిపిస్తాయి మరియు మీకు అవి అవసరమైతే అందుబాటులో ఉంటాయి, కానీ అవి సాధారణ Autopilot ఆపరేషన్లో ఉపయోగించబడవు — అవి బ్యాకప్గా పనిచేస్తాయి (ఉదా., స్కానర్ కస్టమర్ని పికప్ చేయకపోతే మరియు మీరు వాటిని మాన్యువల్గా కనుగొనవలసి ఉంటుంది).
వర్క్ఫ్లో:
- సిబ్బంది యధావిధిగా ఆర్డర్ను తీసుకుంటారు (టిల్ వద్ద, బార్ కౌంటర్, వాష్).
- చెల్లింపు సమయంలో లేదా వెంటనే, కస్టమర్ వారి వాలెట్ కార్డ్ని చూపుతారు.
- బాహ్య స్కానర్ QR “బార్కోడ్గా” పట్టుకుంటుంది.
- 7Stamp Scanner బ్యాక్గ్రౌండ్లో కస్టమర్ కార్డ్కి స్టాంప్ను జోడిస్తుంది.
- మోడల్ లేదు - క్యూ ఆగదు.
- కస్టమర్ ప్రోగ్రెస్ అప్డేట్ని తర్వాత వారి వాలెట్లో పుష్ నోటిఫికేషన్ ద్వారా చూస్తారు.
మీకు ఏమి కావాలి
- బార్కోడ్ స్కానర్: USB లేదా బ్లూటూత్, QR కోడ్లను చదవగలిగే సామర్థ్యం. హనీవెల్, జీబ్రా, డేటాలాజిక్ నుండి ప్రామాణిక నమూనాలు చేస్తాయి. స్కానర్ను కీబోర్డ్ ఎమ్యులేషన్ (HID మోడ్)కి సెట్ చేయాలి.
- వరకు శాశ్వత పరికరం: ల్యాప్టాప్ లేదా టాబ్లెట్
scanner.7stamp.comతో తెరవబడి లేదా Android/iOS యాప్తో. - ** స్థిరమైన ఇంటర్నెట్** — ప్రతి స్టాంప్ నిజ సమయంలో క్లౌడ్కి వెళుతుంది.
Autopilotలో వోచర్ యొక్క కస్టమర్ స్వీయ-విముక్తి
Autopilotలో సిబ్బంది వాలెట్ కార్డ్ని “డైలాగ్ మోడ్”లో భౌతికంగా స్కాన్ చేయరు - వారు క్యూలో పని చేస్తారు. కానీ కస్టమర్ వారి వోచర్ను అక్కడికక్కడే ఉపయోగించవచ్చు**, దానికి మారే మోడ్లు అవసరం లేదు. వాలెట్లోని కార్డ్ పేజీలో కస్టమర్ వారి వోచర్లకు లింక్ను కలిగి ఉన్నారు. దీన్ని తెరవడం, వినియోగదారుడు:
- Redeem Codeని క్యాషియర్కి కాల్ చేస్తాడు, అతను దానిని టిల్లోకి ప్రవేశపెడతాడు (టిల్ ప్రోమో కోడ్లకు మద్దతు ఇస్తే), లేదా
- ** వారి ఫోన్ స్క్రీన్పై QR/బార్కోడ్ను చూపుతుంది** మరియు క్యాషియర్ దానిని బాహ్య స్కానర్తో స్కాన్ చేస్తుంది.
ఆ తర్వాత వోచర్ రిడీమ్ చేయబడిందికి తరలించబడుతుంది మరియు ఇకపై మళ్లీ ఉపయోగించబడదు. ప్రత్యామ్నాయంగా, క్యాషియర్ తాత్కాలికంగా Auto-Stamp టోగుల్ ఆఫ్ చేసి, కస్టమర్ కార్డ్ను మాన్యువల్గా తెరవవచ్చు మరియు వోచర్ ఉపయోగించండితో వోచర్ను రీడీమ్ చేయవచ్చు.
మాన్యువల్కి ఎప్పుడు తిరిగి రావాలి
ఏ క్షణంలోనైనా సిబ్బంది Auto-Stamp టోగుల్ని స్విచ్ ఆఫ్ చేసి, మాన్యువల్ స్కానింగ్కి తిరిగి వెళ్లవచ్చు - ఉదాహరణకు, కస్టమర్ సమస్యతో (వోచర్ను పోగొట్టుకున్నట్లయితే, స్టాంపులను మాన్యువల్గా సర్దుబాటు చేయాలనుకుంటే) లేదా మీరు వాటిని పేరు/ఇమెయిల్ ద్వారా వెతకాలి. అన్ని Manual Mode ఫీచర్లు అందుబాటులో ఉన్నాయి — శోధన, కెమెరా స్కాన్, మాన్యువల్ వోచర్ జారీ మరియు విముక్తి.
9.5 Kiosk Mode — కస్టమర్ స్వీయ-సేవ
Kiosk Mode అనేది పూర్తి-స్క్రీన్ స్వీయ-సేవ మోడ్, దీనిలో టాబ్లెట్ కస్టమర్ను ఎదుర్కొంటుంది మరియు కస్టమర్ వారి స్వంత కార్డ్ని స్కాన్ చేస్తుంది. సిబ్బంది ప్రక్రియలో అస్సలు పాల్గొనరు — అందుకే “సున్నా సిబ్బంది శిక్షణ”. ఇది కాఫీ షాప్లు, బేకరీలు, ఫాస్ట్ క్యాజువల్ రెస్టారెంట్లు, లైట్ రిటైల్, కార్ వాష్లకు అనువైనది.
[స్క్రీన్షాట్: కియోస్క్_Bakery.png]
Kiosk Mode సెటప్
దశ 1. కియోస్క్కి మారండి.
[స్క్రీన్షాట్: 0101_SwitchToKioskMode.png]
సైడ్ మెనులో (☰) Kiosk Mode ఎంచుకోండి. యాప్ సెటప్ మోడ్లోకి ప్రవేశిస్తుంది.
Make ఆండ్రాయిడ్ టాబ్లెట్ లేదా ఐప్యాడ్లో యాప్ను ఎలా “పిన్” చేయాలనే దాని గురించిన ఆన్-స్క్రీన్ చిట్కాలను తప్పకుండా చదవండి, తద్వారా కస్టమర్ దానిని కనిష్టీకరించలేరు లేదా మూసివేయలేరు (పరికరం కియోస్క్ మోడ్ అని పిలవబడేది). ఇవి మీ టాబ్లెట్ సిస్టమ్ లక్షణాలు — మా స్క్రీన్పై సూచనను లేదా మీ పరికరం కోసం మాన్యువల్ను చదవండి.
దశ 2. ప్రదర్శించడానికి కార్డ్ని ఎంచుకోండి.
[స్క్రీన్షాట్: 0201_StartKiosk_Select_Card.png]
మీ వ్యాపారంలో అనేక స్టాంప్ కార్డ్లు ఉంటే (ఉదా., కాఫీ కోసం ప్రత్యేక కార్డ్ మరియు పేస్ట్రీ కోసం మరొక కార్డ్), ఈ నిర్దిష్ట టాబ్లెట్లో చూపబడే దాన్ని ఎంచుకోండి. మీరు వివిధ కార్డ్ల కోసం అనేక టాబ్లెట్లను సెటప్ చేయవచ్చు.
దశ 3. అదనపు ఎంపికలు.
[స్క్రీన్షాట్: 0202_StartKiosk_Options.png]
అదనపు కియోస్క్ లాంచ్ సెట్టింగ్లు.
మొదటిది - రంగు పథకం. మీరు మీ కార్డ్ ప్యాలెట్లో కియోస్క్ని ప్రారంభించవచ్చు లేదా మా ముందే నిర్వచించిన సెట్లలో ఒకదాన్ని ఎంచుకోవచ్చు. మీకు ఉత్తమంగా కనిపించే ఎంపికను ప్రయత్నించండి!
అత్యంత ముఖ్యమైన ఎంపిక తక్షణ స్కాన్లను నిరోధించండి. ఇది ఒకే కస్టమర్ని వరుసగా రెండుసార్లు స్టాంప్ సంపాదించకుండా బ్లాక్ చేస్తుంది: ఎంపిక ఆన్లో ఉంటే, రిపీట్ స్కాన్ కస్టమర్కి వారి మునుపటి ఫలితాన్ని చూపుతుంది (చివరి రివార్డ్ / స్క్రీన్ చూపబడింది), మరియు స్టాంప్ జోడించబడదు. ఇది కౌంటర్ వద్ద ప్రమాదవశాత్తు డబుల్ స్కాన్ల నుండి రక్షిస్తుంది.
నిర్ధారణ తర్వాత — కియోస్క్ లాంచ్ అవుతుంది.
Kiosk Mode ప్రధాన స్క్రీన్
[స్క్రీన్షాట్: 0301_Main.png]
టాబ్లెట్ని సమీపిస్తున్నప్పుడు కస్టమర్ ఏమి చూస్తాడు:
- పైకి — మీ వ్యాపార లోగో మరియు పేరు (కార్డ్ సెట్టింగ్ల నుండి తీసివేయబడింది).
- హెడర్: స్టాంప్లను సేకరించండి రివార్డ్లను పొందండి.
- ఒక
యువర్ రివార్డ్రంగులరాట్నం — తుది బహుమతిని చూపుతుంది (మరియు, మైలురాయి రివార్డ్లతో, అన్ని ఇంటర్మీడియట్ వాటిని). స్వైప్ చేయదగినది. - “కార్డ్ని స్కాన్ చేయడం ద్వారా మీ తదుపరి స్టాంప్ను పొందండి” అనే ఉపలేబుల్తో పెద్ద నలుపు 📱 మీ కార్డ్ని స్కాన్ చేయండి బటన్. (లేదా “మీ ఫోన్ని రీడర్ దగ్గర పట్టుకోండి” — టెక్స్ట్ అనుకూలిస్తుంది).
- దిగువన — కొత్త-కస్టమర్ బ్లాక్: ఇంకా కార్డ్ లేదా? జాయిన్ పేజీ QRతో “QR-కోడ్ని స్కాన్ చేయండి మరియు మీ వాలెట్కి కార్డ్ని జోడించండి”.
Kiosk Modeలో కస్టమర్ దృశ్యం
- కస్టమర్ టాబ్లెట్ స్టాండ్ వరకు వస్తారు.
- వారు ఇప్పటికే కార్డ్ని కలిగి ఉంటే → వాలెట్ తెరవండి → నొక్కండి మీ కార్డ్ని స్కాన్ చేయండి → ట్యాబ్లెట్ కెమెరా → స్టాంప్ జోడించబడిన వాలెట్ స్క్రీన్ను పట్టుకోండి.
- వారికి ఇంకా కార్డ్ లేకపోతే → వారి ఫోన్ కెమెరాతో ఇంకా కార్డ్ లేదు? QRని స్కాన్ చేయండి → కార్డ్ తక్షణమే Walletకి సేవ్ చేయబడుతుంది → మీ కార్డ్ని స్కాన్ చేయి → వారి మొదటి స్టాంప్ను పొందండి.
లక్ష్యాన్ని చేరుకోవడంలో కస్టమర్ ఏమి చూస్తాడు
రివార్డ్ = Award.
[స్క్రీన్షాట్: 0501_RewardUnlocked_Award.png]
బహుమతి చిత్రం మరియు వివరణతో పూర్తి-స్క్రీన్ అభినందనలు! స్క్రీన్. కస్టమర్ స్టాఫ్కి స్క్రీన్ని చూపి, వాగ్దానం చేసిన బహుమతిని సేకరిస్తాడు.
రివార్డ్ = వోచర్.
[స్క్రీన్షాట్: 0502_RewardUnlocked_Voucher.png]
ఒక అభినందనలు! వోచర్ అన్లాక్ చేయబడింది! వోచర్ కార్డ్తో స్క్రీన్. వినియోగదారుడు కియోస్క్లోనే వోచర్ను రీడీమ్ చేసుకోవచ్చు — వినియోగదారుడు క్యాషియర్కు చూపించే Redeem Code (టెక్స్ట్ + QR + బార్కోడ్)తో స్క్రీన్ను తెరుస్తుంది, అతను కోడ్ను స్కాన్ చేస్తాడు లేదా ఎంటర్ చేస్తాడు. రిడీమ్ చేసిన తర్వాత వోచర్ రిడీమ్ చేయబడిందికి తరలించబడుతుంది మరియు కస్టమర్ స్క్రీన్షాట్ను ఉంచినప్పటికీ, మళ్లీ ఉపయోగించలేరు.
దిగువన - బటన్లు:
- My Vouchers — నా వోచర్లన్నింటినీ చూడండి.
- 12 సెకన్లలో ముగుస్తుంది — ప్రధాన స్క్రీన్కి స్వయంచాలకంగా తిరిగి రావడానికి కౌంట్డౌన్.
ఇది ముఖ్యమైన కియోస్క్ నమూనా: ఆటో-క్లోజ్. అది లేకుండా, సిబ్బంది జోక్యం చేసుకునే వరకు టాబ్లెట్ ఒక కస్టమర్ స్క్రీన్పై “ఇరుక్కుపోతుంది”. చర్య తర్వాత 10-15 సెకన్ల తర్వాత టాబ్లెట్ ఎల్లప్పుడూ శుభ్రమైన ప్రారంభ స్క్రీన్కి తిరిగి వచ్చేలా కౌంట్డౌన్ నిర్ధారిస్తుంది.
రివార్డ్ = Lottery.
[స్క్రీన్షాట్: 0503_RewardUnlocked_Lottery.png]
కస్టమర్ స్వయంగా లాటరీని స్క్రీన్పై తిప్పుతాడు - ఒక ఆహ్లాదకరమైన గేమ్ మెకానిక్. వేరియంట్ డ్రాప్ల తర్వాత ([స్క్రీన్షాట్: 0504_RewardUnlocked_LotteryUsed.png]), స్క్రీన్ Award లేదా ఎగువన ఉన్న వోచర్ లాగా ప్రవర్తిస్తుంది.
కస్టమర్ వోచర్లను వీక్షించడం
[స్క్రీన్షాట్: 0601_Vouchers.png]
కస్టమర్ ఏ క్షణంలోనైనా కియోస్క్ ప్రధాన స్క్రీన్పై My Vouchersని నొక్కవచ్చు మరియు వారి సక్రియ వోచర్లన్నింటినీ చూడవచ్చు. ఇది సౌకర్యవంతంగా ఉంటుంది: కస్టమర్ మునుపటి సందర్శన నుండి ఉపయోగించని వోచర్ని కలిగి ఉంటే, వారు వాలెట్ను తెరవకుండానే వెంటనే సిబ్బందికి చూపించగలరు.
కియోస్క్ స్టాండ్ కోసం సాంకేతిక అవసరాలు
- టాబ్లెట్: 10” లేదా 12” iPad / Android టాబ్లెట్. పెద్ద స్క్రీన్, కస్టమర్ కోసం మరింత సౌకర్యవంతంగా ఉంటుంది. మేము ఐప్యాడ్ మినీని ఇష్టపడతాము.
- స్టాండ్: స్థిరంగా, కస్టమర్కి ఎదురుగా. స్టాండ్ వారు వాలెట్ ఫోన్ని టాబ్లెట్ కెమెరా వరకు పట్టుకునేలా చేయాలి.
- పవర్: స్థిరమైన మెయిన్స్ కనెక్షన్. కియోస్క్ రోజంతా నడుస్తుంది.
- ఇంటర్నెట్: విశ్వసనీయ Wi-Fi లేదా మొబైల్ 4G.
- ఐచ్ఛికం — స్టాండ్ పక్కన ఒక సాధారణ సూచన కార్డ్: “1) వాలెట్లో మీ కార్డ్ని తెరవండి. 2) దానిని కెమెరా వరకు పట్టుకోండి. 3) పూర్తయింది!” — మీకు అంతర్జాతీయ అతిథులు ఉంటే రెండు భాషల్లో. మా కియోస్క్ UIతో బాగా ఉంచబడిన టాబ్లెట్ సాధారణంగా ఈ పాత్రను స్వయంగా నిర్వహిస్తుంది.
9.6 Terminal Mode — చెల్లింపు టెర్మినల్పై లాయల్టీ
Terminal Mode ఇప్పటికే ఉన్న Android చెల్లింపు టెర్మినల్లో నేరుగా లాయల్టీని అమలు చేస్తుంది. కొనుగోలుదారులు, చెల్లింపు ప్రాసెసర్లు, ISOs మరియు చెక్అవుట్లో ఇప్పటికే టెర్మినల్ని కలిగి ఉన్న మరియు కొత్త హార్డ్వేర్ లేకుండా లాయల్టీని కోరుకునే ఏ వ్యాపారికైనా ఇది అనువైనది.
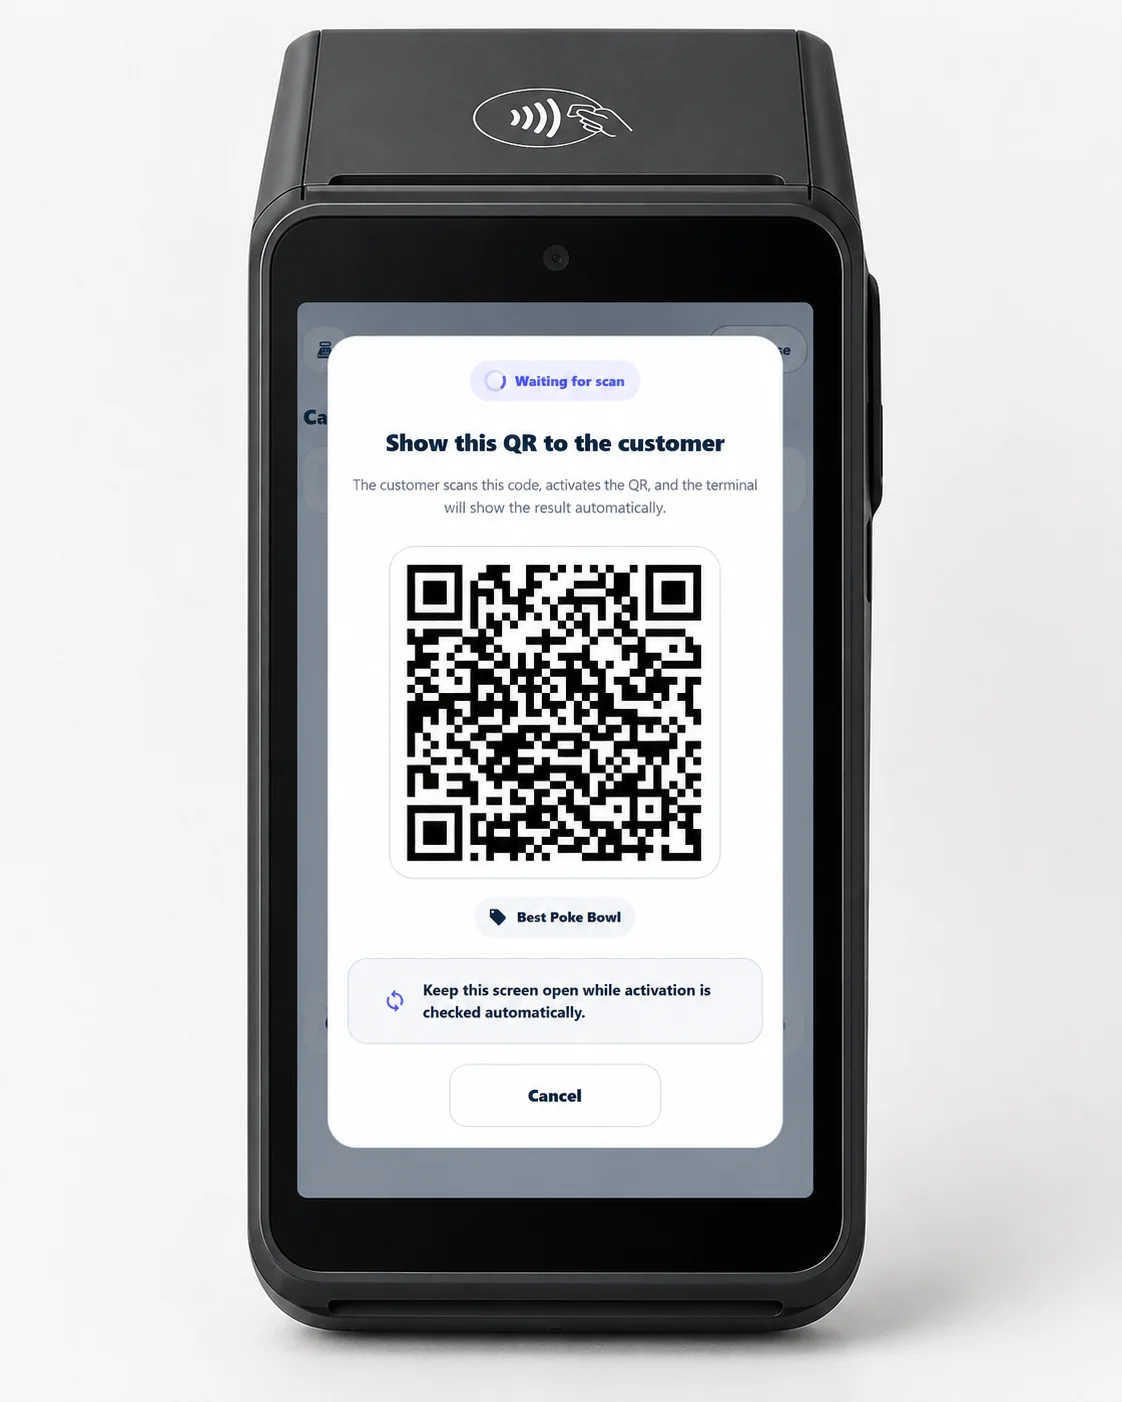
ఇది ఎలా పనిచేస్తుంది
- కస్టమర్ ఎప్పటిలాగే టెర్మినల్లో చెల్లిస్తారు.
- 7Stamp Scanner app తెరుచుకుంటుంది — స్వయంచాలకంగా లైట్ ఇంటిగ్రేషన్తో లేదా క్యాషియర్ ద్వారా ఒక ట్యాప్తో.
- క్యాషియర్ ట్యాప్లు Serve customer; టెర్మినల్ స్క్రీన్పై ప్రత్యేకమైన డైనమిక్ QR కోడ్ కనిపిస్తుంది.
- కస్టమర్ వారి ఫోన్తో QRని స్కాన్ చేస్తారు. కొత్త కార్డ్ సృష్టించబడింది మరియు వాలెట్లో సేవ్ చేయబడుతుంది (మొదటి స్టాంపులతో), లేదా ఇప్పటికే ఉన్న కార్డ్ తక్షణమే నవీకరించబడుతుంది.
స్టాంపులు జోడిస్తోంది
స్టాంపులను నిర్ణీత మొత్తం (కొనుగోలుకు ఒకటి) లేదా మొత్తం (క్యాషియర్ టెర్మినల్లో రసీదు మొత్తాన్ని నమోదు చేస్తారు)గా జోడించవచ్చు.
టెర్మినల్లో రివార్డ్లు
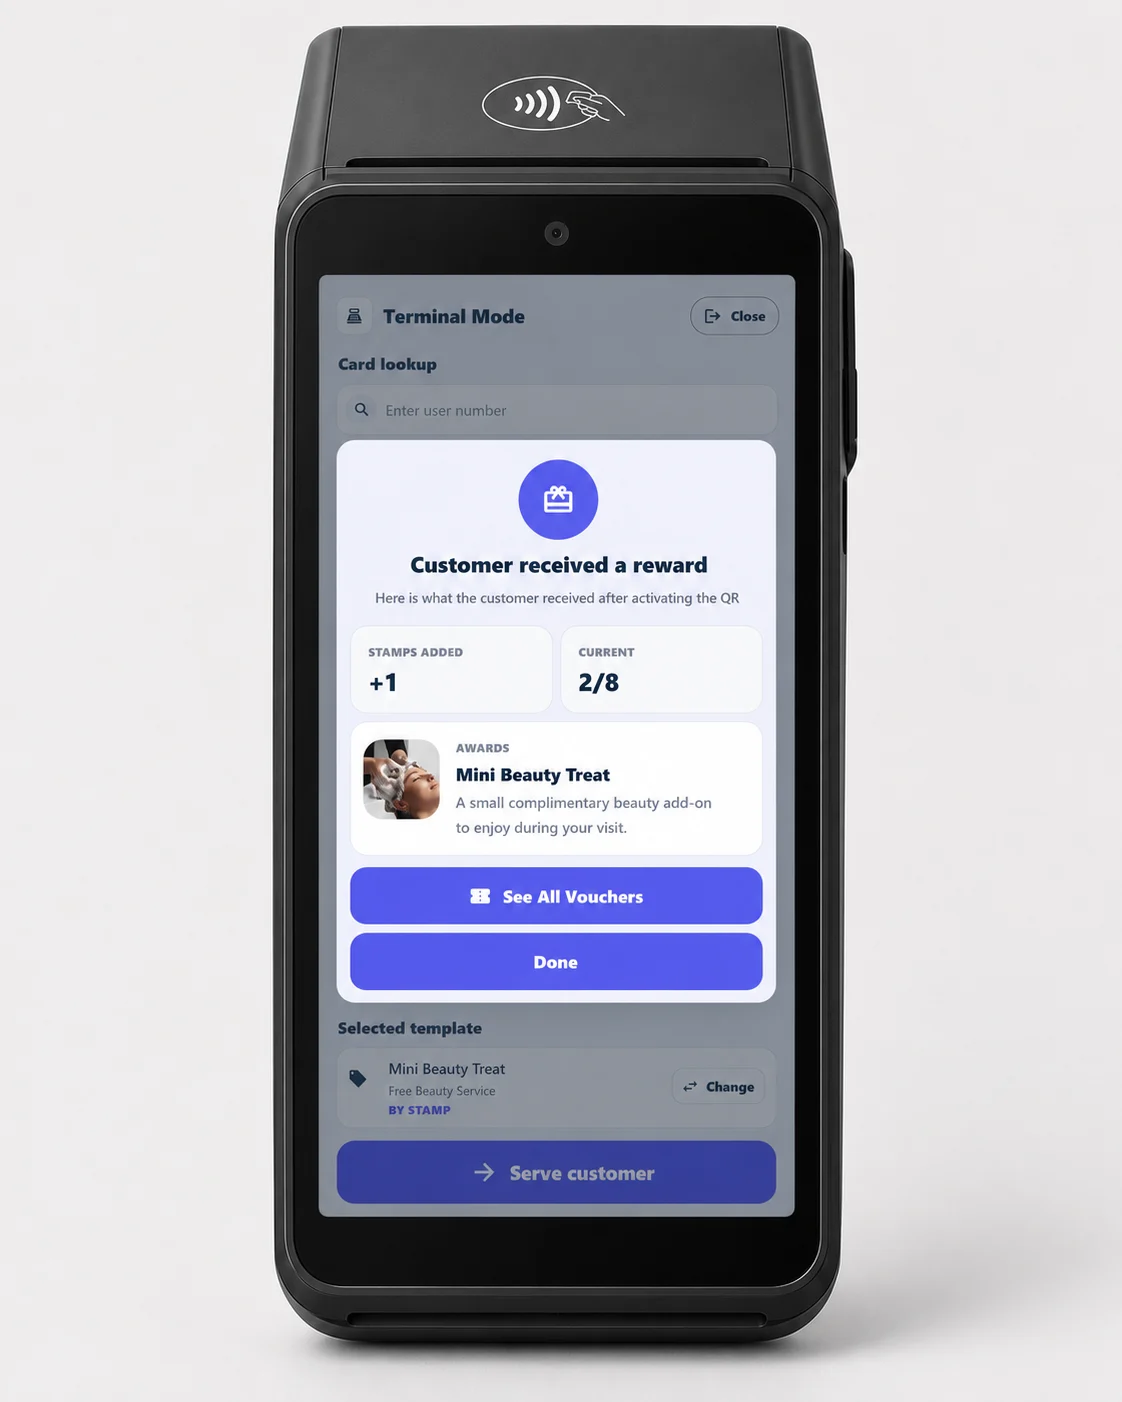
- Award: లక్ష్యాన్ని చేరుకున్నప్పుడు బహుమతిని అందజేయమని టెర్మినల్ క్యాషియర్ని అడుగుతుంది.
- Smart Voucher: తర్వాత సందర్శనలో, క్యాషియర్ కస్టమర్ యొక్క వోచర్లను టెర్మినల్లో తెరుస్తాడు (లేదా వోచర్ నంబర్ను నమోదు చేస్తాడు) మరియు ఒక ట్యాప్లో ఒకదాన్ని రీడీమ్ చేస్తాడు.
- Lottery: కస్టమర్ వారి ఫోన్లో చక్రం తిప్పుతారు; ఫలితం టెర్మినల్ స్క్రీన్పై కనిపిస్తుంది.
టెర్మినల్లో ఇన్స్టాల్ చేస్తోంది
Google Play నుండి 7Stamp Scanner appని ఇన్స్టాల్ చేయండి లేదా మీ టెర్మినల్ ఫ్లీట్లో ప్రత్యక్ష APKని అమలు చేయండి.
అధునాతన ఇంటిగ్రేషన్లు (అభ్యర్థనపై)
Apple VAS మరియు Google Smart Tap కంటే ఎక్కువ సేకరించడానికి నొక్కండి — VAS/స్మార్ట్ ట్యాప్-సర్టిఫైడ్ టెర్మినల్లో టెర్మినల్ చెల్లింపు అప్లికేషన్ ద్వారా చదవబడుతుంది — మరియు కార్డ్-లింక్డ్ లాయల్టీ (ప్రాసెసర్ స్థాయిలో నెట్వర్క్-టోకెన్ మ్యాచింగ్) అభ్యర్థనపై అందుబాటులో ఉన్న అధునాతన ఇంటిగ్రేషన్లు.
భాగస్వామి మరియు వాణిజ్య వివరాల కోసం, కొనుగోలుదారులు & చెల్లింపు నెట్వర్క్లు మరియు Terminal Mode చూడండి.
9.7 మోడ్ను ఎలా ఎంచుకోవాలి — పోలిక
| పరామితి | Manual Mode | Autopilot Mode | Kiosk Mode | Terminal Mode |
|---|---|---|---|---|
| ఎవరు స్కాన్ చేస్తారు | ఫోన్/కెమెరా ద్వారా సిబ్బంది | బాహ్య స్కానర్ “బార్కోడ్గా” | స్టాండ్లో కస్టమర్ స్వయంగా | కస్టమర్ టెర్మినల్ స్క్రీన్పై QRని స్కాన్ చేస్తాడు |
| వ్యాపార రకం | ప్రీమియం సేవ, సెలూన్లు, రెస్టారెంట్లు | కాఫీ షాపులు, ఫాస్ట్ ఫుడ్, బిజీ కౌంటర్లు | కాఫీ షాపులు, బేకరీలు, కార్ వాష్లు, లైట్ రిటైల్ | చెల్లింపు టెర్మినల్ ఉన్న ఏదైనా వ్యాపారి; కొనుగోలుదారు/ప్రాసెసర్ ఎస్టేట్లు |
| హార్డ్వేర్ | పరికరం కెమెరా | బాహ్య QR స్కానర్ | 10–12” టాబ్లెట్ + స్టాండ్ | ఇప్పటికే ఉన్న Android చెల్లింపు టెర్మినల్ |
| అది ఎక్కడ నివసిస్తుంది | సిబ్బంది ఫోన్/టాబ్లెట్ | వరకు ల్యాప్టాప్/టాబ్లెట్ | కస్టమర్కు ఎదురుగా ఉన్న స్టాండ్పై టాబ్లెట్ | చెక్అవుట్ వద్ద చెల్లింపు టెర్మినల్ |
| సిబ్బంది శిక్షణ ప్రమాదం | కనిష్ట (ఒక ట్యాప్) | జీరో (నేపథ్య పని) | జీరో (కస్టమర్ దీన్ని చేస్తాడు) | కనిష్ట (ఒక ట్యాప్: “Serve customer”) |
| Lottery | స్టాఫ్ స్క్రీన్ నుండి కస్టమర్ ప్లే చేస్తాడు | మాన్యువల్ చర్య ద్వారా అందుబాటులో ఉంది | కస్టమర్ దానిని స్వయంగా ప్లే చేస్తాడు | కస్టమర్ వారి ఫోన్లో ప్లే చేస్తారు; టెర్మినల్లో ఫలితం |
మీరు ఒకేసారి అనేక మోడ్లను ఉపయోగించవచ్చు. ఉదాహరణకు, రెస్టారెంట్ మరియు స్పా ఉన్న హోటల్: స్పాలో — Manual Mode (ప్రీమియం, వ్యక్తిగత పరిచయం); రెస్టారెంట్ కేఫ్లో — Kiosk Mode స్టాండ్లో (వేగంగా, వెయిటర్ ప్రమేయం లేదు); రిసెప్షన్ వద్ద — Autopilot రెగ్యులర్ కోసం. ఒక Staff Seat ఒక సమయంలో ఒక లాగిన్కి మద్దతు ఇస్తుంది; మీకు అనేక ఏకకాల పాయింట్లు అవసరమైతే, అడ్మిన్లో Staff Loginలను జోడించండి.
9.8 స్కానర్ని ప్రారంభించేందుకు ఆచరణాత్మక చిట్కాలు
- ** తెరవడానికి ముందు పరీక్షించండి.** షిఫ్ట్కు ముందు ఉదయం మీ స్వంత కార్డ్తో 5–10 ట్రయల్ స్కాన్లను చేయండి — కెమెరా ఫోకస్ చేయబడిందని, ఇంటర్నెట్ పని చేస్తుందని, స్టాంపులు జోడించబడిందని నిర్ధారించుకోండి.
- కియోస్క్ టాబ్లెట్లో, ఆటో-లాక్ మరియు నోటిఫికేషన్లను నిలిపివేయండి. ఎవరూ అనుకోకుండా OS నుండి నిష్క్రమించకూడదు లేదా దారితప్పిన నోటిఫికేషన్ను పొందకూడదు. iOSలో గైడెడ్ యాక్సెస్ని, Androidలో స్క్రీన్ పిన్నింగ్ని ఉపయోగించండి.
- ఇంటర్నెట్ అంతరాయాల కోసం ప్రింటెడ్ QR లేబుల్లను సమీపంలో ఉంచండి (అడ్మిన్ నుండి ఎగుమతి చేయబడింది) — స్కానర్ తాత్కాలికంగా అందుబాటులో లేనప్పటికీ కస్టమర్ స్వయంగా వాటిని స్కాన్ చేసి కార్డ్ని పొందుతారు.
- కొత్త సిబ్బందిని ఆన్బోర్డ్ చేయండి. ప్రతి కొత్త షిఫ్ట్ సభ్యుడు ఐదు విషయాలు తెలుసుకోవాలి: స్కానర్కి ఎలా లాగిన్ చేయాలి, కార్డ్ని స్కాన్ చేయడం ఎలా, స్టాంప్ను ఎలా జోడించాలి,
Voucher Unlocked!ని ఎలా హ్యాండిల్ చేయాలి,వోచర్లుట్యాబ్ నుండి వోచర్ను ఎలా రీడీమ్ చేయాలి. ఐదు నిమిషాల శిక్షణ. - Manual Mode దిగువన ఉన్న ఇటీవలి ఈవెంట్ లాగ్ మీ పని లాగ్. కస్టమర్ “స్టాంప్ పూర్తి కాలేదు” అని ఫిర్యాదు చేస్తే, దాన్ని తనిఖీ చేయండి: మీరు సమయం, కార్డ్ ID మరియు ఏమి జారీ చేయబడిందో/ఉపయోగించబడిందో చూస్తారు.
Visual walkthrough
Use the screen sets below as a visual companion to the article. Open any image to inspect it at full size.