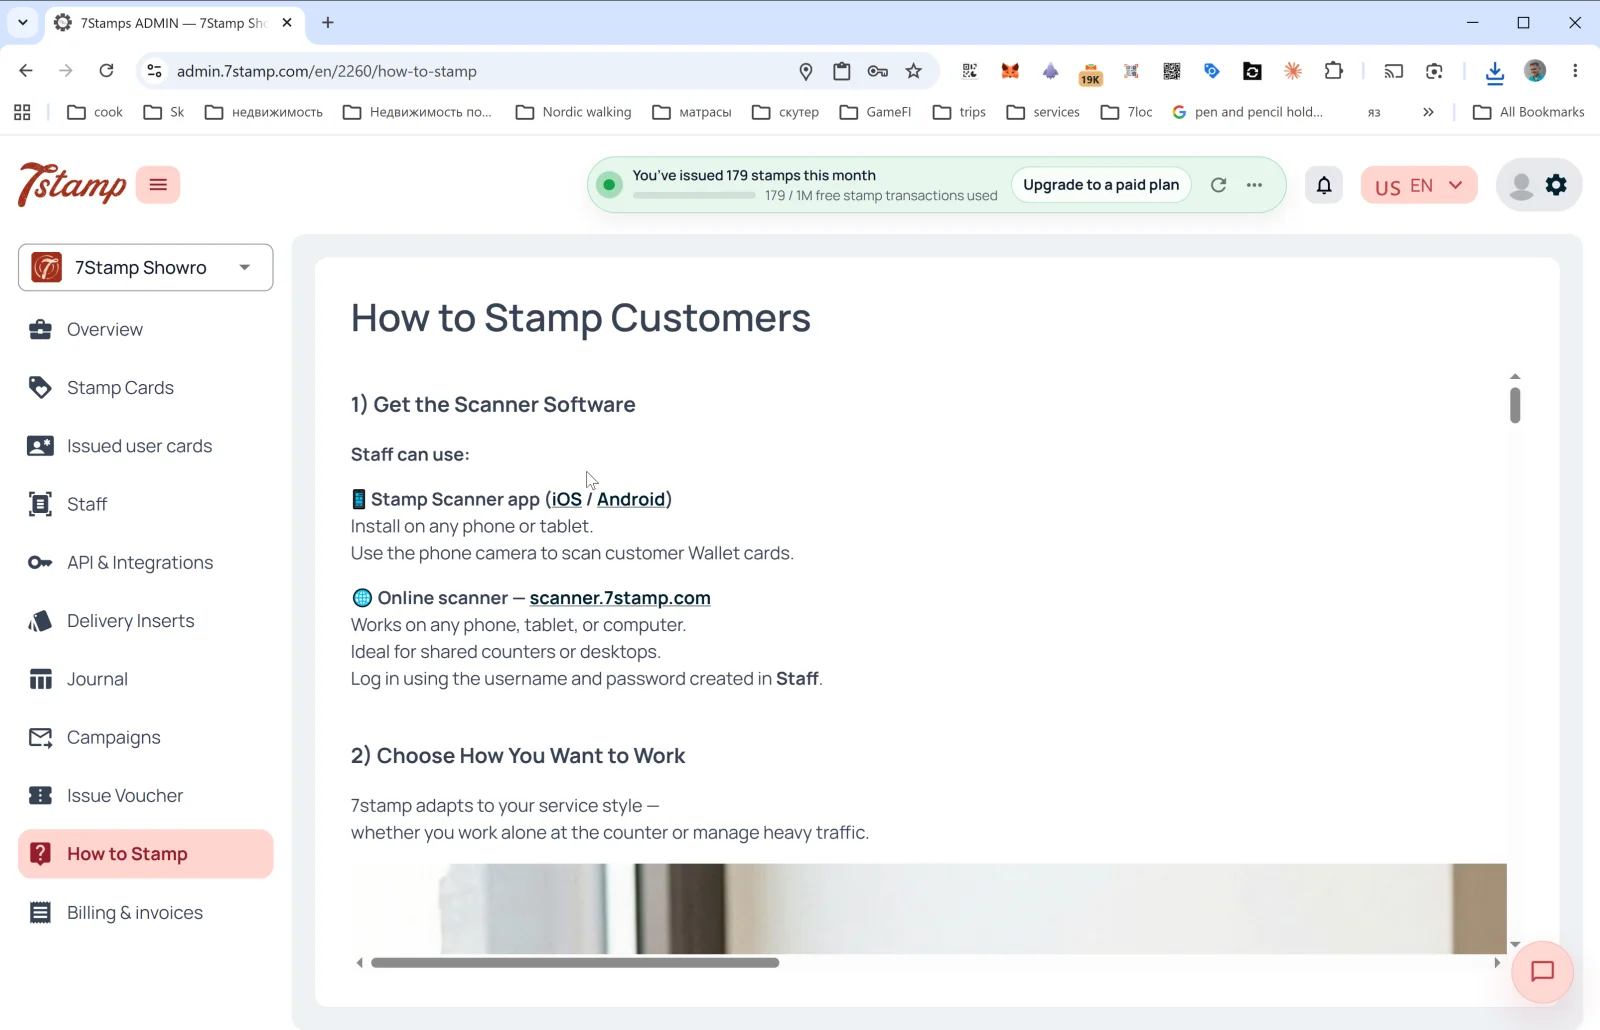
9. 7stamp Scanner Application — Manual / Autopilot / Kiosk / Terminal Mode
7stamp Scanner is the working app for staff, customers, kiosks, and Android payment terminals. Its job is to turn a card scan into stamping, voucher redemption, lottery spinning, and Terminal Mode checkout loyalty. It’s what physically sits at the till, in a staff member’s pocket, on a customer-facing stand, or on the payment terminal already sitting at checkout. One Staff login gives access to the main Scanner modes — the choice of mode depends on the pace of your business and the service scenario.
9.1 Where 7stamp Scanner runs
Web version (any device): scanner.7stamp.com
- Works in any modern browser: on a smartphone, tablet, or computer.
- No install — open the page, enter your Staff Login, get to work.
- Ideal for a shared work laptop at the till, a tablet on a stand, any Windows/Mac/Linux device with a camera.
- You can connect an external scanner and scan customer cards with it. No configuration needed.
Android: Google Play · Direct APK iOS: App Store
- Native app — runs faster, uses the phone camera better.
- A good fit for staff who work off their own phones (premium service, field work, delivery).
- You can connect an external scanner and scan customer cards with it (in which case consider Autopilot mode).
- Can run on a tablet in Kiosk mode.
- Direct APK — download the app package directly from
https://downloads.7stamp.com/7stamp-scanner.apk. Useful for Android payment terminals and for centrally deploying the app across a fleet of devices.
What to pick. If you have an Android tablet at the till or an iPad on a counter — install the native app. If you work from different devices or use a single shared computer at the till — go with the web version https://scanner.7stamp.com. Login and password for entry are created in the admin panel under Staff.
9.2 Login and navigation
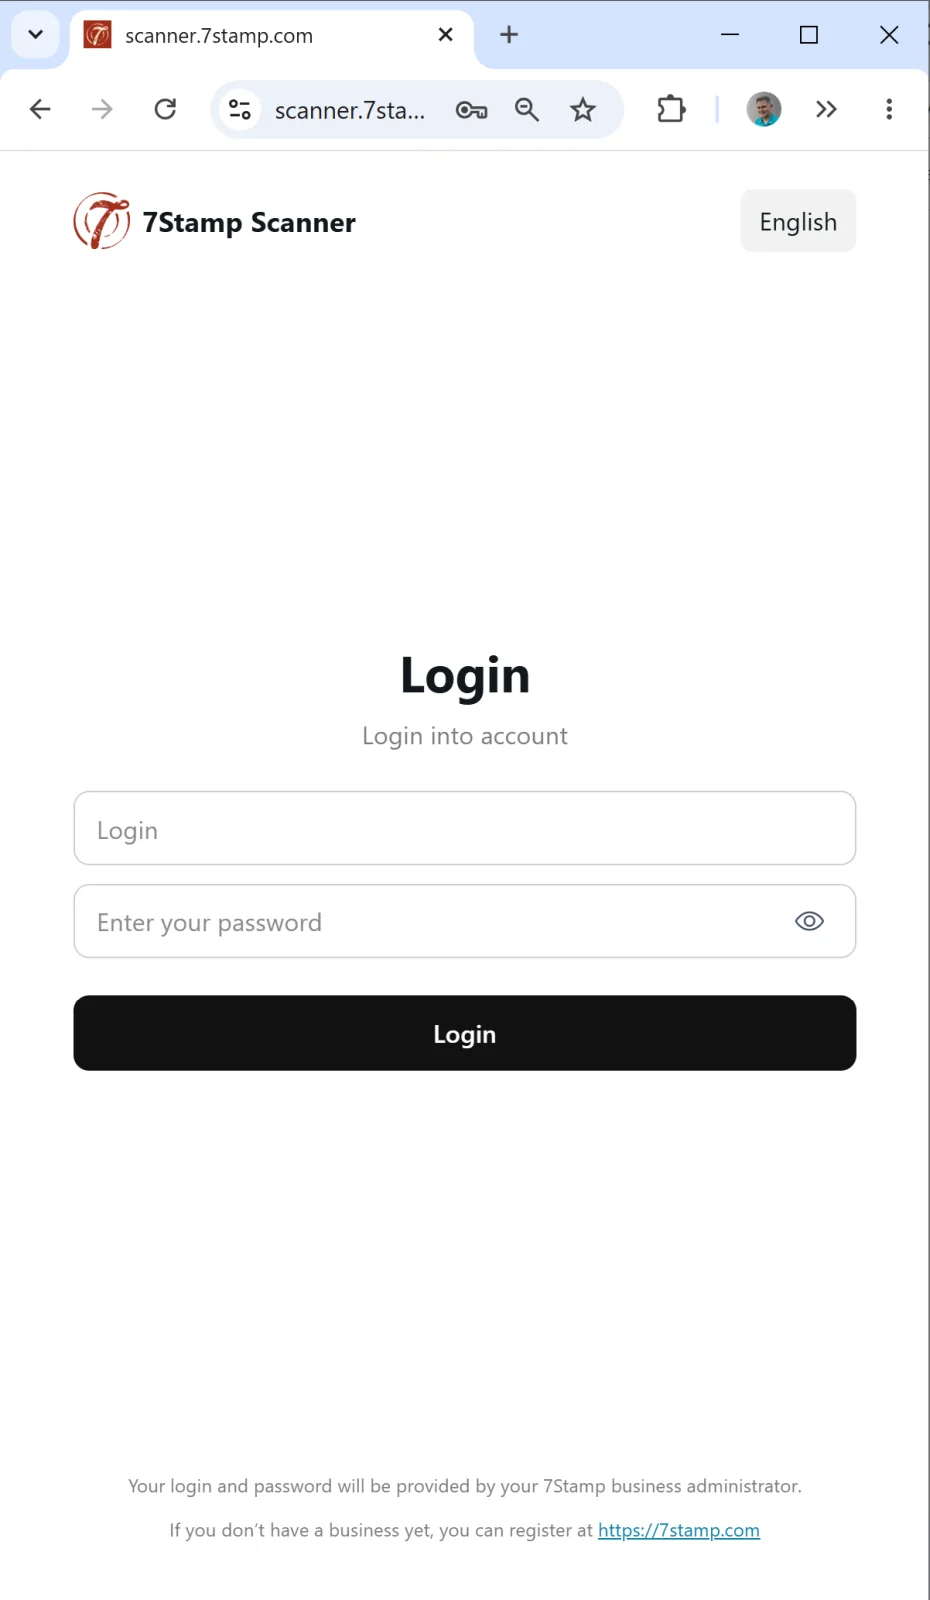
You can log in from any platform (Web / Android / iOS) with the same Staff Login you created in the admin (Staff → + CREATE → Creating Staff Login). After login, the app automatically links to your business profile.
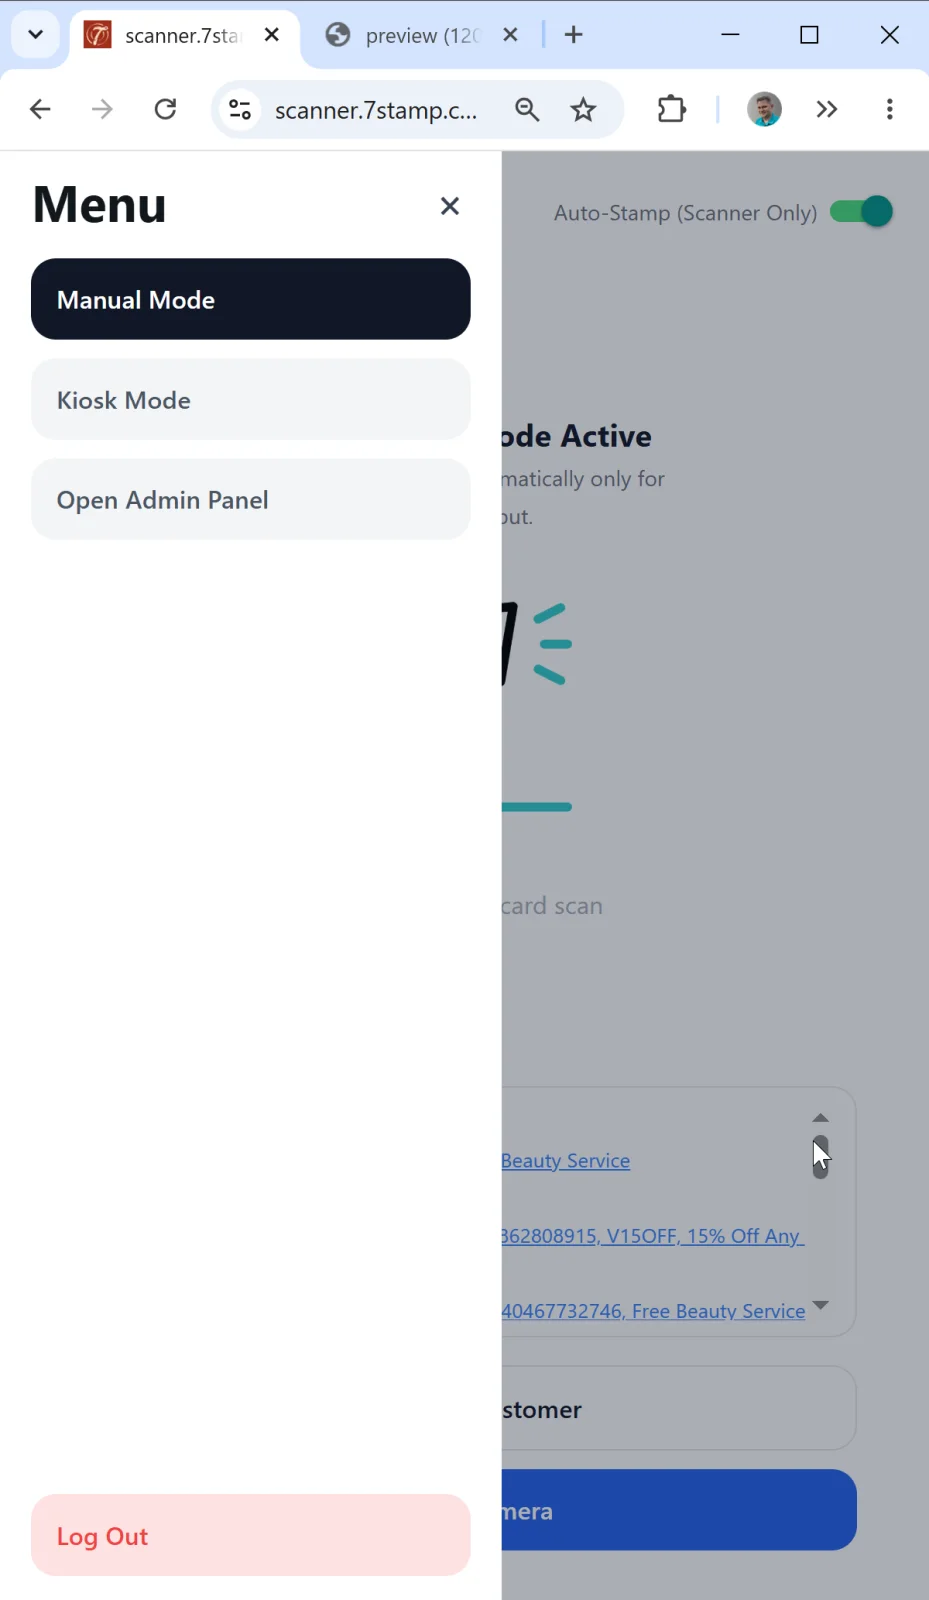
Side menu (opens with the ☰ icon in the upper left):
- Manual Mode — manual scanning mode (default).
- Kiosk Mode — customer self-service mode.
- Open Admin Panel — quick link to the admin (
admin.7stamp.com). - Log Out — sign out (at the bottom of the menu, red button).
You don’t need to “switch modes” between Manual and Autopilot through the menu. Autopilot is a sub-mode of Manual Mode, toggled with a single switch right on the main screen (see below).
9.3 Manual Mode — staff scanning by hand
Manual Mode is the base scenario where staff scan the customer’s card themselves. Used in premium service (beauty salons, barbershops, spa, sit-down restaurants) where stamping is part of the personal interaction with the customer.
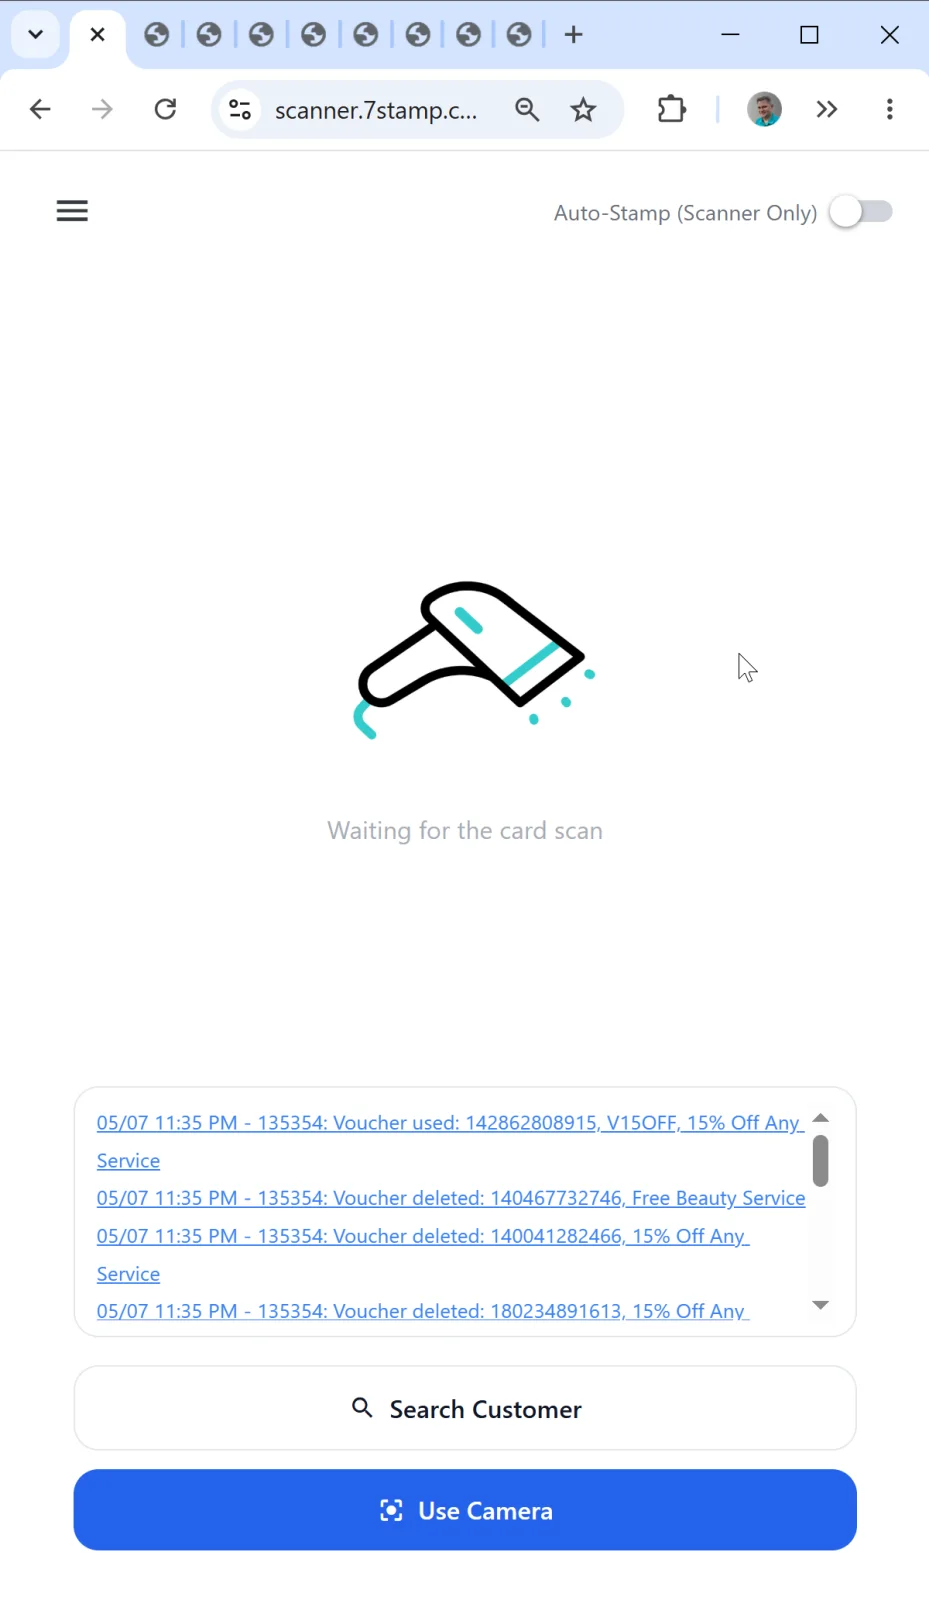
Manual Mode main screen
- Header indicator: Waiting for the card scan — the app is ready to accept a scan.
- Top right — the Auto-Stamp (Scanner Only) toggle (off in Manual).
- Bottom of the screen — the recent shift event log (issued / used / deleted vouchers). Every entry is tappable and opens details.
- At the very bottom — two action buttons:
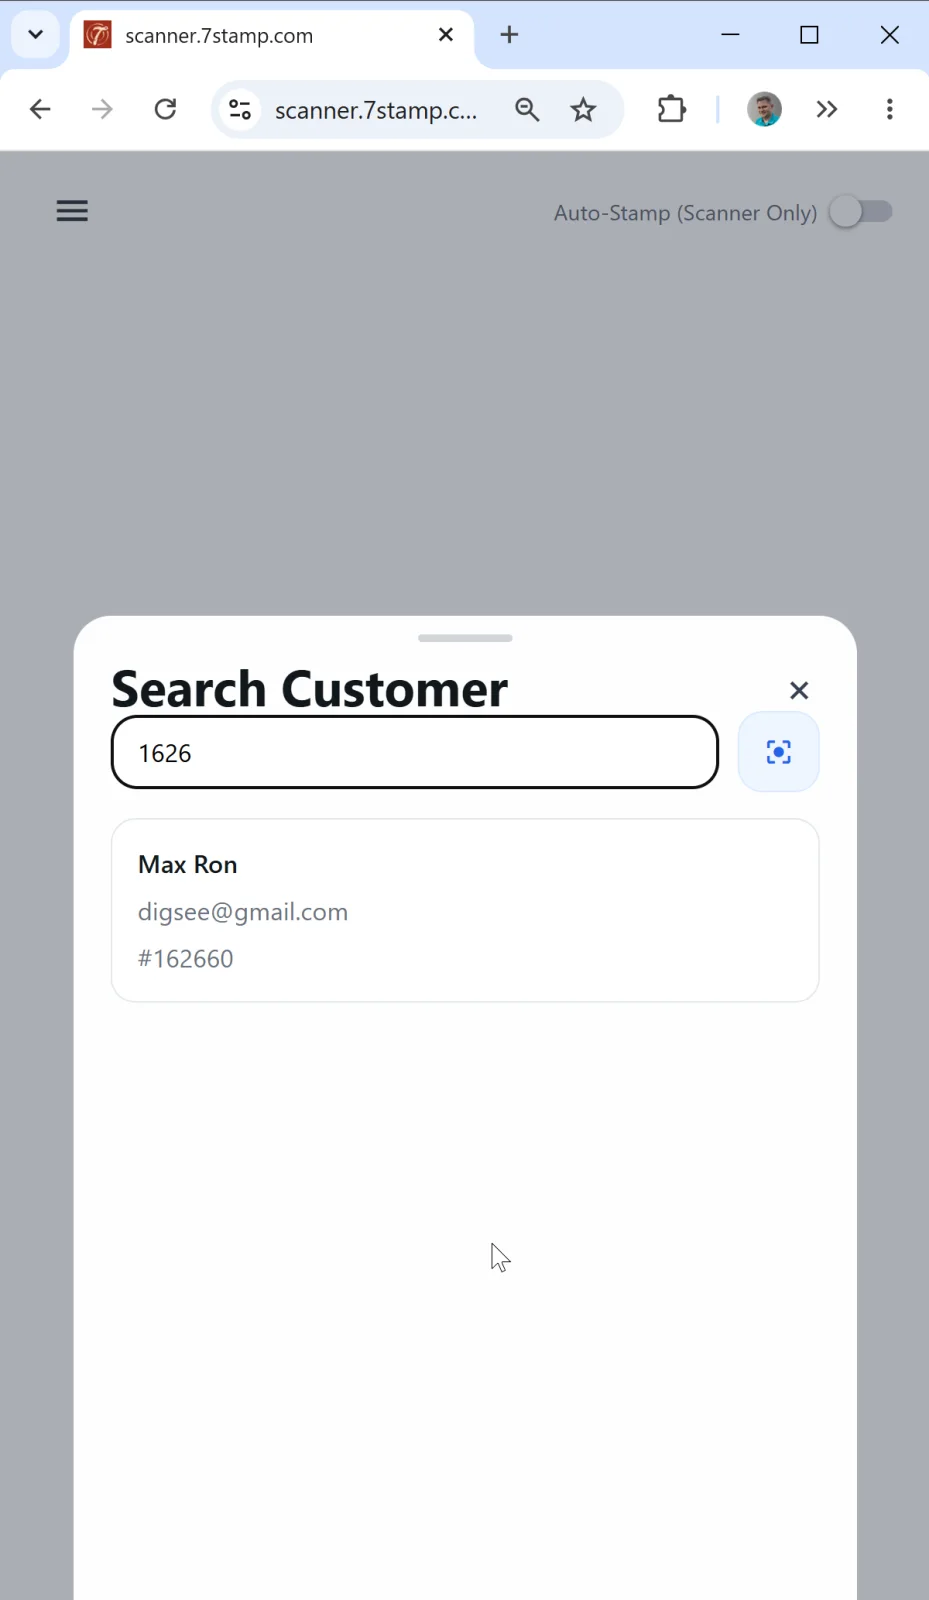
- 🔍 Search Customer — find a customer by name, email, phone, or card number.
- 📷 Use Camera — open the device camera and scan a customer card QR.
Four ways to find a customer and stamp the card
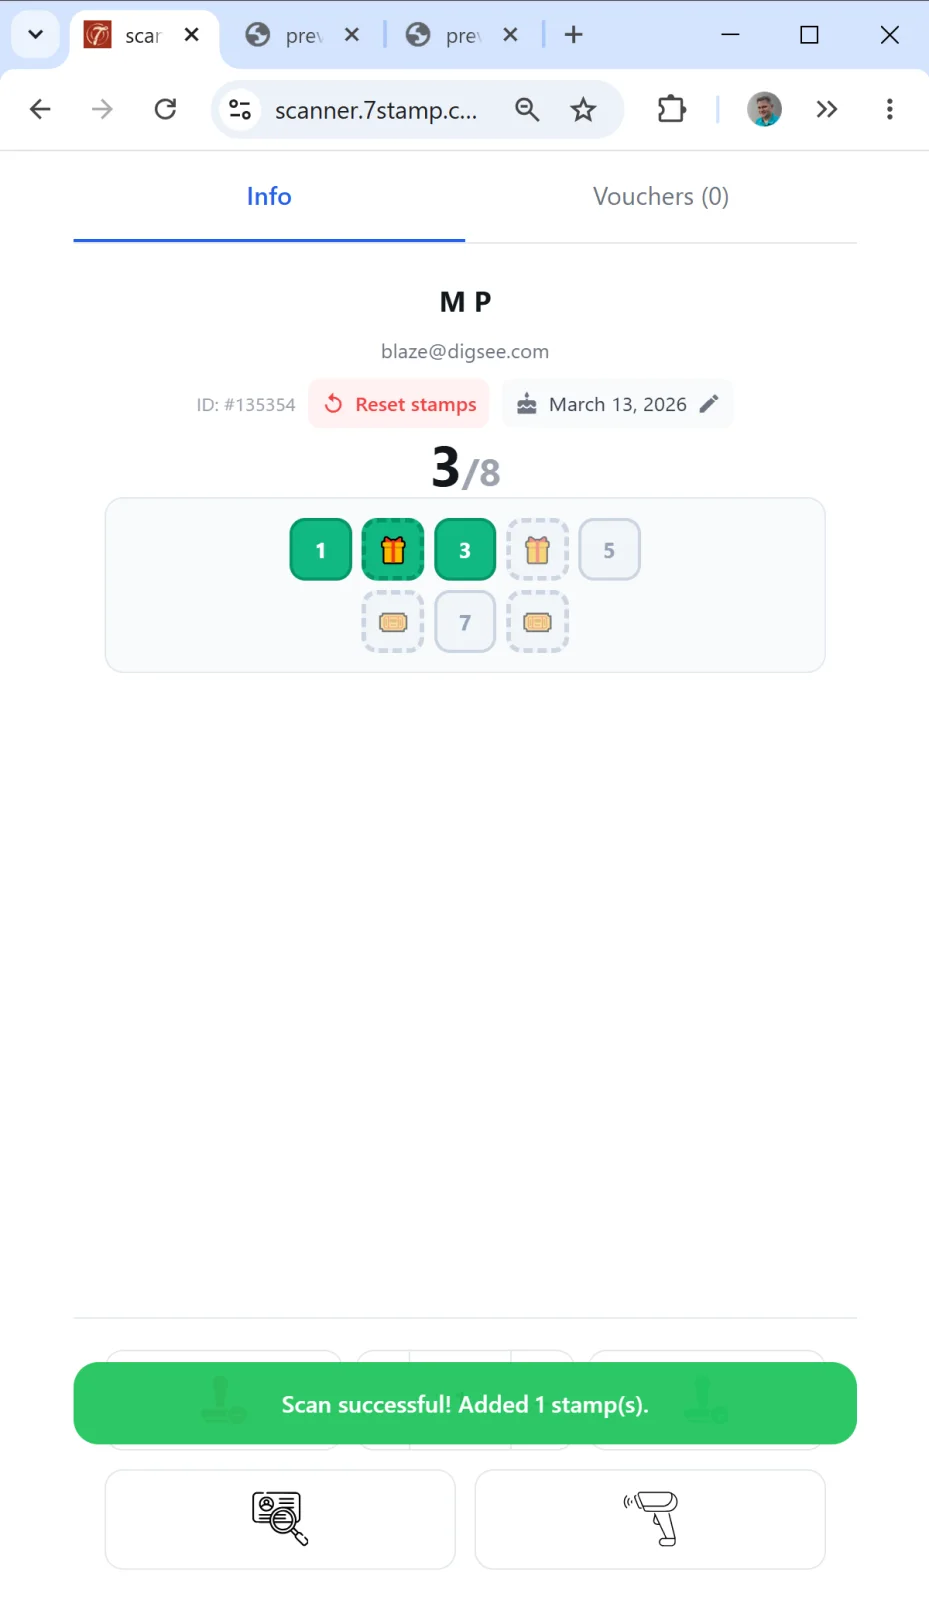
1. Scanning with the device camera (Use Camera). The main way to work.
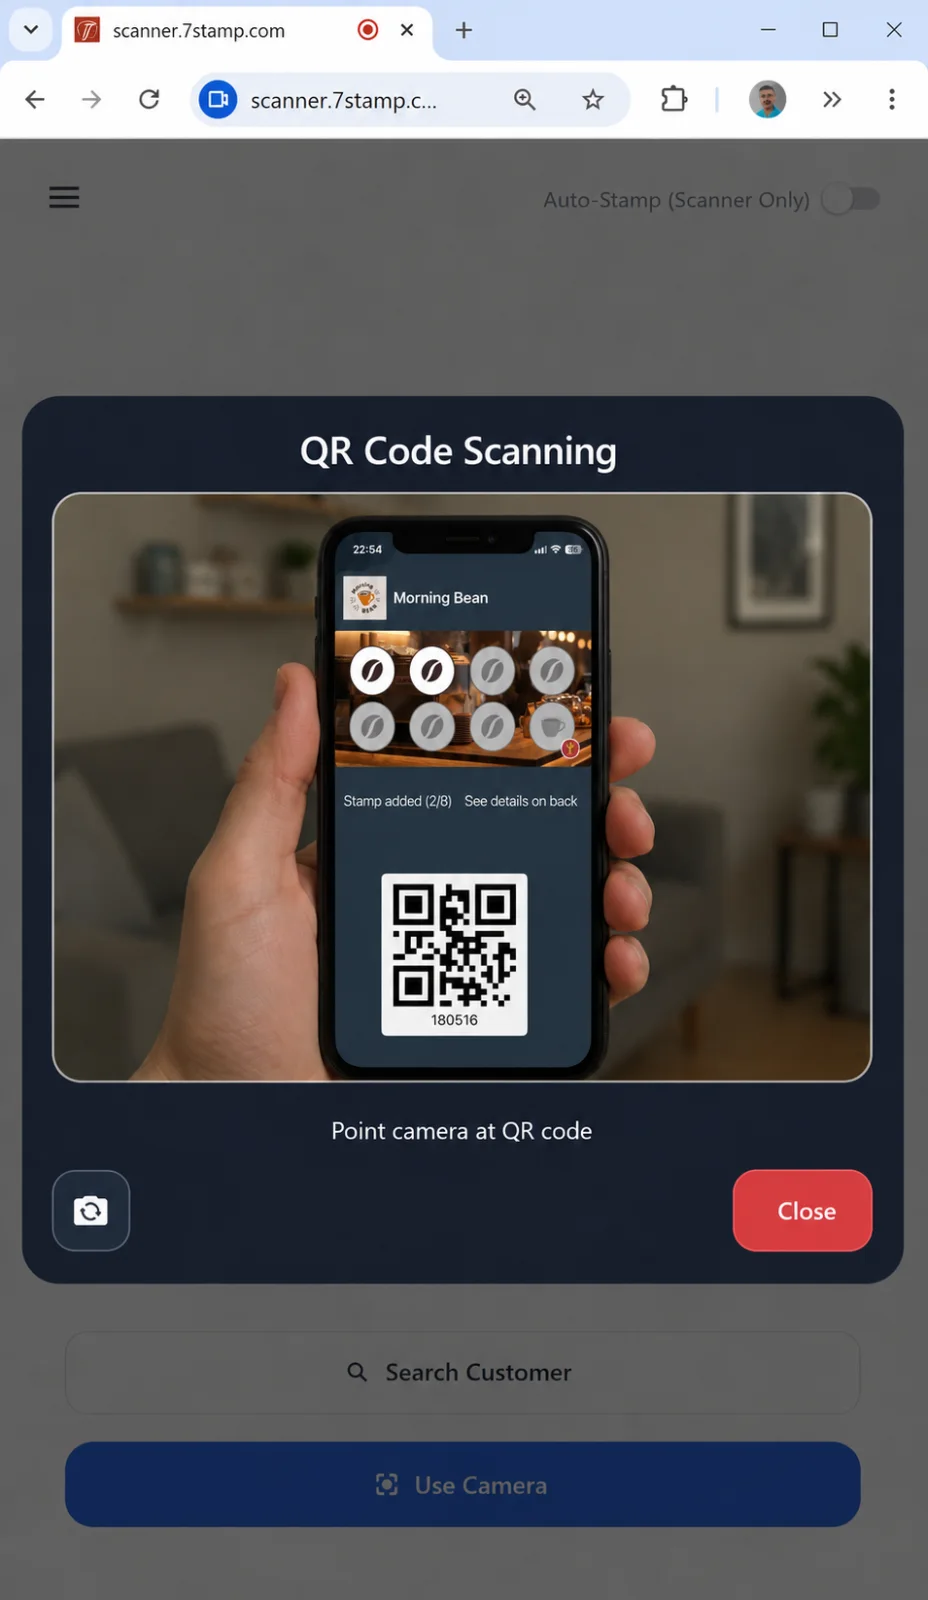
The staff member taps Use Camera, points the phone/tablet camera at the customer’s card QR (the customer opens their card in Apple Wallet or Google Wallet and shows the screen), the app recognizes the code in a fraction of a second, and immediately opens the customer card.
2. Scanning the customer card with an external scanner.
Connect the scanner to your device and simply scan the customer’s card with it.
3. Customer search (Search Customer). A fallback when the customer doesn’t have their phone at hand.
Useful when:
- the customer left or drained their phone;
- the customer just signed up and hasn’t yet figured out where the card opens;
- the staff member works by appointment and opens the customer’s card in advance.
Search works by name, email, or card number.
4. Direct voucher search (Voucher Search). When the customer arrives with a voucher in hand (e.g., a printed paper one) and wants to redeem it. You can enter the voucher number in the search, scan it with an external scanner, or scan it with the device camera.
The customer card after scanning
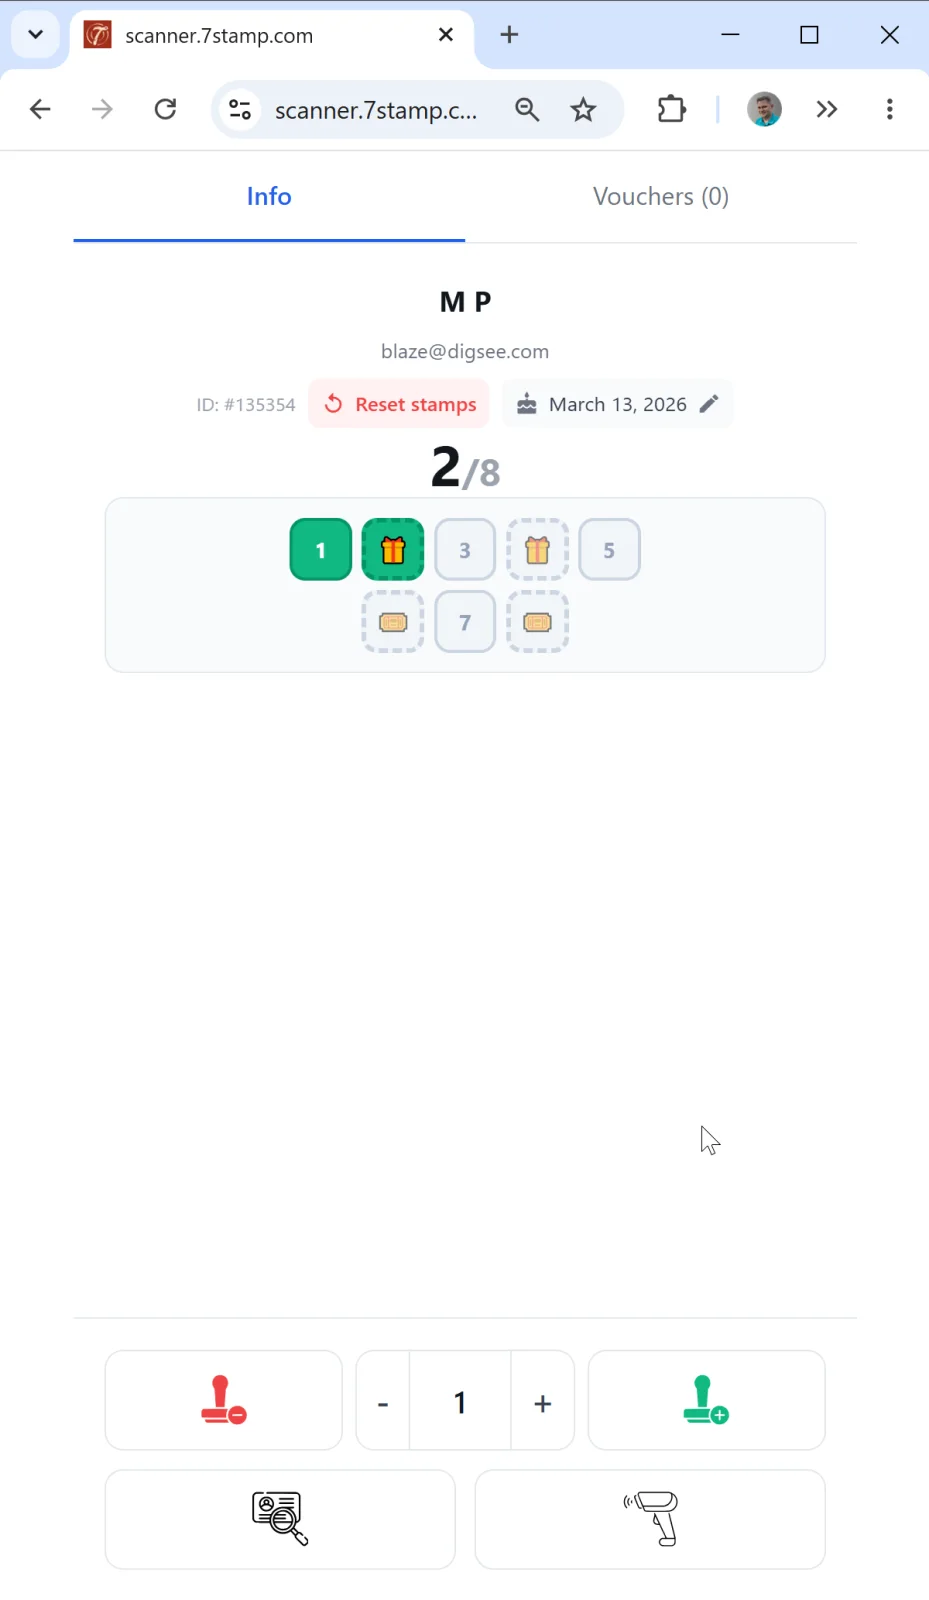
Once the card is found, the customer card opens with two tabs:
- Info — basic information (name, email, card ID
#XXXXXX, birthday with edit ✏️). - Vouchers (N) — list of all this customer’s vouchers: active, redeemed, expired.
In the upper area there’s a red Reset stamps button — it lets you reset the customer’s stamps (e.g., if they closed the final goal, got the reward, and you want to start a new card). Note. You don’t have to reset the card: if next time you scan it on the final goal without resetting, the system will cyclically put the first stamp of a new iteration.
Stamp controls
At the bottom of the screen — the stamp controls:
- 🟢 + (green) — add a stamp.
- 🔴 − (red) — remove a stamp (if you made a mistake).
- A quantity field with − / + — add several stamps at once (e.g., if the card uses
By amountand the customer spent a large sum). - 🔍 Search Customer — open a different customer.
- 📷 — scan again.
Three scenarios on reaching a goal
When a stamp brings the customer to a goal (one of the milestones or the final goal), Scanner shows a popup with the gift. The popup contents depend on the Reward type configured on the card.
1. Reward = Award (instant text gift).
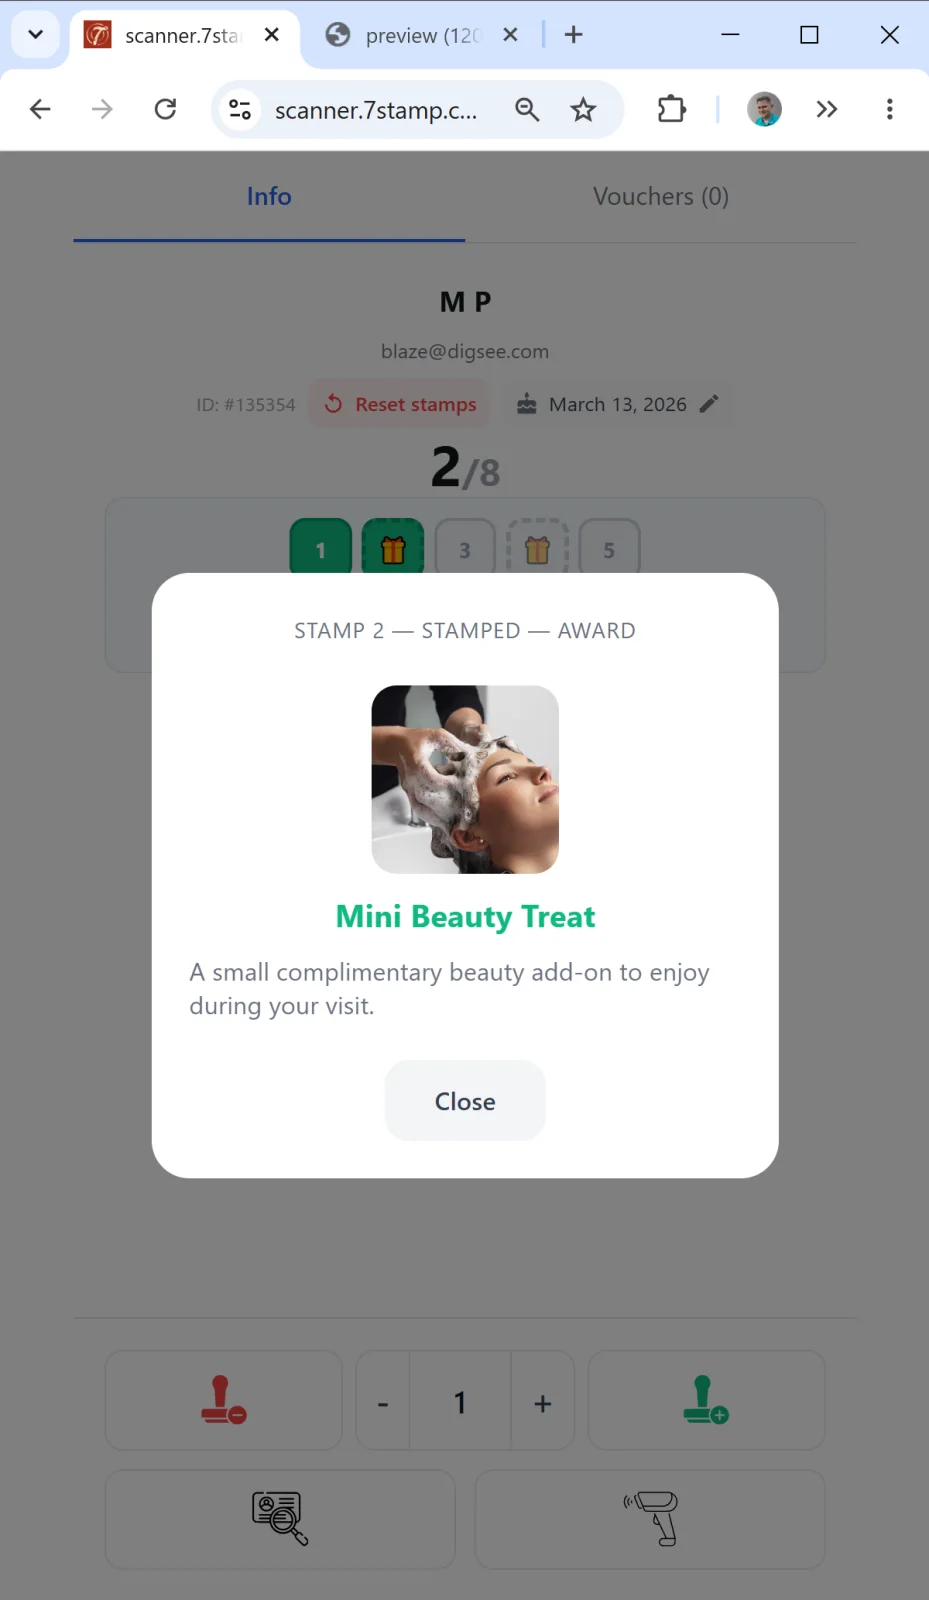
On screen — the gift text and image (“Free Coffee”, “1 free pastry”, etc.). The staff member shows the screen to the customer and hands over the promised gift.
2. Reward = Voucher (Smart Voucher with Redeem Code).
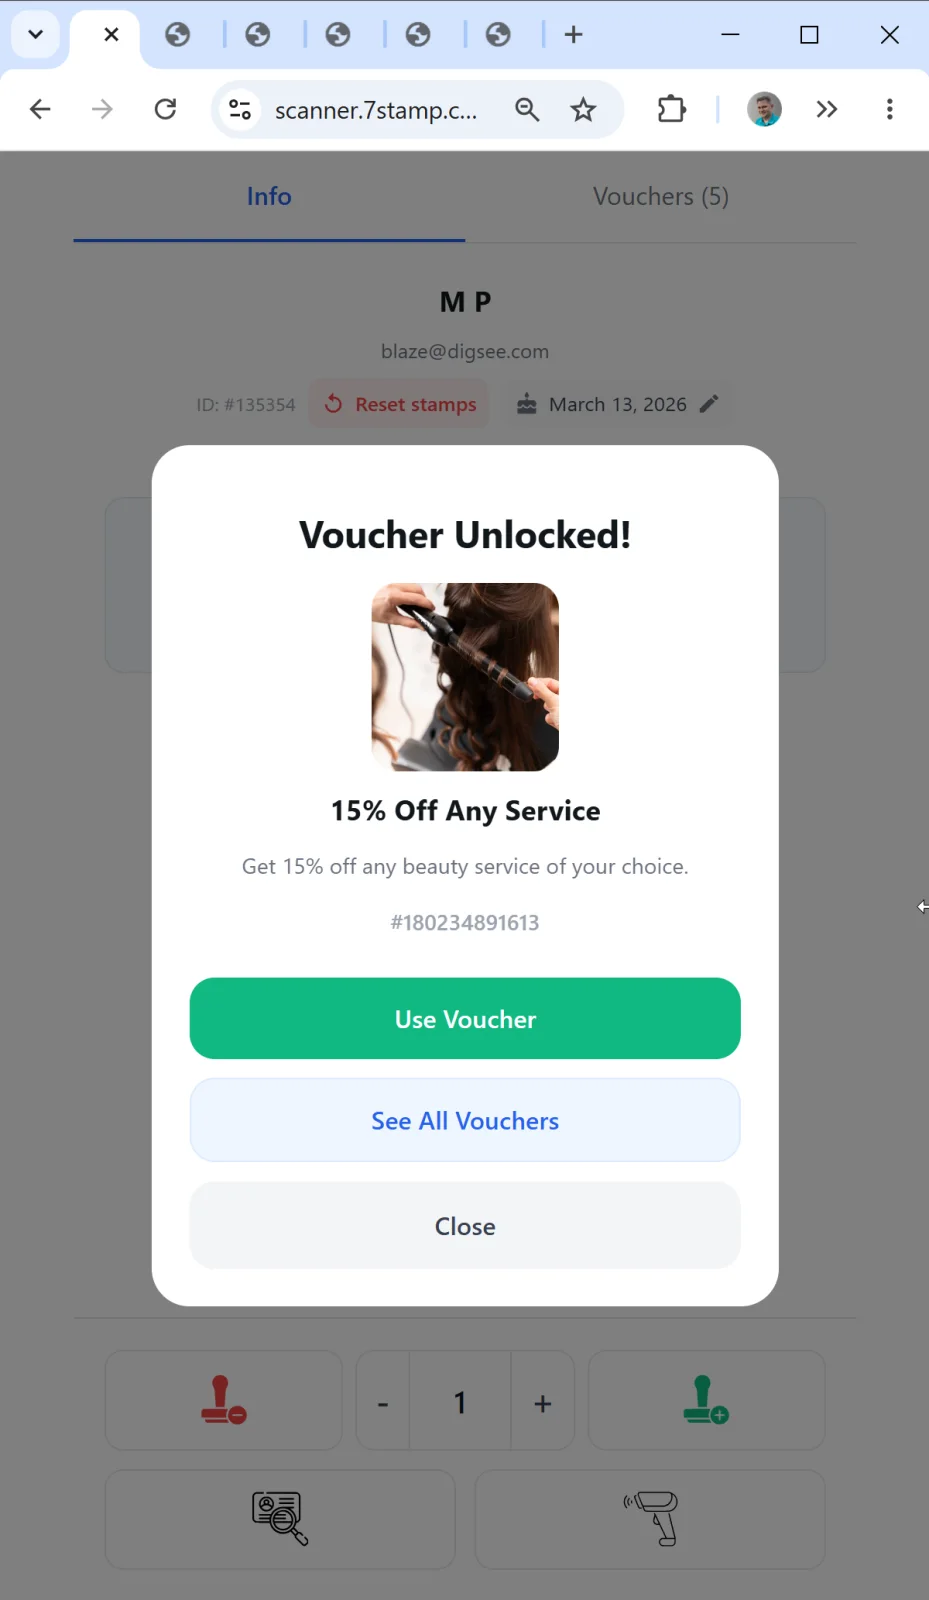
The Voucher Unlocked! popup with image, voucher title, and voucher number #XXXXXXX. Three actions:
- Use Voucher (green button) — redeem the voucher right in Scanner. If the voucher has the Redeem Code option enabled, the screen shows the code text + QR + barcode. The staff enters / scans the code into the POS. The voucher moves to
redeemedand can’t be used again. - See All Vouchers — open the list of all the customer’s vouchers (e.g., if the customer wants to redeem a different voucher first).
- Close — close the popup; the voucher stays active and the customer can use it later.
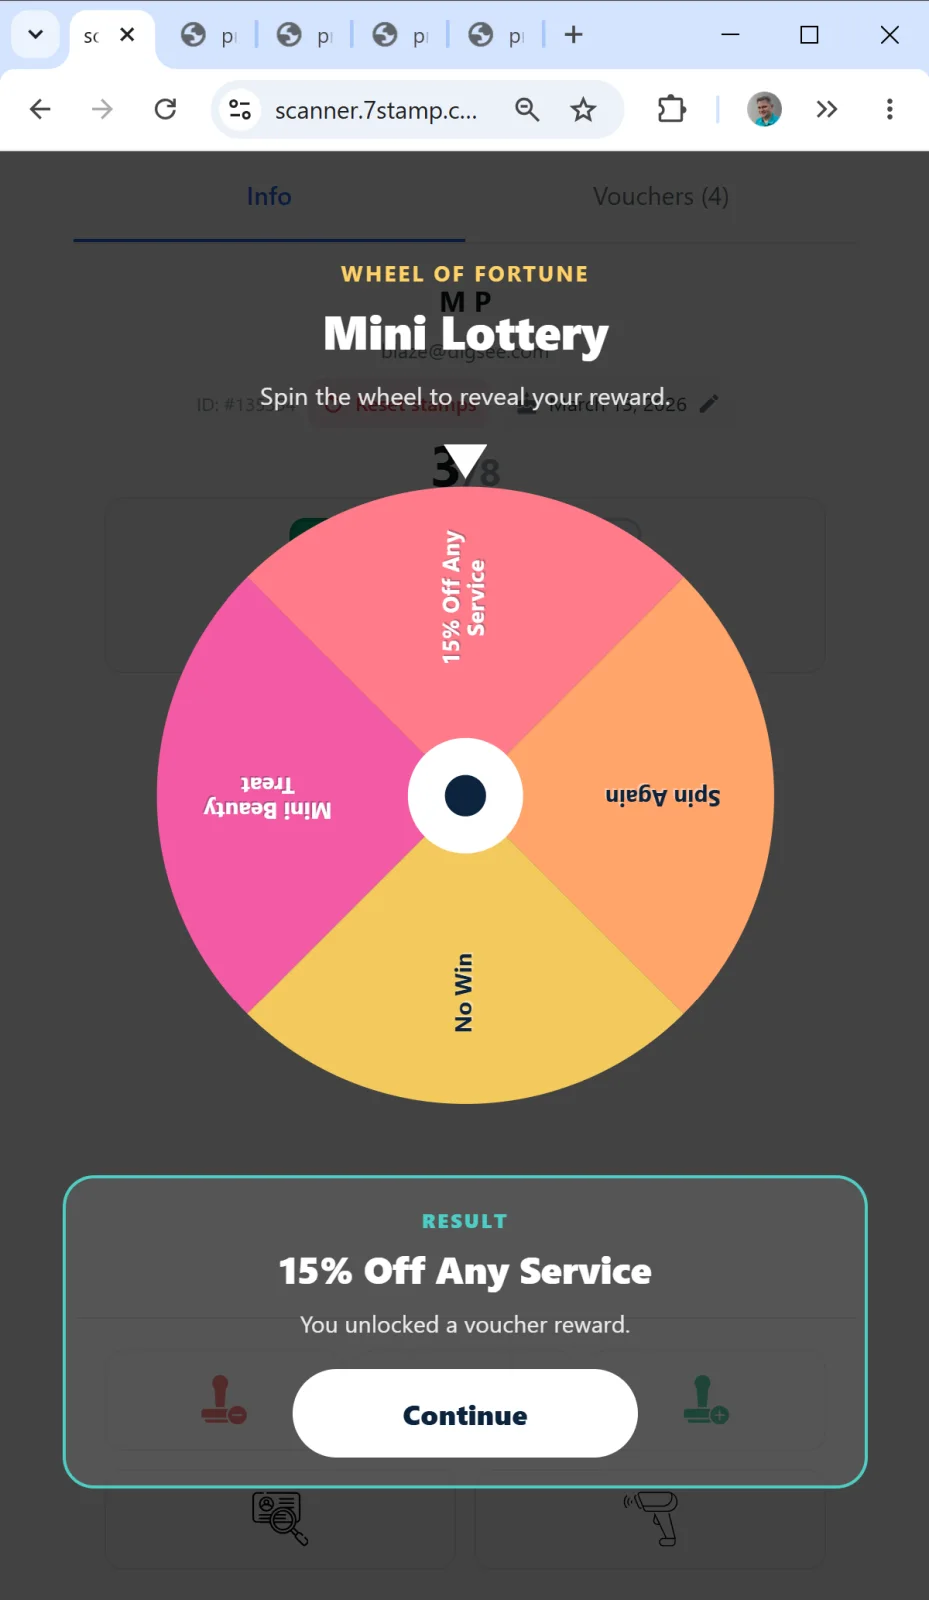
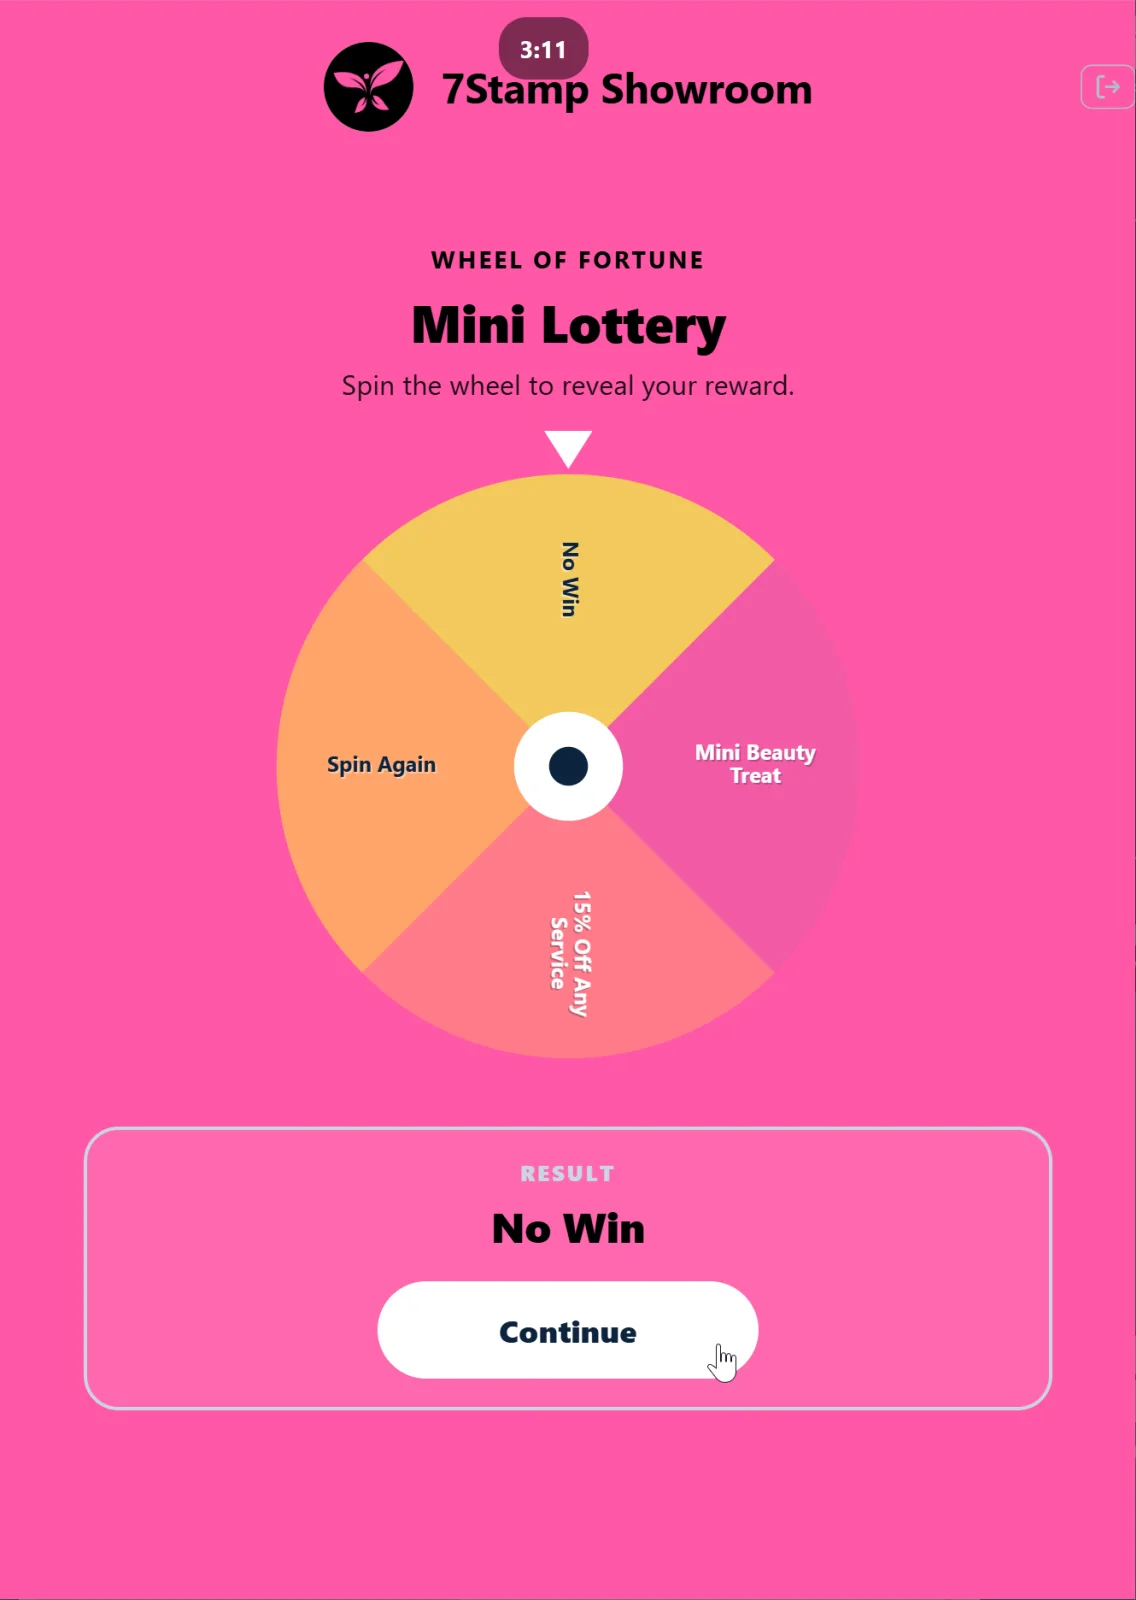
3. Reward = Lottery (a draw).
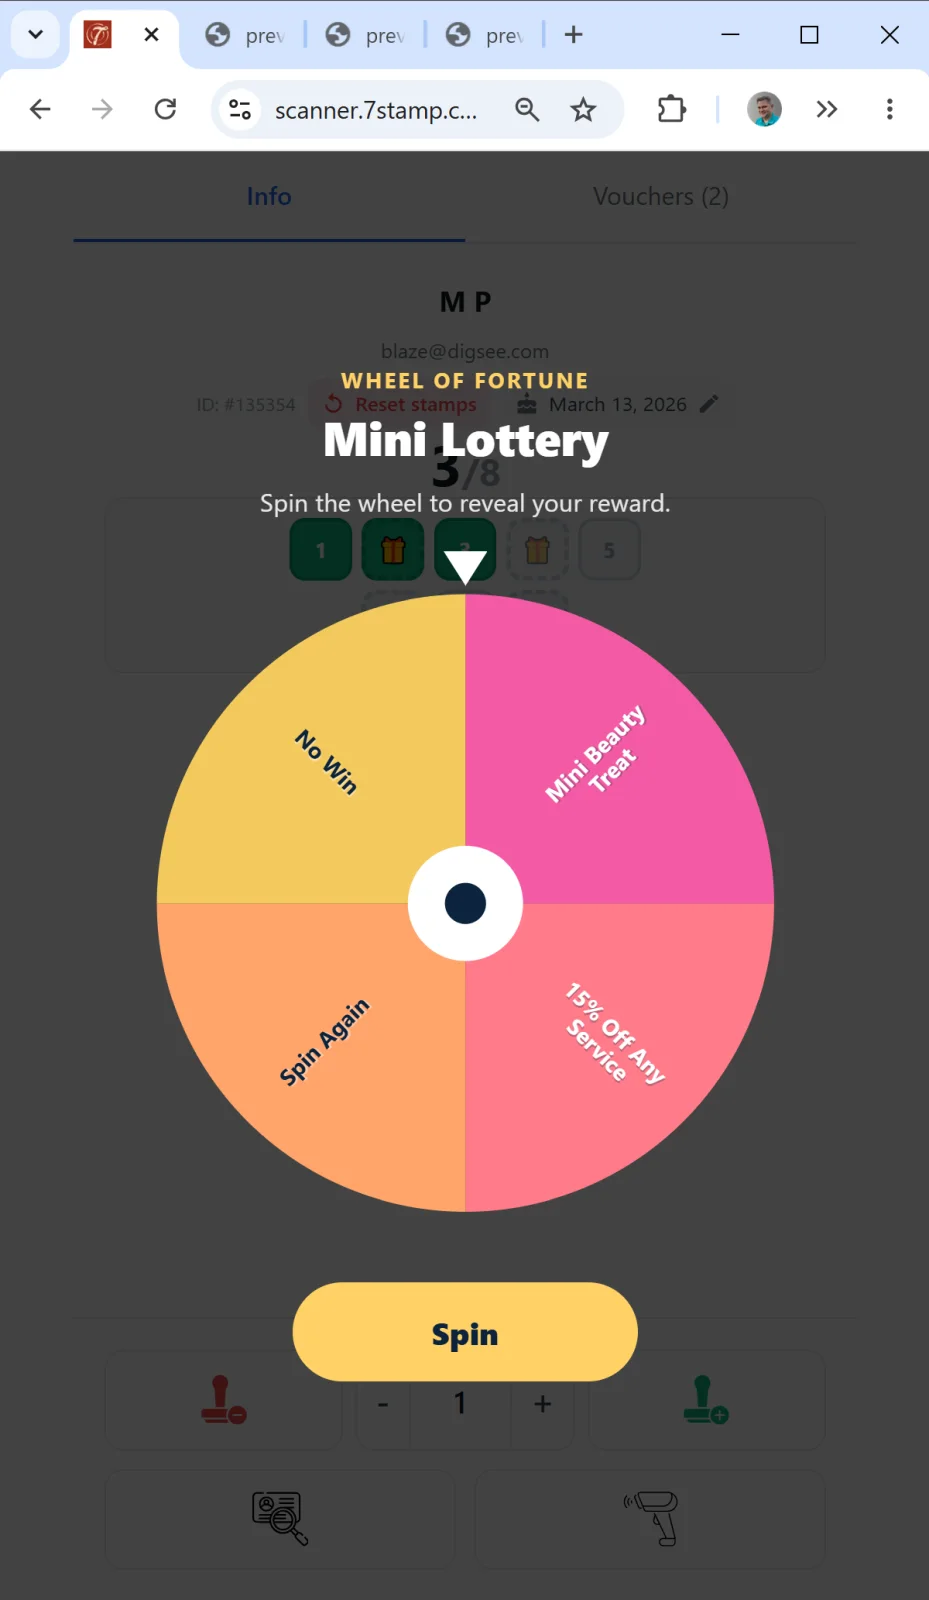
The lottery screen opens on the staff member’s device. The staff hands the device to the customer (or shows the screen) and asks them to tap “Play”. After the spin, one of the Variants fires and is then handled as an Award or a Voucher (see above).
Self-redemption of a voucher in Manual mode
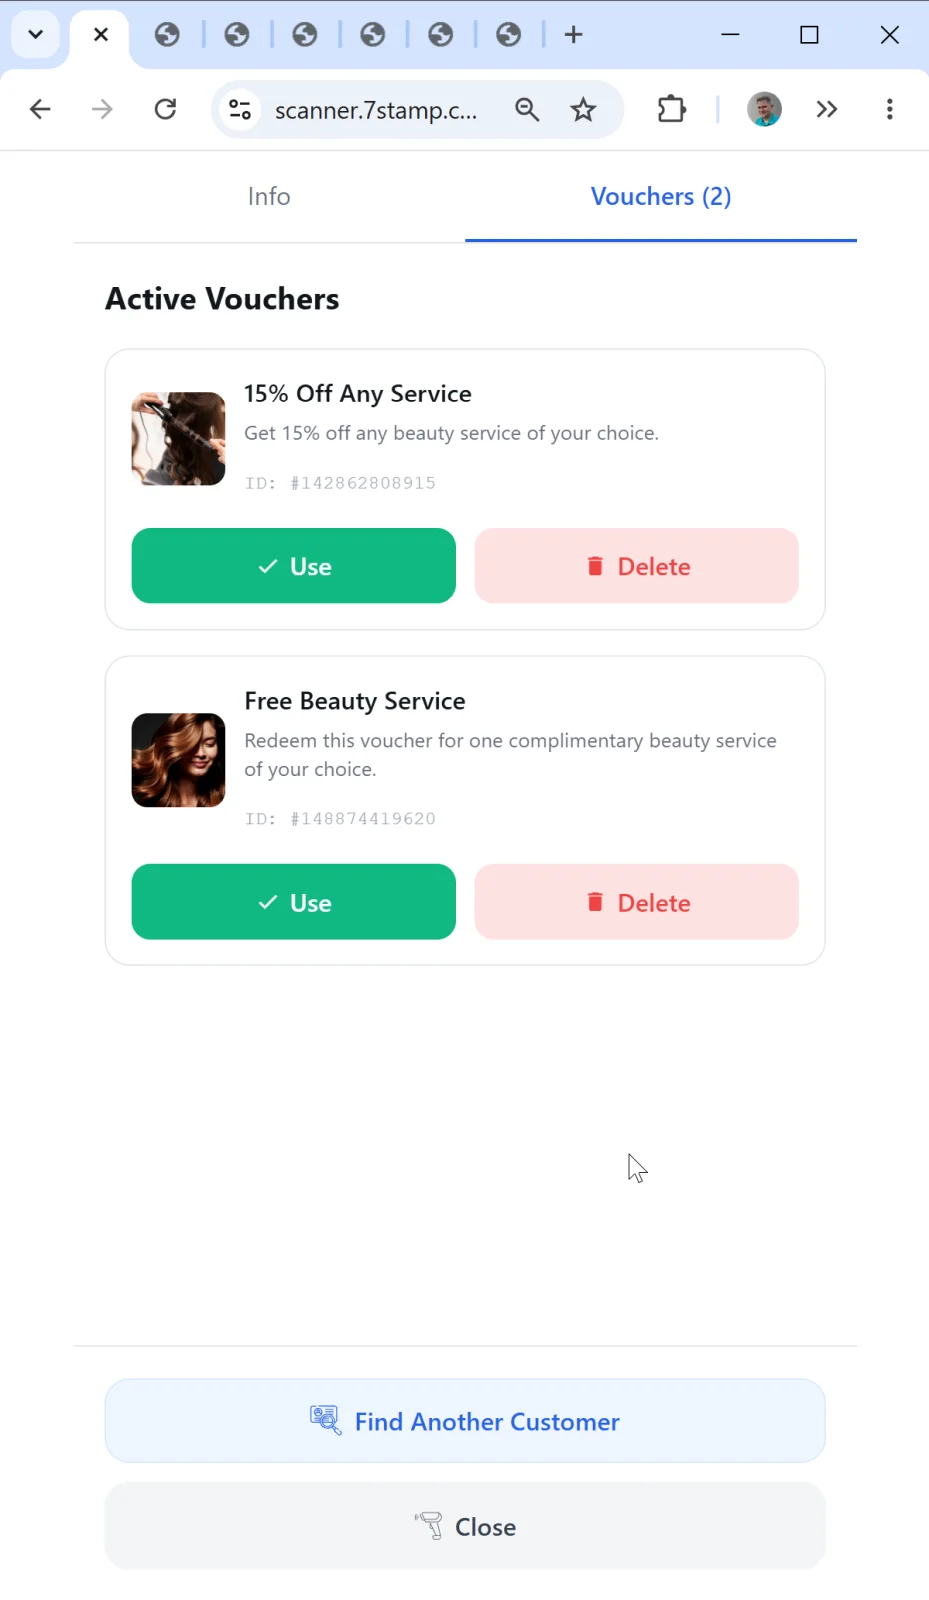
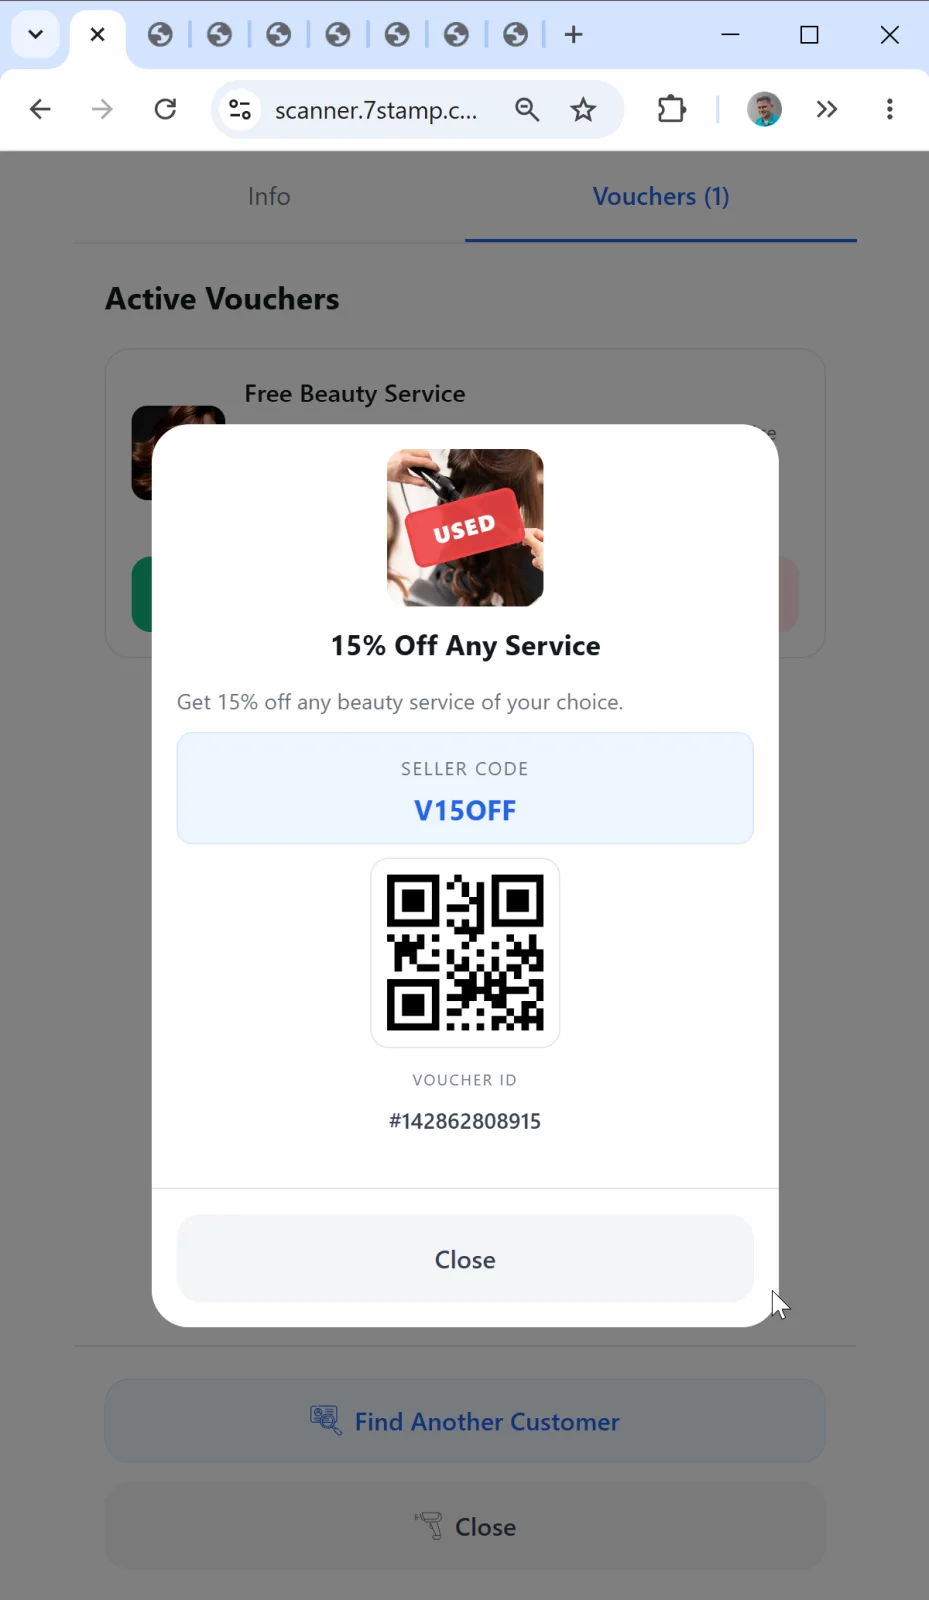
If the customer arrives for a promised gift later (not right after receiving it), the staff opens their card and switches to the Vouchers (N) tab. All the customer’s vouchers are visible here. The staff taps the right one → the voucher opens with Use Voucher → confirm → status redeemed.
Security: the Voucher state machine (issued → active → redeemed → expired) prevents double use. After redeemed the voucher (or its screenshot) won’t work again.
9.4 Autopilot Mode — background scanning at the till
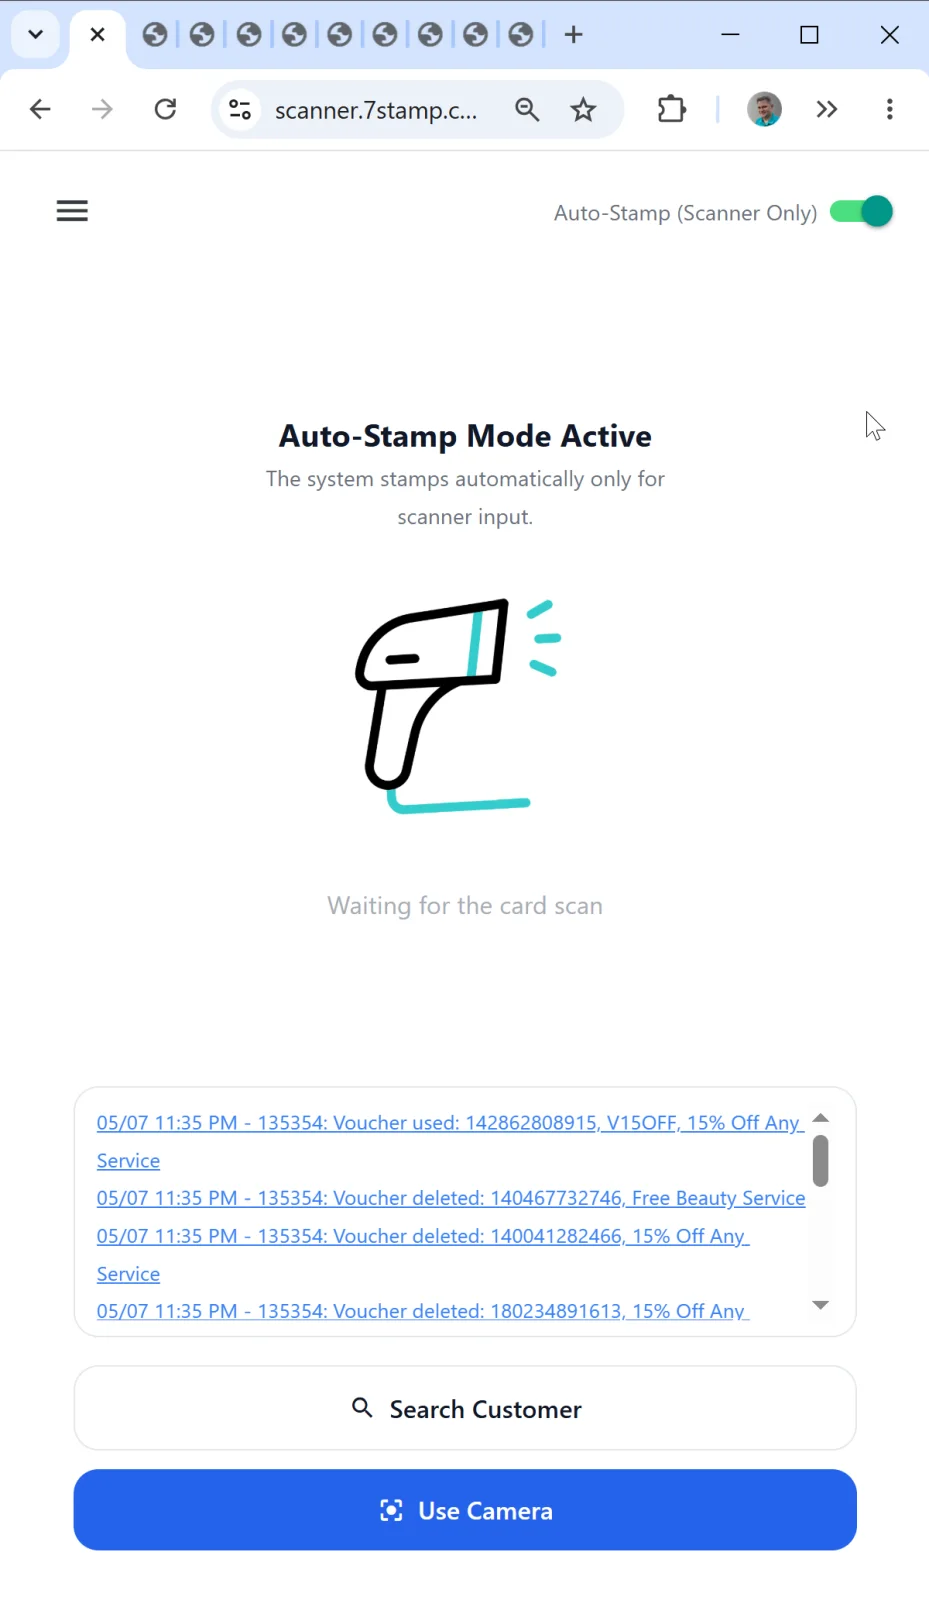
Autopilot Mode is a sub-mode of Manual Mode in which stamps are added in the background, with no confirmations and no modals. Ideal for peak hours in a coffee shop, fast food, bakery, car wash — anywhere there’s a queue and the service can’t slow down.
How to enable it
On the Manual Mode main screen, flip the Auto-Stamp (Scanner Only) toggle in the upper right to “on” (green). The screen changes:
- The icon switches to an external-scanner image.
- The main header reads: Auto-Stamp Mode Active.
- The subheader: “The system stamps automatically only for scanner input.”
How it works
The phrase “Scanner Only” means that in this mode stamps are added only via input from a hardware scanner (an external USB or Bluetooth barcode scanner connected to the computer/tablet). The Use Camera and Search Customer buttons remain visible on screen and available if you need them, but they’re not used in normal Autopilot operation — they serve as a backup (e.g., if the scanner didn’t pick up the customer and you need to find them manually).
Workflow:
- The staff takes the order as usual (at the till, the bar counter, the wash).
- At payment or right after, the customer shows their Wallet card.
- The external scanner catches the QR “as a barcode”.
- 7stamp Scanner adds the stamp to the customer’s card in the background.
- No modal — the queue doesn’t stop.
- The customer sees the progress update later in their Wallet via PUSH notification.
What you need
- Barcode scanner: USB or Bluetooth, capable of reading QR codes. Standard models from Honeywell, Zebra, Datalogic will do. The scanner should be set to keyboard emulation (HID mode).
- A permanent device at the till: a laptop or tablet with
scanner.7stamp.comopen or with the Android/iOS app. - Stable internet — every stamp goes to the cloud in real time.
Customer self-redemption of a voucher in Autopilot
In Autopilot the staff doesn’t physically scan the Wallet card in “dialog mode” — they work the queue. But the customer can use their voucher on the spot, and that doesn’t require switching modes. On the card page in Wallet the customer has a link to their vouchers. Opening it, the customer either:
- calls out the Redeem Code to the cashier, who enters it into the till (if the till supports promo codes), or
- shows the QR/barcode on their phone screen, and the cashier scans it with the external scanner.
After that the voucher moves to redeemed and can no longer be reused. As an alternative, the cashier can temporarily flip the Auto-Stamp toggle off, open the customer card manually, and redeem the voucher with Use Voucher.
When to come back to Manual
At any moment the staff can switch off the Auto-Stamp toggle and go back to manual scanning — for instance, if the customer comes with a problem (lost a voucher, wants to adjust stamps manually) or you need to look them up by name/email. All Manual Mode features are available — search, camera scan, manual voucher issuing and redemption.
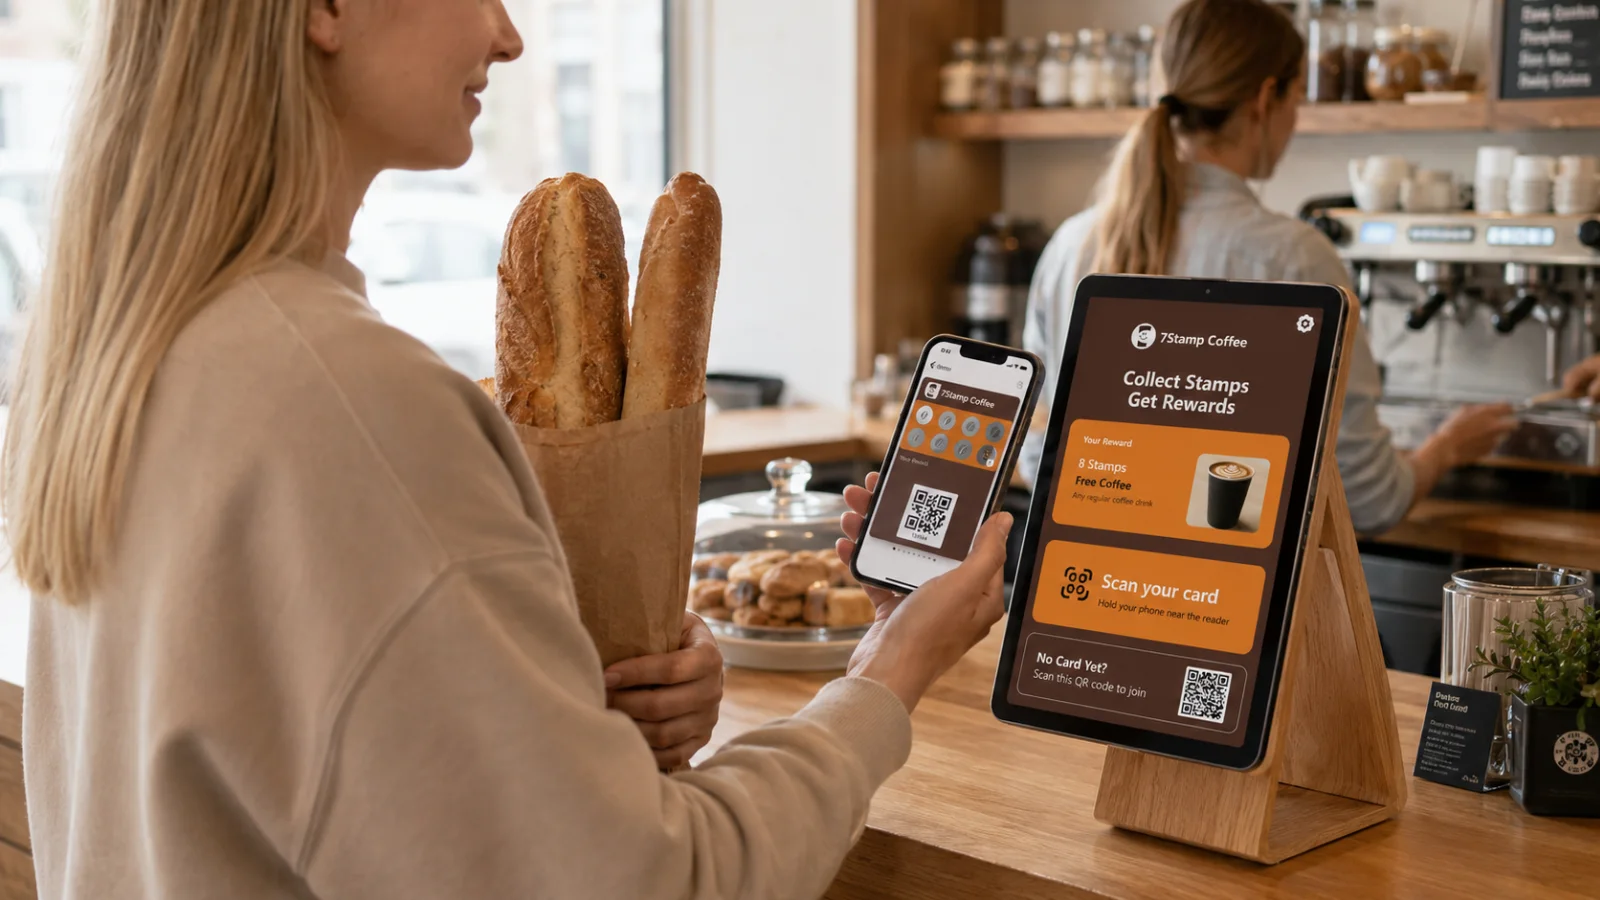
9.5 Kiosk Mode — customer self-service
Kiosk Mode is a full-screen self-service mode in which the tablet faces the customer and the customer scans their own card. The staff is not involved in the process at all — hence “zero staff training”. It’s ideal for coffee shops, bakeries, fast casual restaurants, light retail, car washes.
Kiosk Mode setup
Step 1. Switch to Kiosk.
In the side menu (☰) pick Kiosk Mode. The app enters setup mode.
Make sure to read the on-screen tips about how to “pin” the app on an Android tablet or iPad so the customer can’t minimize or close it (the device’s so-called Kiosk mode). These are your tablet’s system features — read the hint on our screen, or the manual for your device.
Step 2. Pick the card to display.
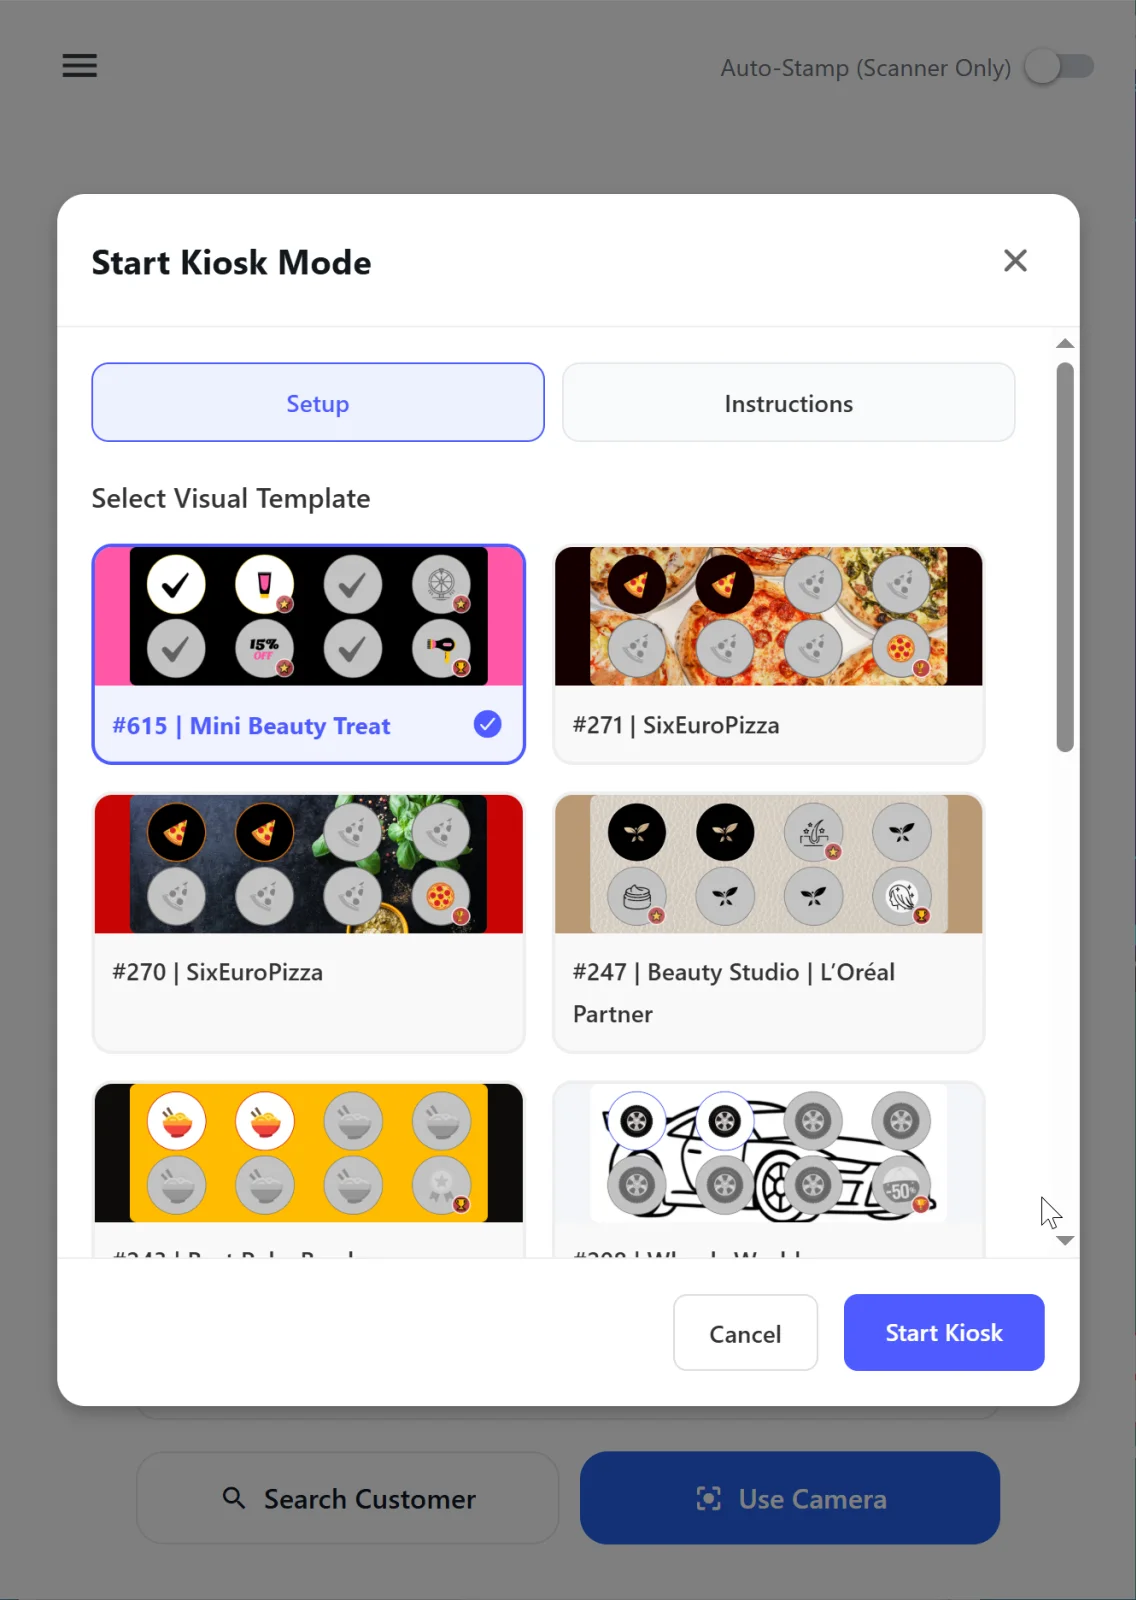
If your business has several Stamp Cards (e.g., a separate card for coffee and another for pastry), pick the one that will be shown on this specific tablet. You can set up several tablets for different cards.
Step 3. Additional options.

Extra Kiosk launch settings.
First — the color scheme. You can launch Kiosk in your card’s palette or pick one of our predefined sets. Try the option that looks best to you!
The most important option is Prevent Immediate Scans. It blocks the same customer from earning a stamp twice in a row: if the option is on, a repeat scan just shows the customer their previous result (the last Reward / screen shown), and no stamp is added. This protects against accidental double scans at the counter.
After confirmation — Kiosk launches.
Kiosk Mode main screen
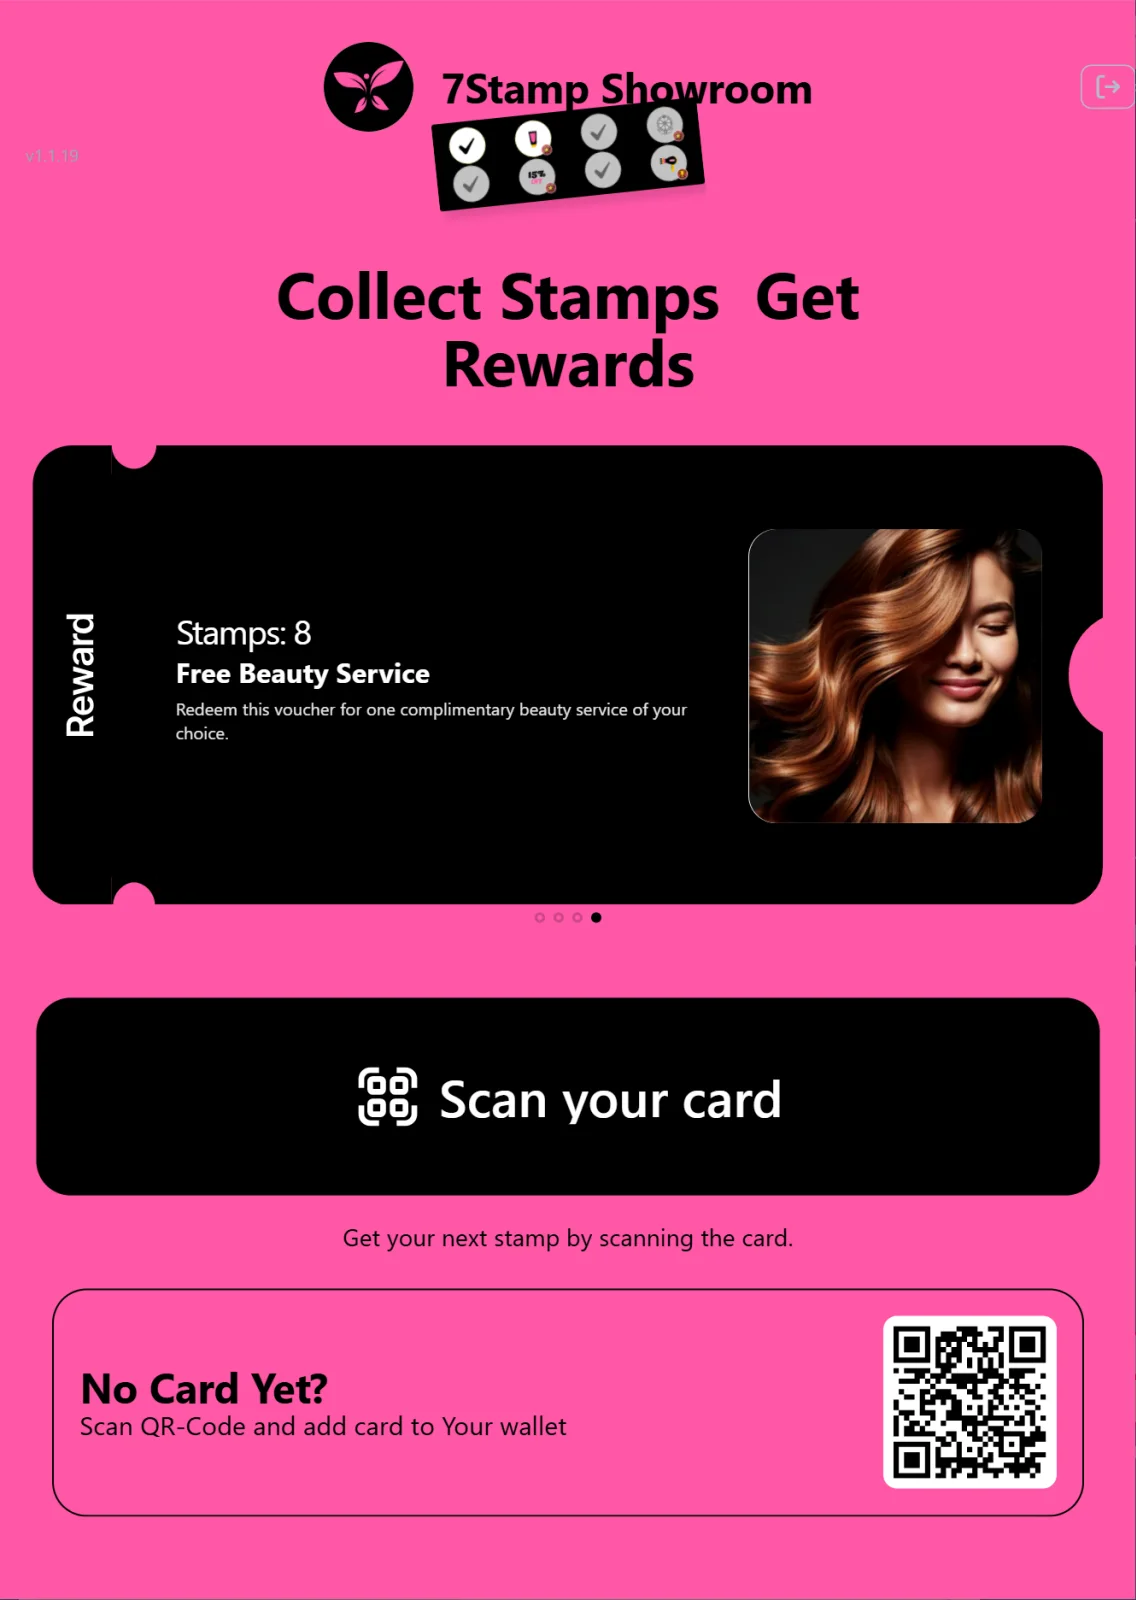
What the customer sees on approaching the tablet:
- Up top — your business logo and name (pulled from the card settings).
- Header: Collect Stamps Get Rewards.
- A
Your Rewardcarousel — shows the final gift (and, with milestone rewards, all intermediate ones). Swipeable. - A large black 📱 Scan your card button with the sublabel “Get your next stamp by scanning the card.” (or “Hold your phone near the reader” — the text adapts).
- At the bottom — the new-customer block: No Card Yet? “Scan QR-Code and add card to Your wallet” with the join page QR.
Customer scenario in Kiosk Mode
- The customer comes up to the tablet stand.
- If they already have a card → open Wallet → tap Scan your card → hold the Wallet screen to the tablet camera → stamp added.
- If they don’t have a card yet → scan the No Card Yet? QR with their phone camera → the card saves to Wallet instantly → tap Scan your card → get their first stamp.
What the customer sees on reaching the goal
Reward = Award.
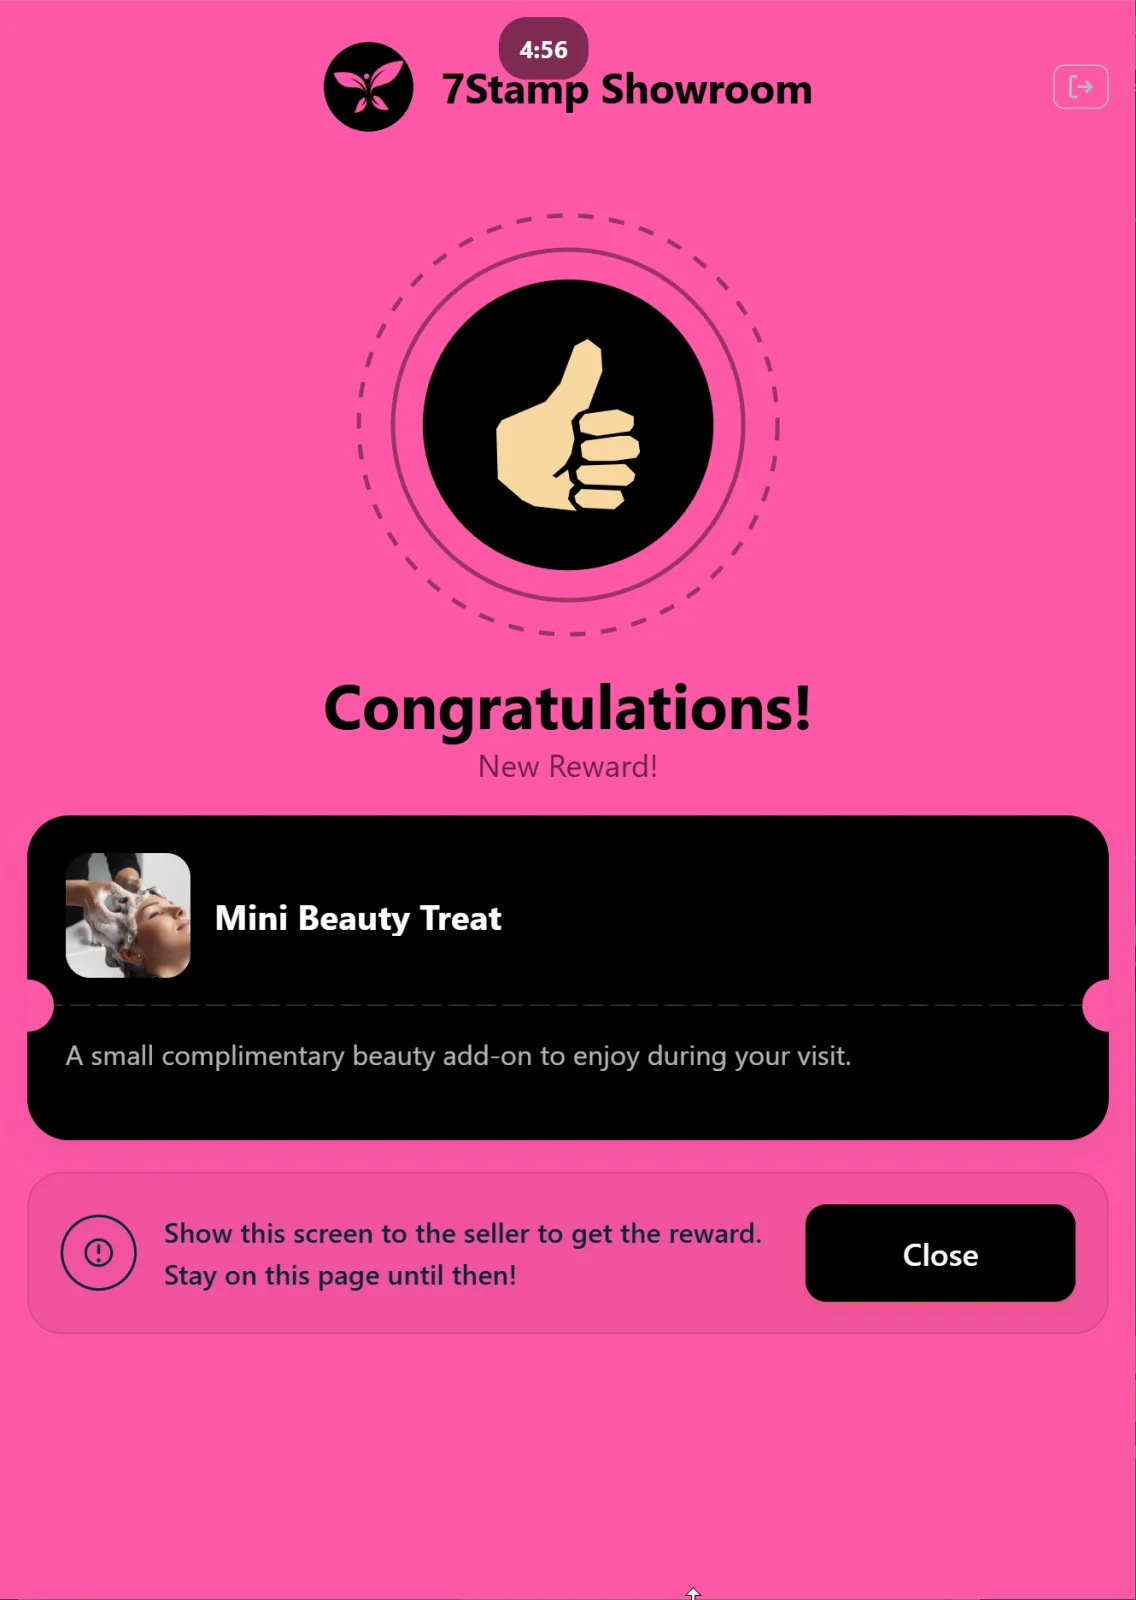
A full-screen Congratulations! screen with the gift’s image and description. The customer shows the screen to staff and collects the promised gift.
Reward = Voucher.
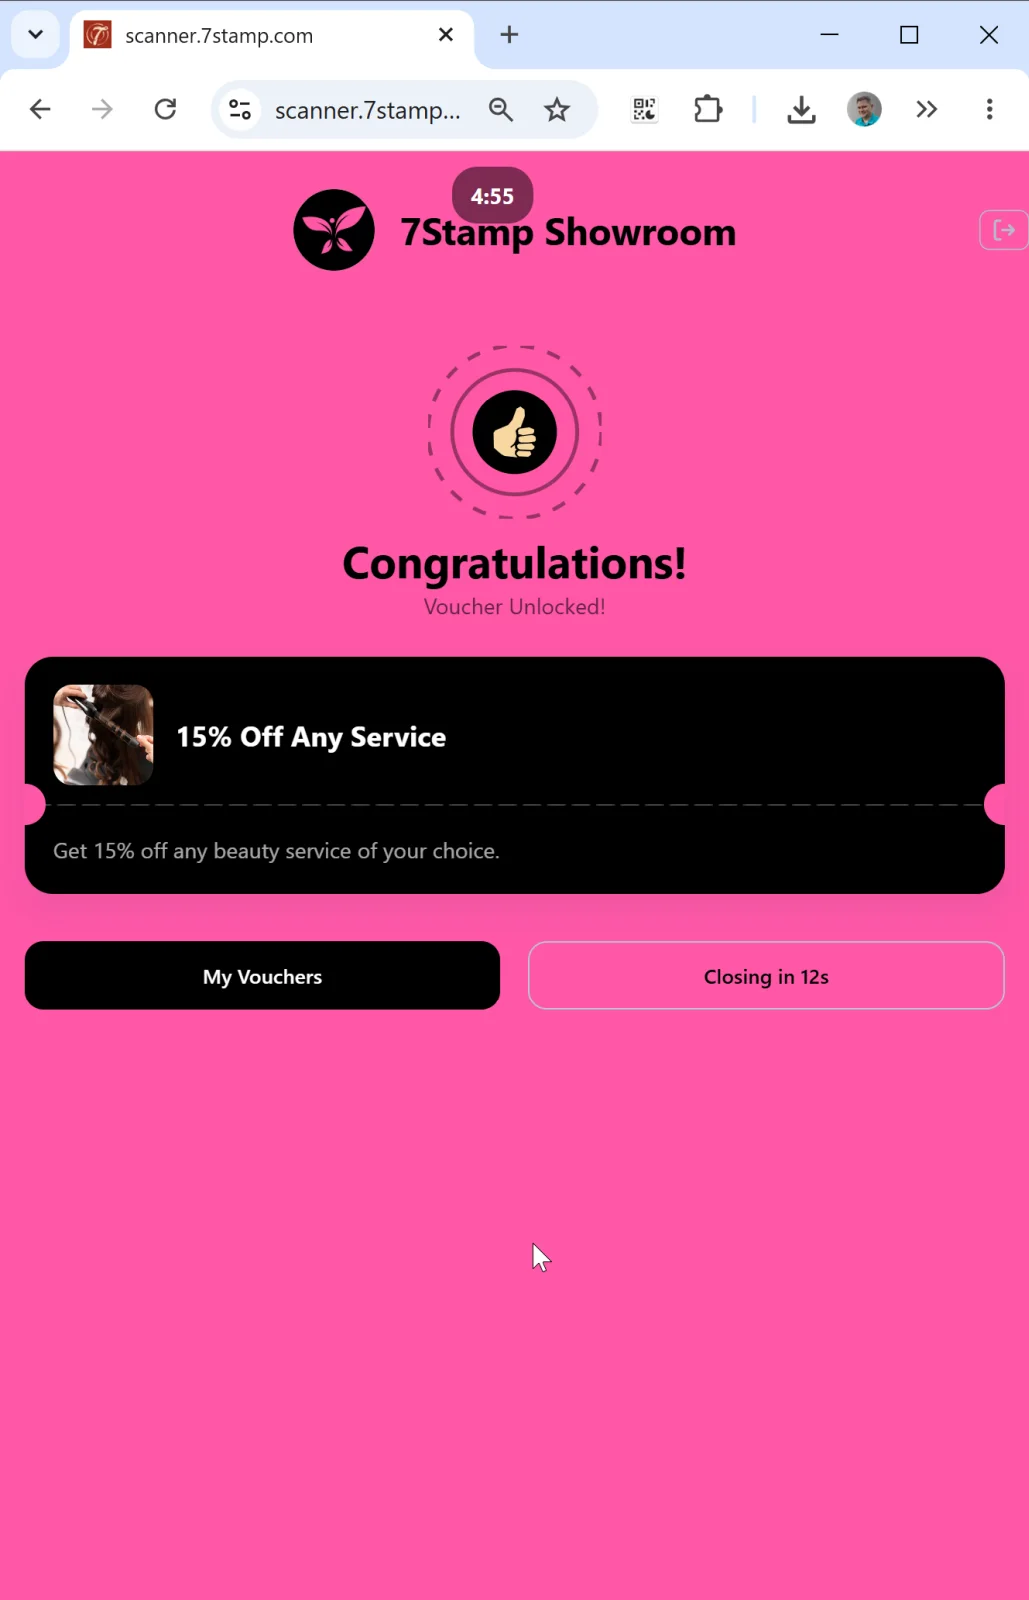
A Congratulations! Voucher Unlocked! screen with the voucher card. The customer can redeem the voucher themselves right in Kiosk — the use button opens a screen with the Redeem Code (text + QR + barcode) that the customer shows to the cashier, who scans or enters the code into the till. After redemption the voucher moves to redeemed and can’t be used again, even if the customer kept a screenshot.
At the bottom — buttons:
- My Vouchers — see all my vouchers.
- Closing in 12s — countdown to automatic return to the main screen.
This is an important Kiosk pattern: auto-close. Without it the tablet would be “stuck” on one customer’s screen until staff intervened. The countdown ensures the tablet always returns to a clean starting screen 10–15 seconds after an action.
Reward = Lottery.
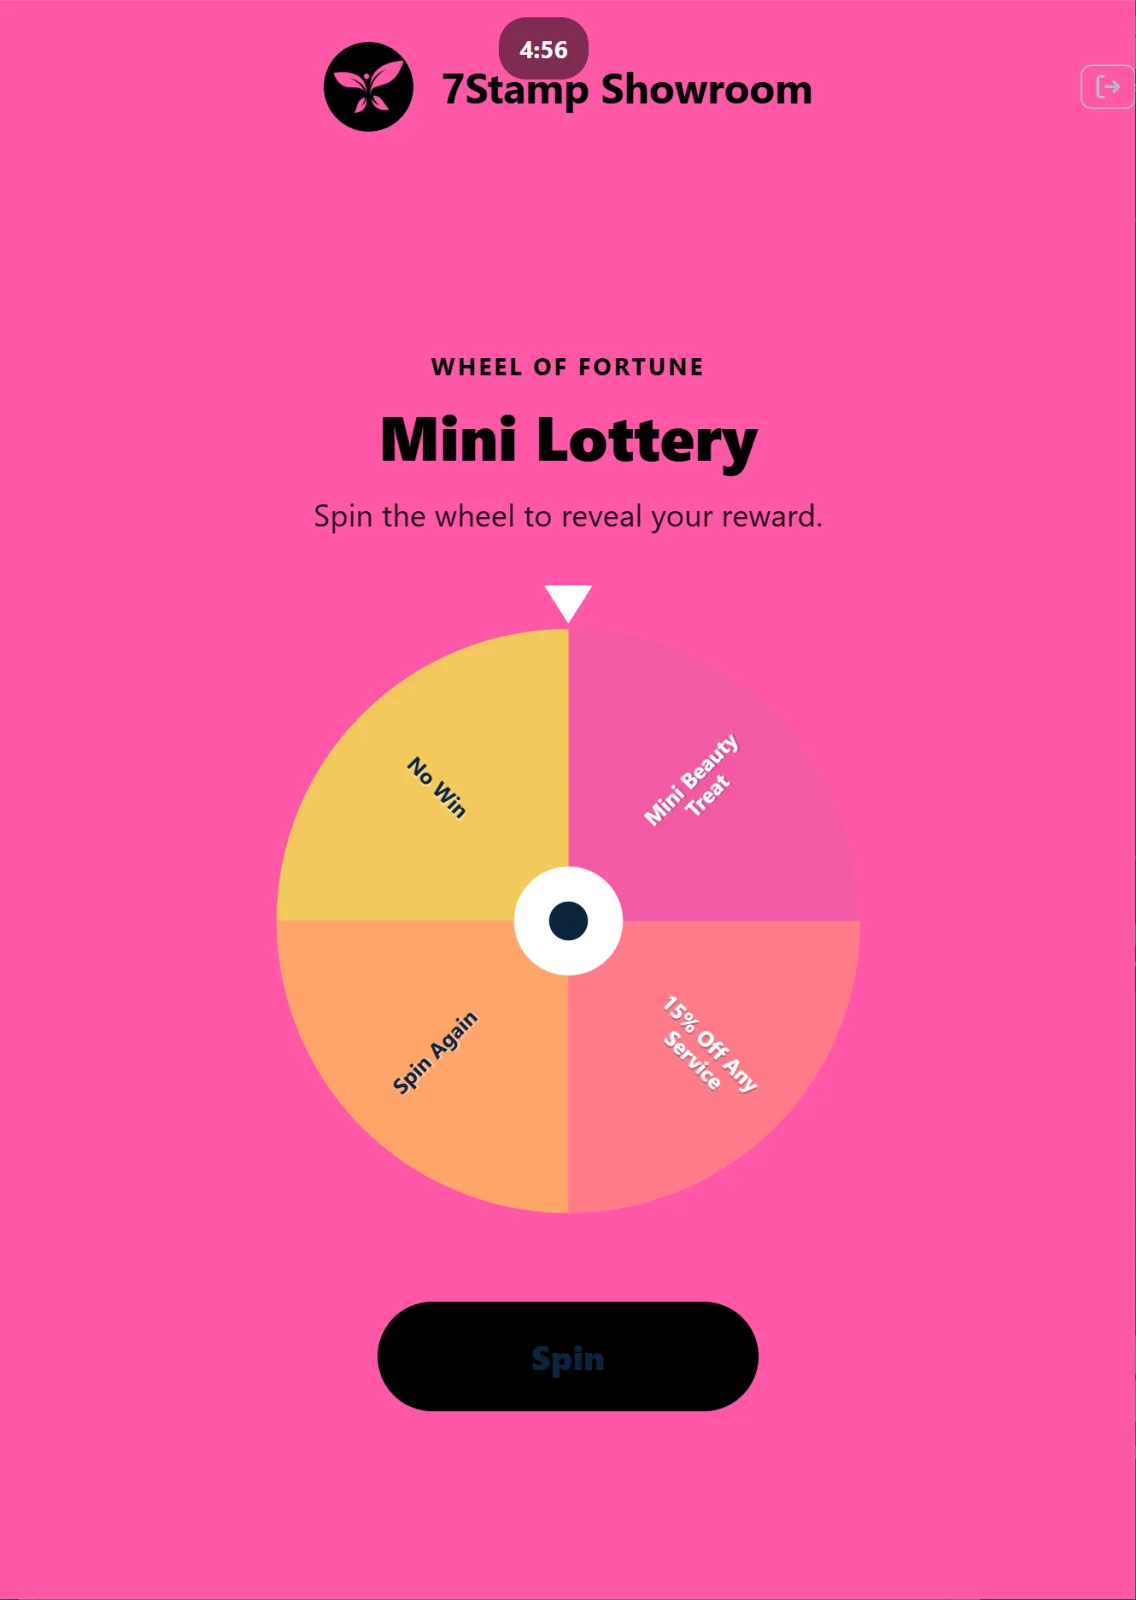
The customer spins the lottery on the screen themselves — a pleasant game mechanic. After a Variant drops, the screen behaves like Award or Voucher above.
Viewing the customer’s vouchers
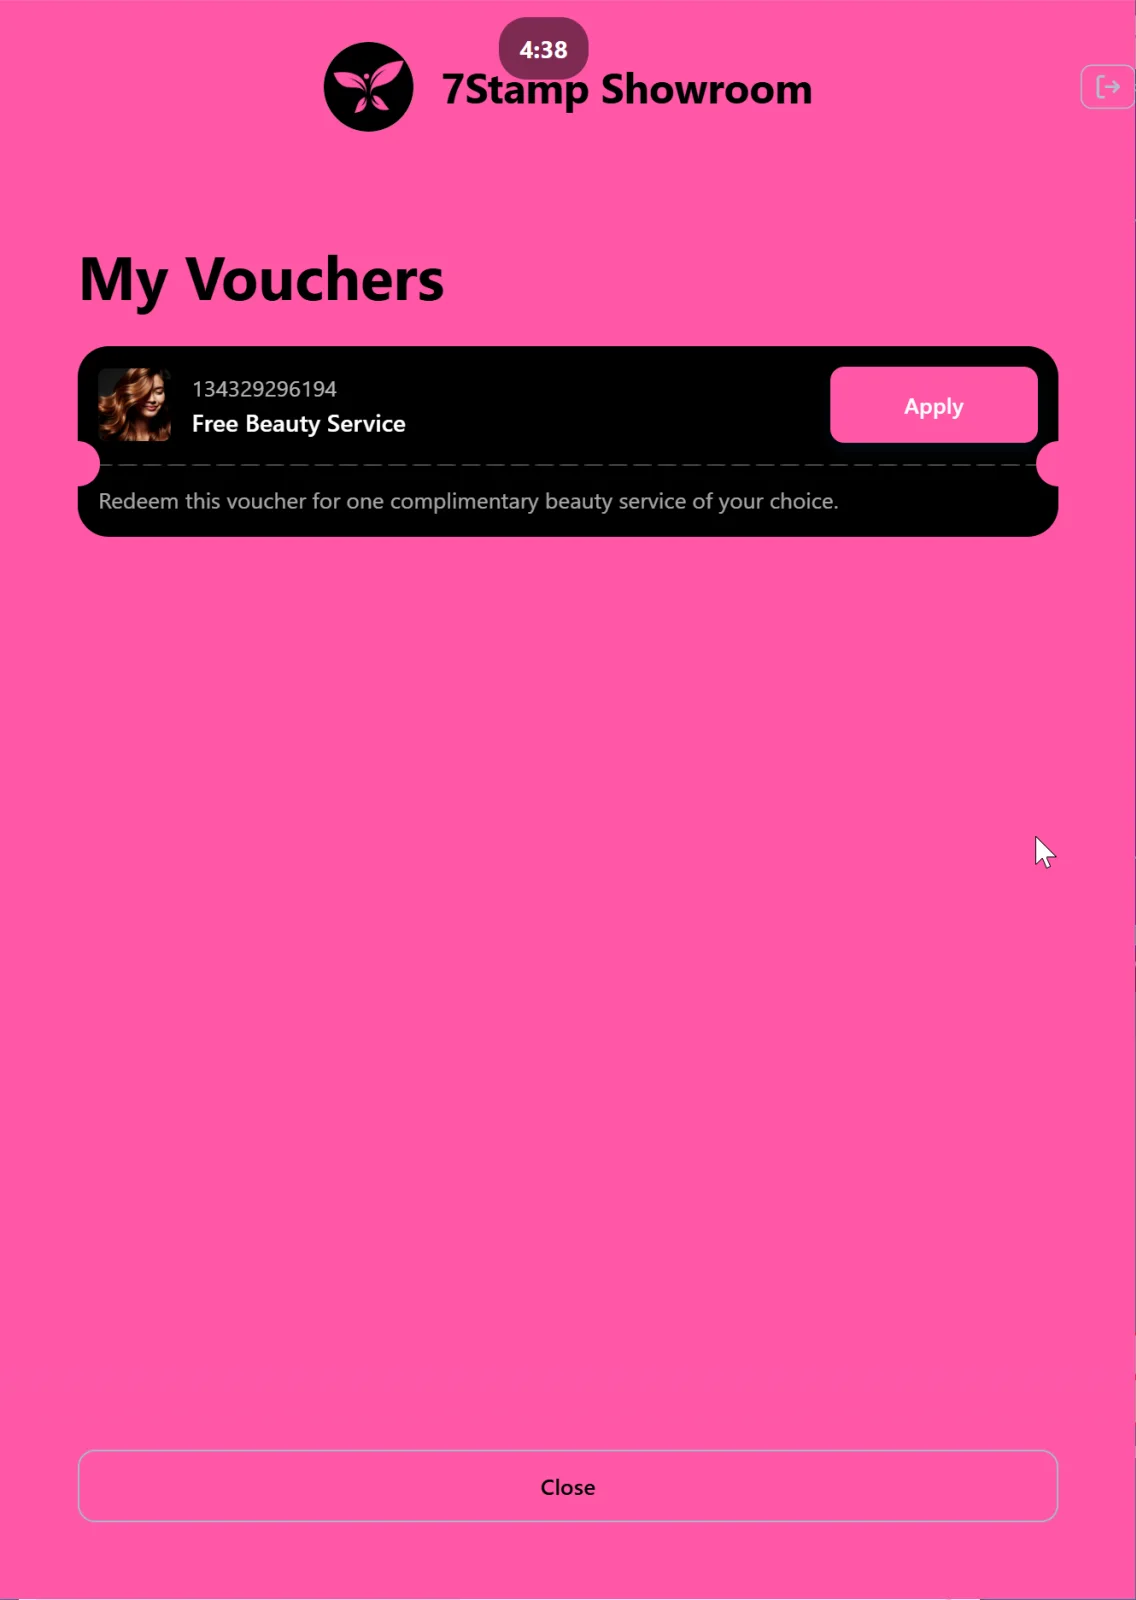
At any moment the customer can tap My Vouchers on the Kiosk main screen and see all their active vouchers. This is convenient: if the customer has an unused voucher from a previous visit, they can show it to staff right away without opening Wallet.
Technical requirements for a Kiosk stand
- Tablet: 10” or 12” iPad / Android tablet. The bigger the screen, the more convenient for the customer. We like the iPad mini.
- Stand: fixed, facing the customer. The stand should let them hold a Wallet phone up to the tablet camera.
- Power: constant mains connection. Kiosk runs all day.
- Internet: reliable Wi-Fi or mobile 4G.
- Optional — a simple instruction card next to the stand: “1) Open your card in Wallet. 2) Hold it up to the camera. 3) Done!” — in two languages if you have international guests. Though a well-placed tablet with our Kiosk UI usually handles this role on its own.
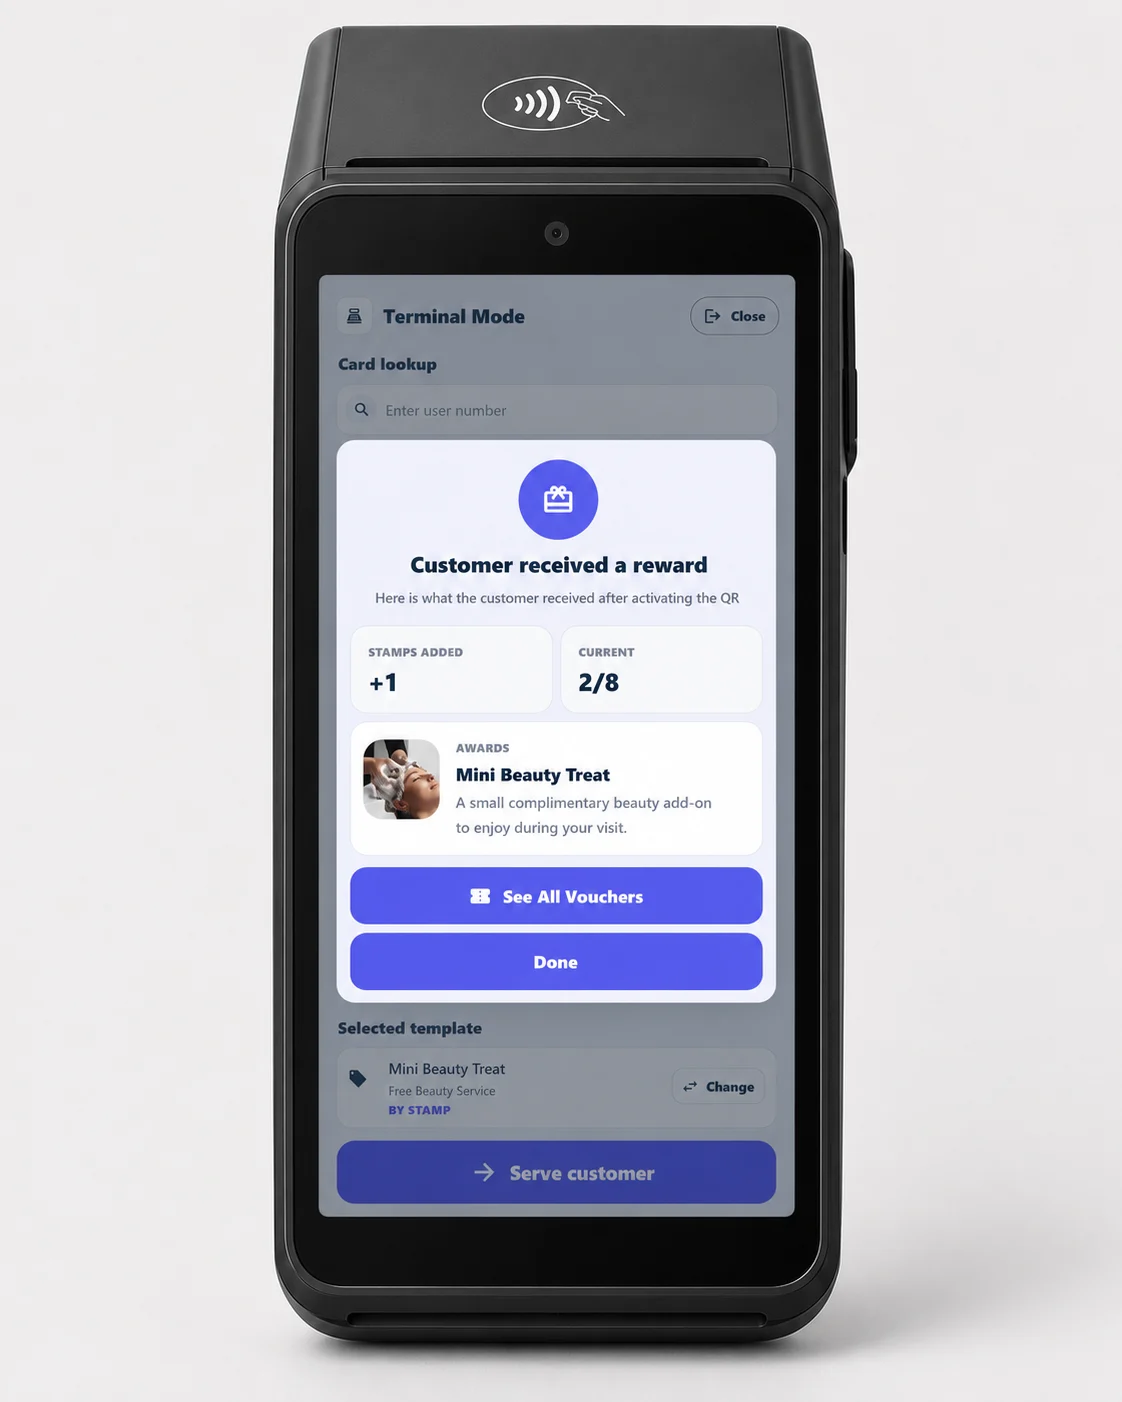
9.6 Terminal Mode — loyalty on a payment terminal
Terminal Mode runs loyalty directly on an existing Android payment terminal. It is ideal for acquirers, payment processors, ISOs, and any merchant who already has a terminal at checkout and wants loyalty without new hardware.
How it works
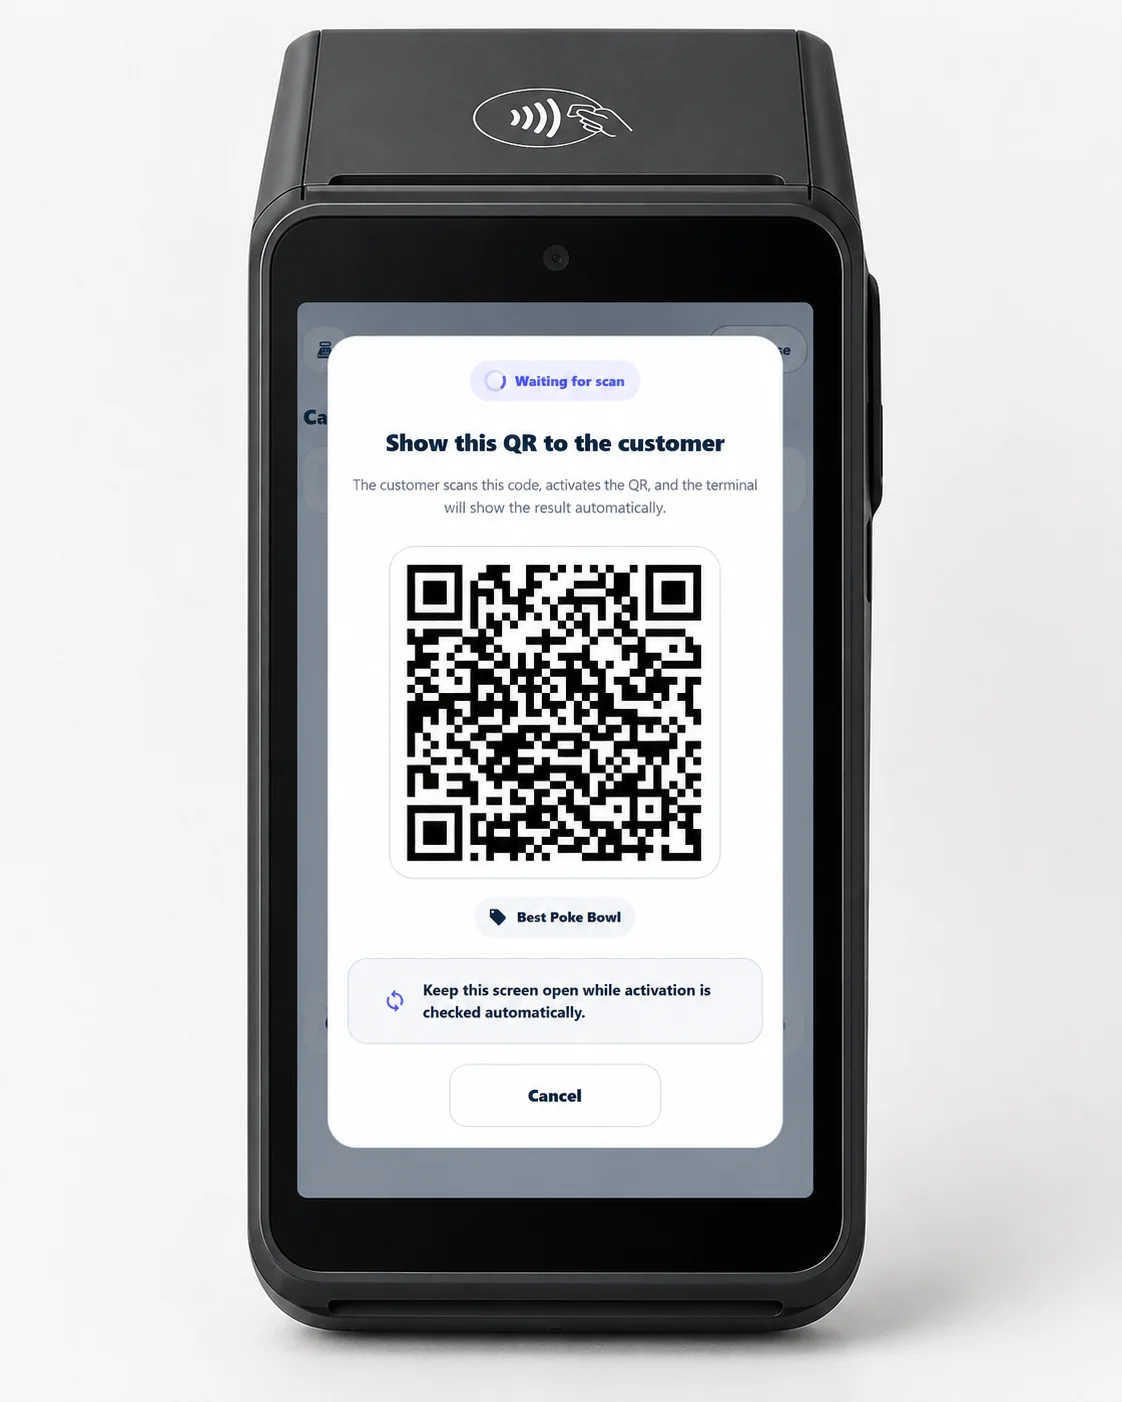
- The customer pays on the terminal as usual.
- The 7stamp Scanner app opens — automatically with light integration, or with one tap by the cashier.
- The cashier taps Serve customer; a unique dynamic QR code appears on the terminal screen.
- The customer scans the QR with their phone. A new card is created and saved to the wallet (with the first stamps), or an existing card updates instantly.
Adding stamps
Stamps can be added as a fixed amount (one per purchase) or by amount (the cashier enters the receipt total on the terminal).
Rewards on the terminal
- Award: the terminal prompts the cashier to hand over the gift when a goal is reached.
- Smart Voucher: on a later visit, the cashier opens the customer’s vouchers on the terminal (or enters the voucher number) and redeems one in a tap.
- Lottery: the customer spins the wheel on their phone; the result appears on the terminal screen.
Installing on the terminal
Install the 7stamp Scanner app from Google Play or deploy the direct APK across your terminal fleet.
Advanced integrations (on request)
Tap-to-collect over Apple VAS and Google Smart Tap — read by the terminal’s payment application on a VAS/Smart Tap–certified terminal — and card-linked loyalty (network-token matching at processor level), are advanced integrations available on request.
For partner and commercial details, see Acquirers & Payment Networks and Terminal Mode.
9.7 How to choose a mode — comparison
| Parameter | Manual Mode | Autopilot Mode | Kiosk Mode | Terminal Mode |
|---|---|---|---|---|
| Who scans | Staff via phone/camera | External scanner “as a barcode” | The customer themselves on the stand | The customer scans a QR on the terminal screen |
| Business type | Premium service, salons, restaurants | Coffee shops, fast food, busy counters | Coffee shops, bakeries, car washes, light retail | Any merchant with a payment terminal; acquirer/processor estates |
| Hardware | Device camera | External QR scanner | 10–12” tablet + stand | Existing Android payment terminal |
| Where it lives | Staff phone/tablet | Laptop/tablet at the till | Tablet on a stand facing the customer | The payment terminal at checkout |
| Staff training risk | Minimal (one tap) | Zero (background work) | Zero (customer does it) | Minimal (one tap: “Serve customer”) |
| Lottery | Customer plays from staff screen | Available via manual action | Customer plays it themselves | Customer plays on their phone; result on terminal |
You can use several modes at once. For example, a hotel with a restaurant and a spa: in the spa — Manual Mode (premium, personal contact); in the restaurant’s cafe — Kiosk Mode on a stand (fast, no waiter involvement); at the reception — Autopilot for regulars. One Staff Seat supports one login at a time; if you need several simultaneous points, add Staff Logins in the admin.
9.8 Practical tips for launching Scanner
- Test before opening. Do 5–10 trial scans with your own card in the morning before the shift — make sure the camera focuses, the internet works, the stamps are added.
- On the Kiosk tablet, disable auto-lock and notifications. Nobody should accidentally exit to the OS or get a stray notification. On iOS use Guided Access, on Android Screen Pinning.
- For internet outages keep printed QR labels nearby (exported from the admin) — the customer scans them themselves and gets the card even if Scanner is temporarily unavailable.
- Onboard new staff. Every new shift member should know five things: how to log in to Scanner, how to scan a card, how to add a stamp, how to handle
Voucher Unlocked!, how to redeem a voucher from theVoucherstab. Five minutes of training. - The recent event log at the bottom of Manual Mode is your working log. If the customer complains “the stamp didn’t go through”, check it: you’ll see the time, the card ID, and what was issued / used.
Visual walkthrough
Use the screen sets below as a visual companion to the article. Open any image to inspect it at full size.