
เอกสารอ้างอิง
7Stamp Scanner เป็นแอปที่ใช้งานได้สำหรับพนักงาน ลูกค้า ตู้คีออสก์ และเครื่องชำระเงินของ Android เปลี่ยนการสแกนบัตรเป็นการให้แสตมป์ การแลกบัตรกำนัล การหมุนเวียนลอตเตอรี และความภักดีในการชำระเงิน Terminal Mode การเข้าสู่ร…
9. 7Stamp Scanner แอปพลิเคชัน — ด้วยตนเอง / Autopilot / Kiosk / Terminal Mode
7Stamp Scanner เป็นแอปที่ใช้งานได้สำหรับพนักงาน ลูกค้า ตู้คีออสก์ และเครื่องชำระเงินของ Android หน้าที่ของบริษัทคือเปลี่ยนการสแกนบัตรให้เป็นการให้แสตมป์ การแลกบัตรกำนัล การหมุนเวียนลอตเตอรี และความภักดีในการชำระเงิน Terminal Mode มันเป็นสิ่งที่วางอยู่ตรงเคาน์เตอร์ ในกระเป๋าของพนักงาน บนแผงที่หันหน้าเข้าหาลูกค้า หรือบนเครื่องชำระเงินที่กำลังนั่งอยู่ที่จุดชำระเงิน การเข้าสู่ระบบของพนักงานเพียงครั้งเดียวทำให้สามารถเข้าถึงโหมดสแกนเนอร์หลักได้ — การเลือกโหมดจะขึ้นอยู่กับจังหวะของธุรกิจของคุณและสถานการณ์การบริการ
[ภาพหน้าจอ: 1101_How_To_Scanpng.png]
9.1 โดยที่ 7Stamp Scanner ทำงาน
เวอร์ชันเว็บ (ทุกอุปกรณ์): เครื่องสแกน7stamp.com
- ใช้งานได้กับเบราว์เซอร์สมัยใหม่ทุกชนิด บนสมาร์ทโฟน แท็บเล็ต หรือคอมพิวเตอร์
- ไม่มีการติดตั้ง — เปิดหน้า ป้อน Staff Login ของคุณ และเริ่มทำงาน
- เหมาะสำหรับแล็ปท็อปที่ใช้งานร่วมกันได้ตลอดเวลา แท็บเล็ตแบบตั้งพื้น และอุปกรณ์ Windows/Mac/Linux ใดๆ ที่มีกล้อง
- คุณสามารถเชื่อมต่อเครื่องสแกนภายนอกและสแกนบัตรลูกค้าได้ ไม่จำเป็นต้องกำหนดค่า
Android: Google Play · APK โดยตรง iOS: แอพสโตร์
- แอพเนทีฟ — ทำงานเร็วขึ้น ใช้กล้องโทรศัพท์ดีขึ้น
- เหมาะสำหรับพนักงานที่ทำงานโดยใช้โทรศัพท์ของตัวเอง (บริการระดับพรีเมียม งานภาคสนาม และจัดส่ง)
- คุณสามารถเชื่อมต่อเครื่องสแกนภายนอกและสแกนบัตรลูกค้าได้ (ในกรณีนี้ให้พิจารณาโหมด Autopilot)
- สามารถทำงานบนแท็บเล็ตในโหมดคีออสก์
- Direct APK — ดาวน์โหลดแพ็คเกจแอปได้โดยตรงจาก
https://downloads.7stamp.com/7stamp-scanner.apkมีประโยชน์สำหรับเทอร์มินัลการชำระเงินของ Android และสำหรับการปรับใช้แอปจากส่วนกลางบนอุปกรณ์ต่างๆ
สิ่งที่ต้องเลือก หากคุณมีแท็บเล็ต Android อยู่หน้าร้านหรือมี iPad บนเคาน์เตอร์ ให้ติดตั้งแอปเนทีฟ หากคุณทำงานจากอุปกรณ์ที่แตกต่างกันหรือใช้คอมพิวเตอร์ที่ใช้ร่วมกันเพียงเครื่องเดียว — ลองใช้เวอร์ชันเว็บ https://scanner.7stamp.com การเข้าสู่ระบบและรหัสผ่านสำหรับการเข้าจะถูกสร้างขึ้นในแผงผู้ดูแลระบบภายใต้ พนักงาน
9.2 เข้าสู่ระบบและการนำทาง
[ภาพหน้าจอ: 0101-Login.png]
คุณสามารถเข้าสู่ระบบจากแพลตฟอร์มใดก็ได้ (เว็บ / Android / iOS) ด้วย Staff Login เดียวกับที่คุณสร้างในผู้ดูแลระบบ (เจ้าหน้าที่ → + สร้าง → การสร้าง Staff Login) หลังจากเข้าสู่ระบบ แอปจะเชื่อมโยงกับโปรไฟล์ธุรกิจของคุณโดยอัตโนมัติ
เมนูด้านข้าง (เปิดด้วยไอคอน ☰ ที่ด้านซ้ายบน):
- Manual Mode — โหมดการสแกนด้วยตนเอง (ค่าเริ่มต้น)
- Kiosk Mode — โหมดการบริการตนเองของลูกค้า
- เปิดแผงผู้ดูแลระบบ — ลิงก์ด่วนไปยังผู้ดูแลระบบ (
admin.7stamp.com) - ออกจากระบบ — ออกจากระบบ (ที่ด้านล่างของเมนู ปุ่มสีแดง)
คุณไม่จำเป็นต้อง “สลับโหมด” ระหว่าง Manual และ Autopilot ผ่านเมนู Autopilot เป็นโหมดย่อยของ Manual Mode ซึ่งสลับได้ด้วยสวิตช์ตัวเดียวบนหน้าจอหลัก (ดูด้านล่าง)
9.3 Manual Mode — พนักงานสแกนด้วยมือ
[ภาพหน้าจอ: 0201-WaitingScansManualMode.png]
Manual Mode เป็นสถานการณ์พื้นฐานที่พนักงานสแกนบัตรของลูกค้าด้วยตนเอง ใช้ในบริการระดับพรีเมียม (ร้านเสริมสวย ร้านตัดผม สปา ร้านอาหารแบบนั่งทาน) โดยที่การให้แสตมป์ เป็นส่วนหนึ่งของปฏิสัมพันธ์ส่วนตัวกับลูกค้า
Manual Mode หน้าจอหลัก
- ตัวบ่งชี้ส่วนหัว: กำลังรอการสแกนการ์ด — แอปพร้อมที่จะยอมรับการสแกนแล้ว
- บนขวา — ปุ่มสลับ Auto-Stamp (Scanner Only) (ปิดในโหมดกำหนดเอง)
- ด้านล่างของหน้าจอ — บันทึกเหตุการณ์กะล่าสุด (บัตรกำนัลที่ออก/ใช้แล้ว/ลบ) ทุกรายการสามารถแตะและเปิดรายละเอียดได้
- ที่ด้านล่างสุด — สองปุ่มการทำงาน:
- 🔍 Search Customer — ค้นหาลูกค้าด้วยชื่อ อีเมล โทรศัพท์ หรือหมายเลขบัตร
- 📷 Use Camera — เปิดกล้องของอุปกรณ์และสแกนบัตรลูกค้า QR
สี่วิธีในการค้นหาลูกค้าและให้แสตมป์บนบัตร
1. กำลังสแกนด้วยกล้องของอุปกรณ์ (Use Camera) วิธีหลักในการทำงาน
[ภาพหน้าจอ: 0302-ScanByCamera.png]
พนักงานแตะ Use Camera ชี้กล้องโทรศัพท์/แท็บเล็ตไปที่บัตรของลูกค้า QR (ลูกค้าเปิดบัตรใน Apple Wallet หรือ Google Wallet แล้วแสดงหน้าจอ) แอปจะจดจำรหัสได้ภายในเสี้ยววินาที และเปิดบัตรลูกค้าทันที
2. การสแกนบัตรลูกค้าด้วยเครื่องสแกนภายนอก
เชื่อมต่อเครื่องสแกนเข้ากับอุปกรณ์ของคุณ และเพียงสแกนบัตรของลูกค้าด้วยเครื่องสแกน
3. การค้นหาลูกค้า (Search Customer) ตัวเลือกสำรองเมื่อลูกค้าไม่มีโทรศัพท์อยู่ในมือ
[ภาพหน้าจอ: 0301-CustomerSearch.png]
มีประโยชน์เมื่อ:
- ลูกค้าทิ้งหรือทำให้โทรศัพท์หมด
- ลูกค้าเพิ่งสมัครและยังไม่ทราบว่าบัตรเปิดที่ไหน
- พนักงานทำงานตามนัดหมายและเปิดบัตรลูกค้าล่วงหน้า
ค้นหาได้ตามชื่อ อีเมล หรือหมายเลขบัตร
4. ค้นหาบัตรกำนัลโดยตรง (ค้นหาบัตรกำนัล) เมื่อลูกค้ามาถึงพร้อมกับบัตรกำนัลในมือ (เช่น กระดาษที่พิมพ์) และต้องการแลก คุณสามารถป้อนหมายเลขบัตรกำนัลในการค้นหา สแกนด้วยเครื่องสแกนภายนอก หรือสแกนด้วยกล้องของอุปกรณ์
บัตรลูกค้าหลังจากการสแกน
[ภาพหน้าจอ: 0401-CustomerCard.png]
เมื่อพบบัตรแล้ว บัตรลูกค้า จะเปิดขึ้นพร้อมกับสองแท็บ:
- ข้อมูล — ข้อมูลพื้นฐาน (ชื่อ อีเมล รหัสบัตร
#XXXXXXวันเกิดพร้อมการแก้ไข ✏️) - บัตรกำนัล (N) — รายการบัตรกำนัลของลูกค้าทั้งหมดนี้: ใช้งานอยู่ แลกแล้ว และหมดอายุแล้ว
ในพื้นที่ด้านบนจะมีปุ่ม รีเซ็ตแสตมป์ สีแดง ซึ่งช่วยให้คุณรีเซ็ตแสตมป์ ของลูกค้าได้ (เช่น หากพวกเขาปิดประตูสุดท้าย ได้รับรางวัล และคุณต้องการเริ่มการ์ดใหม่) หมายเหตุ คุณไม่จำเป็นต้องรีเซ็ตการ์ด: หากครั้งถัดไปที่คุณสแกนเป้าหมายสุดท้ายโดยไม่รีเซ็ต ระบบจะวนแสตมป์ แรกของการวนซ้ำใหม่
การควบคุมแสตมป์
[ภาพหน้าจอ: 0402-Stamped.png]
ที่ด้านล่างของหน้าจอ — ตัวควบคุมแสตมป์:
- 🟢 + (สีเขียว) — เพิ่มแสตมป์
- 🔴 − (สีแดง) — ลบแสตมป์ ออก (หากคุณทำผิด)
- ช่องปริมาณที่มี − / + — เพิ่มแสตมป์ หลายรายการพร้อมกัน (เช่น หากบัตรใช้ “ตามจำนวนเงิน” และลูกค้าใช้จ่ายเป็นจำนวนมาก)
- 🔍 Search Customer — เปิดลูกค้ารายอื่น
- 📷 — สแกนอีกครั้ง
สถานการณ์สามประการในการบรรลุเป้าหมาย
เมื่อแสตมป์ นำลูกค้าไปสู่เป้าหมาย (หนึ่งในเหตุการณ์สำคัญหรือเป้าหมายสุดท้าย) เครื่องสแกนจะแสดงป๊อปอัปพร้อมกับของขวัญ เนื้อหาป๊อปอัปขึ้นอยู่กับประเภทรางวัลที่กำหนดค่าไว้บนการ์ด
1. รางวัล = Award (ของขวัญข้อความโต้ตอบแบบทันที)
[ภาพหน้าจอ: 0403-StampedAndGetAward.png]
บนหน้าจอ — ข้อความและรูปภาพของขวัญ (“กาแฟฟรี”, “ขนมอบฟรี 1 ชิ้น” ฯลฯ) พนักงานแสดงหน้าจอให้ลูกค้าดูและมอบของขวัญตามสัญญา
2. รางวัล = บัตรกำนัล (Smart Voucher พร้อม Redeem Code).
[ภาพหน้าจอ: 0404-StampedAndGetVoucher.png]
ป๊อปอัป ปลดล็อคบัตรกำนัล! พร้อมรูปภาพ ชื่อบัตรกำนัล และหมายเลขบัตรกำนัล #XXXXXXX สามการกระทำ:
- ใช้บัตรกำนัล (ปุ่มสีเขียว) — แลกบัตรกำนัลได้จากเครื่องสแกน หากใบสำคัญเปิดใช้งานตัวเลือก Redeem Code หน้าจอจะแสดงข้อความโค้ด + QR + บาร์โค้ด เจ้าหน้าที่เข้า/สแกนรหัสลงใน POS บัตรกำนัลย้ายไปที่ “แลกแล้ว” และไม่สามารถใช้ได้อีก
- ดูบัตรกำนัลทั้งหมด — เปิดรายการบัตรกำนัลของลูกค้าทั้งหมด (เช่น หากลูกค้าต้องการแลกบัตรกำนัลอื่นก่อน)
- ปิด — ปิดป๊อปอัป บัตรกำนัลยังคงใช้งานได้และลูกค้าสามารถใช้งานได้ในภายหลัง
3. รางวัล = Lottery (เสมอ).
[ภาพหน้าจอ: 0405-StampedAndGetLottery.png]
หน้าจอลอตเตอรี่จะเปิดขึ้นบนอุปกรณ์ของพนักงาน พนักงานมอบอุปกรณ์ให้กับลูกค้า (หรือแสดงหน้าจอ) และขอให้พวกเขาแตะ “เล่น” หลังจากการหมุน ตัวแปรตัวใดตัวหนึ่งจะเริ่มทำงาน จากนั้นจะถูกจัดการเป็น Award หรือบัตรกำนัล (ดูด้านบน)
[ภาพหน้าจอ: 0406-LotteryUsed.png]
การแลกบัตรกำนัลด้วยตนเองในโหมดด้วยตนเอง
[ภาพหน้าจอ: 0407-CustomerVouchers.png] [ภาพหน้าจอ: 0408-VoucherUsed.png]
หากลูกค้ามาถึงเพื่อรับของขวัญตามสัญญาในภายหลัง (ไม่ใช่ทันทีหลังจากได้รับของขวัญ) พนักงานจะเปิดบัตรและสลับไปที่แท็บ บัตรกำนัล (N) บัตรกำนัลของลูกค้าทั้งหมดสามารถดูได้ที่นี่ เจ้าหน้าที่แตะอันที่ถูกต้อง → บัตรกำนัลจะเปิดขึ้นพร้อม ใช้บัตรกำนัล → ยืนยัน → สถานะ แลกแล้ว
ความปลอดภัย: เครื่องสถานะบัตรกำนัล (ออกแล้ว → ใช้งานอยู่ → แลกแล้ว → หมดอายุแล้ว) ป้องกันการใช้ซ้ำซ้อน หลังจาก “แลก” บัตรกำนัล (หรือภาพหน้าจอ) จะไม่ทำงานอีกครั้ง
9.4 Autopilot Mode — การสแกนพื้นหลังจนถึงเวลา
[ภาพหน้าจอ: 0101-WaitingScans_AutoPilotMode.png]
Autopilot Mode เป็นโหมดย่อยของ Manual Mode โดยที่ แสตมป์จะถูกเพิ่ม ในเบื้องหลัง โดยไม่มีการยืนยันและไม่มีโมดัล เหมาะสำหรับชั่วโมงเร่งด่วนในร้านกาแฟ อาหารจานด่วน ร้านเบเกอรี่ ล้างรถ ทุกที่ที่มีคิวและบริการไม่สามารถชะลอได้
วิธีการเปิดใช้งาน
บนหน้าจอหลัก Manual Mode ให้พลิกปุ่มสลับ Auto-Stamp (Scanner Only) ที่มุมขวาบนเป็น “เปิด” (สีเขียว) หน้าจอเปลี่ยนไป:
- ไอคอนจะเปลี่ยนเป็นรูปภาพจากเครื่องสแกนภายนอก
- ส่วนหัวหลักอ่านว่า: Auto-Stamp Mode Active
- ส่วนหัวย่อย: “ระบบแสตมป์ โดยอัตโนมัติสำหรับอินพุตสแกนเนอร์เท่านั้น”
มันทำงานอย่างไร
วลี “Scanner Only” หมายความว่าในโหมดนี้ แสตมป์จะถูกเพิ่มผ่านการป้อนข้อมูลจากเครื่องสแกนฮาร์ดแวร์เท่านั้น (เครื่องสแกนบาร์โค้ด USB หรือบลูทูธภายนอกที่เชื่อมต่อกับคอมพิวเตอร์/แท็บเล็ต) ปุ่ม Use Camera และ Search Customer ยังคงมองเห็นได้บนหน้าจอและใช้งานได้หากคุณต้องการ แต่ปุ่มเหล่านี้จะไม่ได้ใช้ในการทำงาน Autopilot ปกติ ปุ่มเหล่านี้จะทำหน้าที่เป็นปุ่มสำรอง (เช่น หากเครื่องสแกนไม่ไปรับลูกค้าและคุณจำเป็นต้องค้นหาด้วยตนเอง)
ขั้นตอนการทำงาน:
- พนักงานรับออเดอร์ตามปกติ (ตอนรับ, เคาน์เตอร์บาร์, ล้าง)
- เมื่อชำระเงินหรือหลังจากนั้น ลูกค้าจะแสดงบัตร Wallet ของตน
- เครื่องสแกนภายนอกจับ QR “เป็นบาร์โค้ด”
- 7Stamp Scanner เพิ่มแสตมป์ ลงในบัตรของลูกค้าในเบื้องหลัง
- ไม่มีกิริยา — คิวไม่หยุด
- ลูกค้าเห็นการอัปเดตความคืบหน้าในภายหลังใน Wallet ผ่านการแจ้งเตือนแบบ PUSH
สิ่งที่คุณต้องการ
- เครื่องสแกนบาร์โค้ด: USB หรือบลูทูธ สามารถอ่านรหัส QR ได้ รุ่นมาตรฐานจาก Honeywell, Zebra, Datalogic จะทำ ควรตั้งค่าเครื่องสแกนเป็นการจำลองแป้นพิมพ์ (โหมด HID)
- อุปกรณ์ถาวรที่ใช้งานได้: แล็ปท็อปหรือแท็บเล็ตที่มี
scanner.7stamp.comเปิดอยู่หรือเปิดด้วยแอป Android/iOS - อินเทอร์เน็ตที่เสถียร — ทุกแสตมป์ ไปที่คลาวด์แบบเรียลไทม์
ลูกค้าแลกบัตรกำนัลด้วยตนเองใน Autopilot
ใน Autopilot พนักงานไม่ได้สแกนบัตร Wallet ทางกายภาพใน “โหมดโต้ตอบ” — พวกเขาทำงานตามคิว แต่ลูกค้าสามารถ ใช้บัตรกำนัลได้ทันที และไม่จำเป็นต้องเปลี่ยนโหมด ในหน้าบัตรใน Wallet ลูกค้ามีลิงก์ไปยังบัตรกำนัลของตน เมื่อเปิดแล้ว ลูกค้าจะ:
- โทรออก Redeem Code ไปที่แคชเชียร์ ซึ่งเป็นผู้กรอกหมายเลขนั้นในจนถึง (หากจนถึงรองรับรหัสโปรโมชัน) หรือ
- แสดง QR/บาร์โค้ดบนหน้าจอโทรศัพท์ และแคชเชียร์จะสแกนด้วยเครื่องสแกนภายนอก
หลังจากนั้นบัตรกำนัลจะย้ายไปที่ “แลกแล้ว” และไม่สามารถนำมาใช้ซ้ำได้อีกต่อไป อีกทางเลือกหนึ่ง แคชเชียร์สามารถปิดสวิตช์ Auto-Stamp ชั่วคราว เปิดบัตรลูกค้าด้วยตนเอง และแลกบัตรกำนัลด้วย ใช้บัตรกำนัล
เมื่อใดจึงจะกลับมาที่ Manual
พนักงานสามารถปิดการสลับ Auto-Stamp และกลับไปที่การสแกนด้วยตนเองได้ตลอดเวลา เช่น หากลูกค้าประสบปัญหา (บัตรกำนัลสูญหาย ต้องการแก้ไขแสตมป์ ด้วยตนเอง) หรือคุณต้องค้นหาพวกเขาด้วยชื่อ/อีเมล คุณสมบัติ Manual Mode ทั้งหมดพร้อมใช้งานแล้ว — การค้นหา การสแกนกล้อง การออกบัตรกำนัลด้วยตนเอง และการแลกใช้
9.5 Kiosk Mode — การบริการตนเองของลูกค้า
Kiosk Mode เป็นโหมดการบริการตนเองแบบเต็มหน้าจอ โดยให้แท็บเล็ตหันหน้าเข้าหาลูกค้าและลูกค้าจะสแกนการ์ดของตนเอง พนักงานไม่เกี่ยวข้องกับกระบวนการเลย ดังนั้น “การฝึกอบรมพนักงานเป็นศูนย์” เหมาะสำหรับร้านกาแฟ ร้านเบเกอรี่ ร้านอาหารฟาสต์แคชชวล ร้านค้าปลีกขนาดเล็ก ร้านล้างรถ
[ภาพหน้าจอ: Kiosk_Bakery.png]
Kiosk Mode ตั้งค่า
ขั้นตอนที่ 1. เปลี่ยนไปใช้คีออสก์
[ภาพหน้าจอ: 0101_SwitchToKioskMode.png]
ในเมนูด้านข้าง (☰) เลือก Kiosk Mode แอปเข้าสู่โหมดการตั้งค่า
Make อย่าลืมอ่านเคล็ดลับบนหน้าจอเกี่ยวกับวิธี “ปักหมุด” แอปบนแท็บเล็ต Android หรือ iPad เพื่อให้ลูกค้าไม่สามารถย่อหรือปิดได้ (อุปกรณ์เรียกว่าโหมดคีออสก์) นี่คือคุณสมบัติระบบของแท็บเล็ตของคุณ - อ่านคำแนะนำบนหน้าจอของเราหรือคู่มือสำหรับอุปกรณ์ของคุณ
ขั้นตอนที่ 2. เลือกการ์ดที่จะแสดง
[ภาพหน้าจอ: 0201_StartKiosk_Select_Card.png]
หากธุรกิจของคุณมีบัตรแสตมป์หลายใบ (เช่น บัตรแยกสำหรับกาแฟและอีกใบสำหรับขนม) ให้เลือกบัตรที่จะแสดงบนแท็บเล็ตนี้ คุณสามารถตั้งค่าแท็บเล็ตหลายเครื่องสำหรับการ์ดที่แตกต่างกันได้
ขั้นตอนที่ 3. ตัวเลือกเพิ่มเติม
[ภาพหน้าจอ: 0202_StartKiosk_Options.png]
การตั้งค่าการเปิด Kiosk เพิ่มเติม
อย่างแรก — โทนสี คุณสามารถเปิด Kiosk ได้ในแผงการ์ดของคุณหรือเลือกชุดใดชุดหนึ่งที่เรากำหนดไว้ล่วงหน้า ลองตัวเลือกที่เหมาะกับคุณที่สุด!
ตัวเลือกที่สำคัญที่สุดคือ ป้องกันการสแกนทันที โดยจะบล็อกลูกค้ารายเดิมไม่ให้ได้รับแสตมป์ สองครั้งติดต่อกัน: หากตัวเลือกเปิดอยู่ การสแกนซ้ำจะแสดงให้ลูกค้าเห็นผลลัพธ์ก่อนหน้านี้ (รางวัล / หน้าจอสุดท้ายที่แสดง) และไม่มีการเพิ่มแสตมป์ สิ่งนี้จะช่วยป้องกันการสแกนสองครั้งโดยไม่ตั้งใจที่เคาน์เตอร์
หลังจากการยืนยัน — Kiosk จะเปิดตัว
Kiosk Mode หน้าจอหลัก
[ภาพหน้าจอ: 0301_Main.png]
สิ่งที่ลูกค้าเห็นเมื่อเข้าใกล้แท็บเล็ต:
- ด้านบน — โลโก้และชื่อธุรกิจของคุณ (ดึงมาจากการตั้งค่าการ์ด)
- หัวข้อ: สะสมแสตมป์รับรางวัล.
- ภาพหมุน “รางวัลของคุณ” — แสดงของขวัญชิ้นสุดท้าย (และของขวัญชิ้นกลางทั้งหมดที่มีรางวัลตามหลักชัย) ปัดได้
- ปุ่ม 📱 สแกนบัตรของคุณ สีดำขนาดใหญ่ที่มีป้ายกำกับย่อย “รับแสตมป์ ถัดไปของคุณโดยการสแกนบัตร” (หรือ “ถือโทรศัพท์ของคุณไว้ใกล้เครื่องอ่าน” — ข้อความจะปรับให้เหมาะสม)
- ที่ด้านล่าง — บล็อกลูกค้าใหม่: ยังไม่มีบัตร? “สแกน QR-รหัสและเพิ่มบัตรในกระเป๋าเงินของคุณ” ด้วยหน้าเข้าร่วม QR
สถานการณ์ลูกค้าใน Kiosk Mode
- ลูกค้าขึ้นมาที่ขาตั้งแท็บเล็ต
- หากพวกเขามีบัตรอยู่แล้ว → เปิด Wallet → แตะ สแกนบัตรของคุณ → กดหน้าจอ Wallet ไว้ที่กล้องแท็บเล็ต → เพิ่มแสตมป์ แล้ว
- หากพวกเขายังไม่มีบัตร → สแกน ไม่มีบัตรหรือยัง QR ด้วยกล้องในโทรศัพท์ → บัตรจะบันทึกลงใน Wallet ทันที → แตะสแกนบัตรของคุณ → รับแสตมป์ แรก
สิ่งที่ลูกค้ามองเห็นเมื่อบรรลุเป้าหมาย
รางวัล = Award.
[ภาพหน้าจอ: 0501_รางวัลปลดล็อค_Award.png]
หน้าจอ ขอแสดงความยินดี! แบบเต็มหน้าจอพร้อมรูปภาพและคำอธิบายของของขวัญ ลูกค้าแสดงหน้าจอให้พนักงานและรับของขวัญตามสัญญา
รางวัล = บัตรกำนัล
[ภาพหน้าจอ: 0502_รางวัลปลดล็อค_Voucher.png]
A ขอแสดงความยินดี! หน้าจอ Voucher Unlocked! พร้อมบัตร Voucher ลูกค้าสามารถ แลกบัตรกำนัลด้วยตนเอง ได้ใน Kiosk — ปุ่มใช้จะเปิดหน้าจอที่มีบาร์โค้ด Redeem Code (ข้อความ + QR +) ที่ลูกค้าแสดงให้แคชเชียร์เห็น ซึ่งจะสแกนหรือป้อนรหัสในช่องจ่ายเงิน หลังจากแลกคูปองแล้ว บัตรกำนัลจะย้ายไปที่ “แลกแล้ว” และไม่สามารถนำมาใช้ได้อีก แม้ว่าลูกค้าจะเก็บภาพหน้าจอไว้ก็ตาม
ที่ด้านล่าง — ปุ่ม:
- My Vouchers — ดูบัตรกำนัลทั้งหมดของฉัน
- ปิดใน 12 วินาที — นับถอยหลังเพื่อกลับสู่หน้าจอหลักโดยอัตโนมัติ
นี่คือรูปแบบคีออสก์ที่สำคัญ: ปิดอัตโนมัติ หากไม่มีแท็บเล็ตก็จะ “ติดอยู่” บนหน้าจอของลูกค้ารายหนึ่งจนกว่าพนักงานจะเข้ามาแทรกแซง การนับถอยหลังช่วยให้แน่ใจว่าแท็บเล็ตจะกลับสู่หน้าจอเริ่มต้นที่สะอาดเสมอ 10–15 วินาทีหลังจากการดำเนินการ
รางวัล = Lottery.
[ภาพหน้าจอ: 0503_รางวัลปลดล็อค_Lottery.png]
ลูกค้าหมุนลอตเตอรีบนหน้าจอด้วยตนเอง — ช่างเล่นเกมที่ถูกใจ หลังจากที่ตัวแปรลดลง ([สกรีนช็อต: 0504_RewardUnlocked_LotteryUsed.png]) หน้าจอจะทำงานเหมือน Award หรือ Voucher ด้านบน
การดูบัตรกำนัลของลูกค้า
[ภาพหน้าจอ: 0601_Vouchers.png]
ลูกค้าสามารถแตะ My Vouchers บนหน้าจอหลักของคีออสก์และดูบัตรกำนัลที่ใช้งานอยู่ทั้งหมดได้ตลอดเวลา สะดวก: หากลูกค้ามีบัตรกำนัลที่ไม่ได้ใช้จากการเข้าชมครั้งก่อน ก็สามารถแสดงให้พนักงานเห็นได้ทันทีโดยไม่ต้องเปิด Wallet
ข้อกำหนดทางเทคนิคสำหรับขาตั้งคีออสก์
- แท็บเล็ต: iPad / แท็บเล็ต Android ขนาด 10 นิ้ว หรือ 12 นิ้ว ยิ่งหน้าจอใหญ่ก็ยิ่งสะดวกสำหรับลูกค้า เราชอบไอแพดมินิ
- ยืน: ยืนนิ่ง หันหน้าเข้าหาลูกค้า ขาตั้งควรให้พวกเขาถือโทรศัพท์ Wallet ไว้ใกล้กับกล้องแท็บเล็ต
- กำลังไฟ: การเชื่อมต่อสายไฟหลักคงที่ คีออสก์เปิดตลอดทั้งวัน
- อินเทอร์เน็ต: Wi-Fi หรือ 4G บนมือถือที่เชื่อถือได้
- ไม่บังคับ — การ์ดคำแนะนำง่ายๆ ถัดจากขาตั้ง: “1) เปิดการ์ดของคุณใน Wallet 2) ถือไว้ใกล้กล้อง 3) เสร็จสิ้น!” — มีสองภาษาหากคุณมีแขกต่างชาติ แม้ว่าแท็บเล็ตที่อยู่ในตำแหน่งที่ดีพร้อม Kiosk UI ของเรามักจะจัดการบทบาทนี้ได้ด้วยตัวเอง
9.6 Terminal Mode — ความภักดีในเทอร์มินัลการชำระเงิน
Terminal Mode ดำเนินการความภักดีโดยตรงบนเครื่องชำระเงิน Android ที่มีอยู่ เหมาะอย่างยิ่งสำหรับผู้ซื้อ ผู้ประมวลผลการชำระเงิน ISOs และผู้ค้าใดๆ ที่มีเครื่องปลายทางเมื่อชำระเงินอยู่แล้ว และต้องการความภักดีโดยไม่ต้องใช้ฮาร์ดแวร์ใหม่
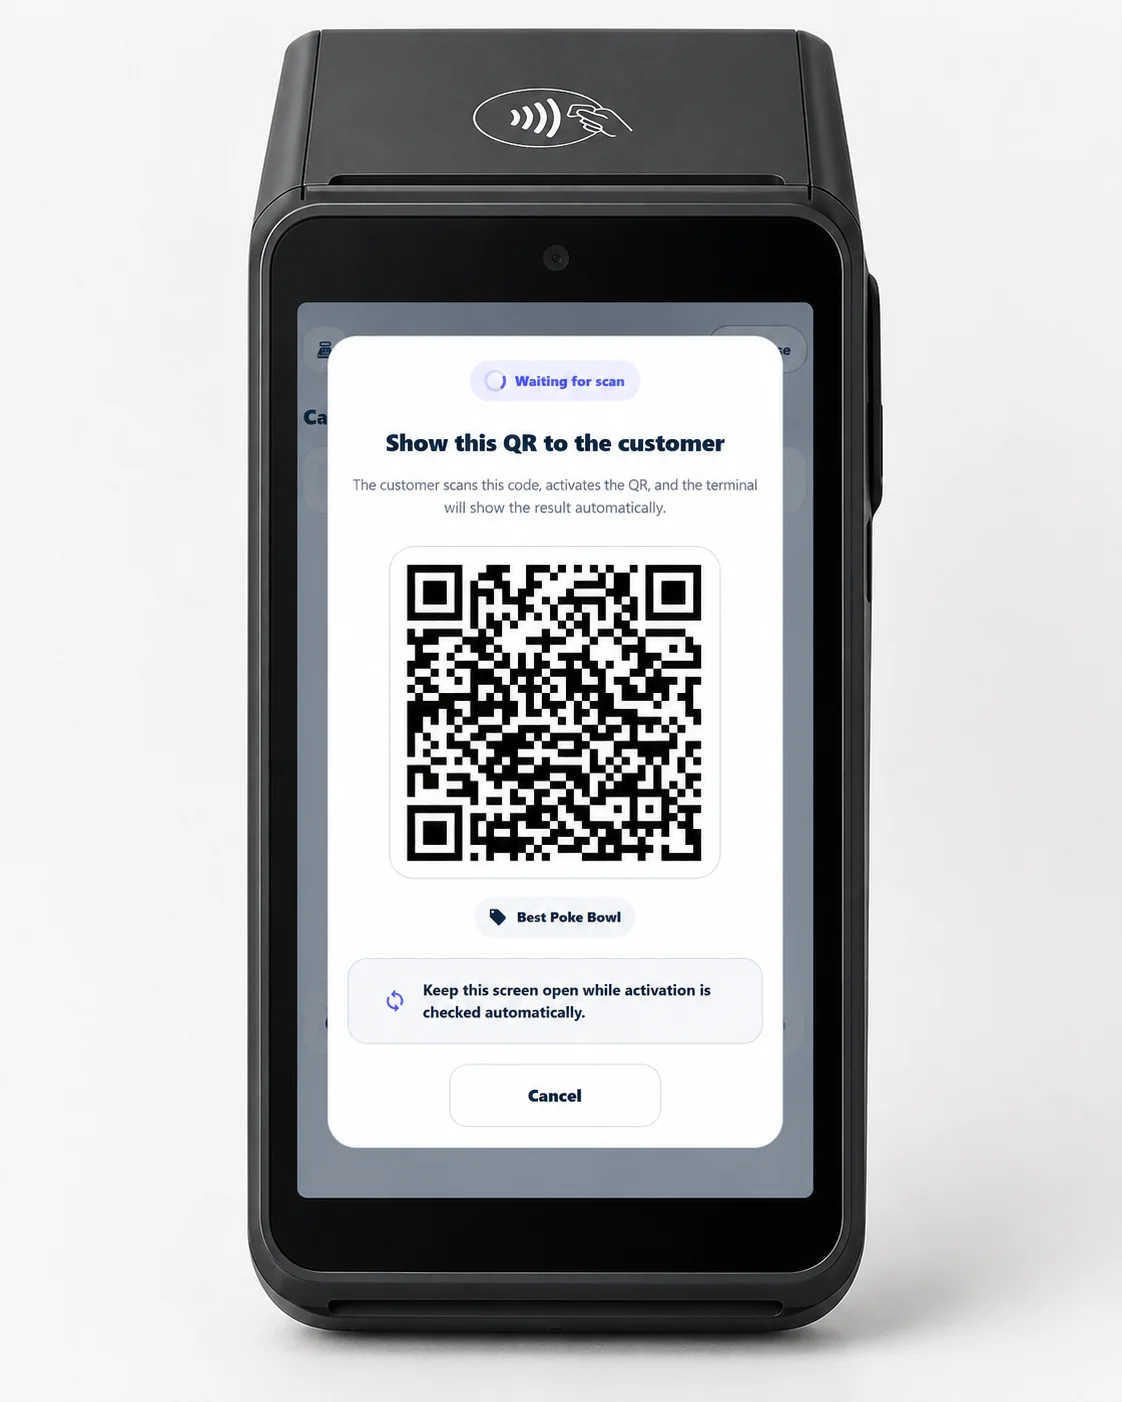
มันทำงานอย่างไร
- ลูกค้าชำระเงินที่เครื่องปลายทางตามปกติ
- 7Stamp Scanner app จะเปิดขึ้น — โดยอัตโนมัติด้วยการผสานรวมแบบ light หรือด้วยการแตะเพียงครั้งเดียวที่แคชเชียร์
- แคชเชียร์แตะ Serve customer; รหัส QR แบบไดนามิกที่ไม่ซ้ำใครจะปรากฏบนหน้าจอเทอร์มินัล
- ลูกค้าสแกน QR ด้วยโทรศัพท์ของตน บัตรใหม่จะถูกสร้างขึ้นและบันทึกลงในกระเป๋าเงิน (ด้วยแสตมป์ ตัวแรก) หรือบัตรที่มีอยู่จะอัปเดตทันที
เพิ่มแสตมป์
สามารถเพิ่มแสตมป์เป็นจำนวนเงินคงที่ (หนึ่งรายการต่อการซื้อ) หรือตามจำนวน (แคชเชียร์ป้อนยอดรวมใบเสร็จบนเครื่อง)
รางวัลบนเทอร์มินัล
- Award: เครื่องจะแจ้งให้แคชเชียร์มอบของขวัญเมื่อบรรลุเป้าหมาย
- Smart Voucher: ในภายหลัง แคชเชียร์จะเปิดบัตรกำนัลของลูกค้าบนเครื่องชำระเงิน (หรือป้อนหมายเลขบัตรกำนัล) และแลกหนึ่งใบด้วยการแตะ
- Lottery: ลูกค้าหมุนวงล้อบนโทรศัพท์ของตน ผลลัพธ์จะปรากฏบนหน้าจอเทอร์มินัล
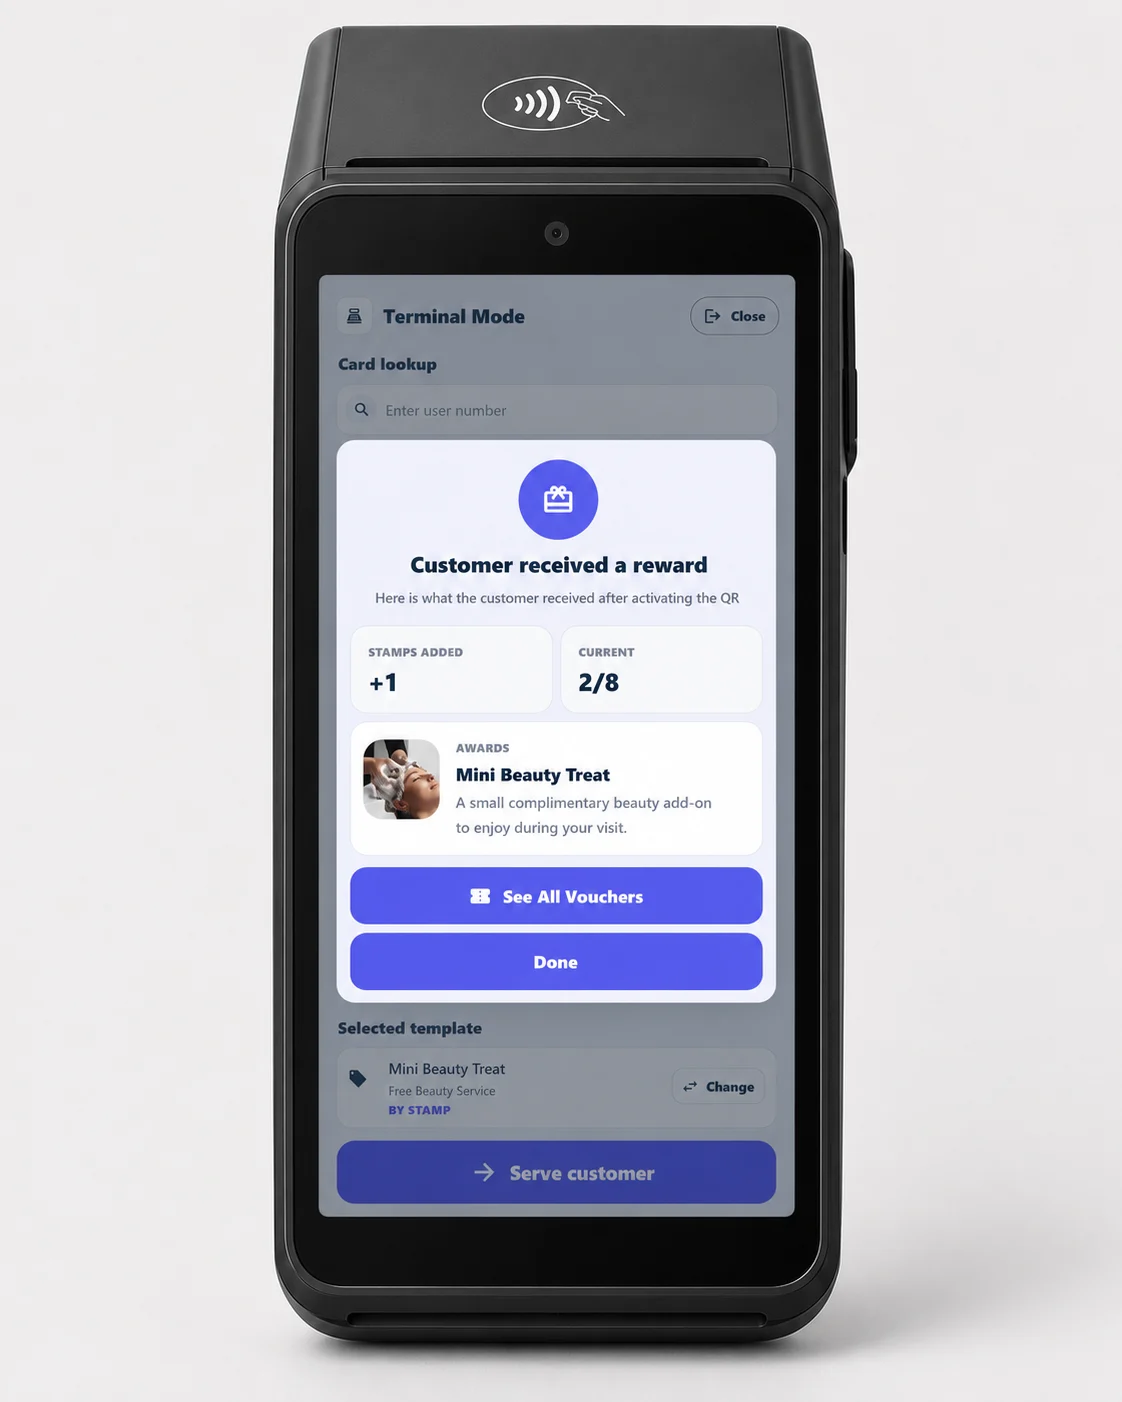
การติดตั้งบนเทอร์มินัล
ติดตั้ง 7Stamp Scanner app จาก Google Play หรือปรับใช้ APK โดยตรง ทั่วทั้งเทอร์มินัลฟลีตของคุณ
การบูรณาการขั้นสูง (ตามคำขอ)
แตะเพื่อเรียกเก็บเงินบน Apple VAS และ Google Smart Tap — อ่านโดยแอปพลิเคชันการชำระเงินของเครื่องอ่านบัตรบนเครื่องอ่านบัตร VAS/Smart Tap ที่ได้รับการรับรอง — และความภักดีที่เชื่อมโยงกับการ์ด (การจับคู่โทเค็นเครือข่ายที่ระดับโปรเซสเซอร์) เป็นการผสานรวมขั้นสูงที่พร้อมให้ใช้งานตามคำขอ
สำหรับรายละเอียดเกี่ยวกับพันธมิตรและเชิงพาณิชย์ โปรดดูที่ ธนาคารของผู้รับบัตรและเครือข่ายการชำระเงิน และ Terminal Mode
9.7 วิธีเลือกโหมด — การเปรียบเทียบ
| พารามิเตอร์ | Manual Mode | Autopilot Mode | Kiosk Mode | Terminal Mode |
|---|---|---|---|---|
| ใครสแกน. | เจ้าหน้าที่ผ่านทางโทรศัพท์/กล้อง | เครื่องสแกนภายนอก “เป็นบาร์โค้ด” | ลูกค้าเองก็ยืนอยู่บนสแตนด์ | ลูกค้าสแกน QR บนหน้าจอเทอร์มินัล |
| ประเภทธุรกิจ | บริการระดับพรีเมียม ร้านเสริมสวย ร้านอาหาร | ร้านกาแฟ อาหารจานด่วน เคาน์เตอร์ที่มีผู้คนพลุกพล่าน | ร้านกาแฟ ร้านเบเกอรี่ ร้านล้างรถ ร้านค้าปลีกขนาดเล็ก | ร้านค้าที่มีเครื่องชำระเงิน ที่ดินของผู้ซื้อ/โปรเซสเซอร์ |
| ฮาร์ดแวร์ | กล้องของอุปกรณ์ | เครื่องสแกนภายนอก QR | แท็บเล็ตขนาด 10–12 นิ้ว + ขาตั้ง | เทอร์มินัลการชำระเงิน Android ที่มีอยู่ |
| มันอาศัยอยู่ที่ไหน | โทรศัพท์/แท็บเล็ตของพนักงาน | แล็ปท็อป/แท็บเล็ตตลอดเวลา | แท็บเล็ตบนขาตั้งหันหน้าไปทางลูกค้า | เครื่องชำระเงินเมื่อชำระเงิน |
| ความเสี่ยงในการฝึกอบรมพนักงาน | น้อยที่สุด (แตะครั้งเดียว) | ศูนย์ (งานเบื้องหลัง) | ศูนย์ (ลูกค้าทำ) | น้อยที่สุด (แตะครั้งเดียว: “Serve customer”) |
| Lottery | ลูกค้าเล่นจากหน้าจอเจ้าหน้าที่ | ใช้งานได้ผ่านการดำเนินการด้วยตนเอง | ลูกค้าเล่นเอง | ลูกค้าเล่นบนโทรศัพท์ ผลลัพธ์บนเทอร์มินัล |
คุณสามารถใช้หลายโหมดพร้อมกันได้ ตัวอย่างเช่น โรงแรมที่มีร้านอาหารและสปา: ในสปา — Manual Mode (พรีเมียม การติดต่อส่วนตัว); ในร้านกาแฟของร้านอาหาร — Kiosk Mode บนขาตั้ง (รวดเร็ว ไม่มีพนักงานเสิร์ฟ); ที่แผนกต้อนรับ — Autopilot สำหรับลูกค้าประจำ หนึ่ง Staff Seat รองรับการเข้าสู่ระบบครั้งละครั้ง หากคุณต้องการหลายคะแนนพร้อมกัน ให้เพิ่ม Staff Logins ในผู้ดูแลระบบ
9.8 เคล็ดลับการปฏิบัติสำหรับการเปิดตัวสแกนเนอร์
- ทดสอบก่อนเปิด ทดลองสแกนด้วยบัตรของคุณเอง 5-10 ครั้งในตอนเช้าก่อนเข้ากะ ตรวจสอบให้แน่ใจว่ากล้องโฟกัสได้ อินเทอร์เน็ตใช้งานได้ เพิ่มแสตมป์ แล้ว
- บนแท็บเล็ต Kiosk ให้ปิดใช้งานการล็อกอัตโนมัติและการแจ้งเตือน ไม่มีใครควรออกจากระบบปฏิบัติการโดยไม่ได้ตั้งใจหรือรับการแจ้งเตือนที่หลงทาง บน iOS ให้ใช้ Guided Access บน Android ปักหมุดหน้าจอ
- สำหรับการขัดข้องของอินเทอร์เน็ต ให้พิมพ์ป้ายกำกับ QR ไว้ใกล้ๆ (ส่งออกจากผู้ดูแลระบบ) — ลูกค้าจะสแกนด้วยตนเองและรับการ์ด แม้ว่าเครื่องสแกนเนอร์จะไม่พร้อมใช้งานชั่วคราวก็ตาม
- การร่วมงานกับพนักงานใหม่ สมาชิกกะใหม่ทุกคนควรรู้ห้าสิ่ง: วิธีเข้าสู่ระบบเครื่องสแกน วิธีสแกนบัตร วิธีเพิ่มแสตมป์ วิธีจัดการ
Voucher Unlocked!วิธีแลกบัตรกำนัลจากแท็บ “บัตรกำนัล” ห้านาทีของการฝึกอบรม - บันทึกเหตุการณ์ล่าสุดที่ด้านล่างของ Manual Mode คือบันทึกการทำงานของคุณ หากลูกค้าบ่นว่า “แสตมป์ไม่ผ่าน” ให้ตรวจสอบ: คุณจะเห็นเวลา รหัสบัตร และสิ่งที่ออก / ใช้
คำแนะนำแบบภาพ
ใช้ชุดหน้าจอด้านล่างเป็นตัวช่วยทางภาพสำหรับบทความ คลิกรูปภาพใดก็ได้เพื่อดูในขนาดเต็ม