
संदर्भ
7Stamp Scanner हे कर्मचारी, ग्राहक, कियॉस्क आणि Android पेमेंट टर्मिनलसाठी कार्यरत ॲप आहे. हे कार्ड स्कॅनला स्टॅम्पिंग, व्हाउचर रिडेम्पशन, लॉटरी स्पिनिंग आणि Terminal Mode चेकआउट लॉयल्टीमध्ये बदलते.
९. 7Stamp Scanner अर्ज — मॅन्युअल / Autopilot / किओस्क / Terminal Mode
7Stamp Scanner हे कर्मचारी, ग्राहक, किओस्क आणि Android पेमेंट टर्मिनलसाठी कार्यरत ॲप आहे. कार्ड स्कॅनचे स्टॅम्पिंग, व्हाउचर रिडेम्पशन, लॉटरी स्पिनिंग आणि Terminal Mode चेकआउट लॉयल्टीमध्ये बदलणे हे त्याचे काम आहे. हेच शारीरिकरित्या, कर्मचारी सदस्याच्या खिशात, ग्राहकासमोरील स्टँडवर किंवा चेकआउटच्या वेळी आधीच बसलेल्या पेमेंट टर्मिनलवर बसते. एक कर्मचारी लॉगिन मुख्य स्कॅनर मोडमध्ये प्रवेश देते — मोडची निवड तुमच्या व्यवसायाच्या गतीवर आणि सेवा परिस्थितीवर अवलंबून असते.
[स्क्रीनशॉट: 1101_How_To_Scanpng.png]
9.1 जिथे 7Stamp Scanner धावतो
वेब आवृत्ती (कोणतेही उपकरण): स्कॅनर.7stamp.com
- कोणत्याही आधुनिक ब्राउझरमध्ये कार्य करते: स्मार्टफोन, टॅबलेट किंवा संगणकावर.
- कोणतीही स्थापना नाही — पृष्ठ उघडा, तुमचा Staff Login प्रविष्ट करा, कामावर जा.
- टिलवर सामायिक कार्य लॅपटॉप, स्टँडवरील टॅबलेट, कॅमेरा असलेले कोणतेही Windows/Mac/Linux डिव्हाइससाठी आदर्श.
- तुम्ही बाह्य स्कॅनर कनेक्ट करू शकता आणि त्याद्वारे ग्राहक कार्ड स्कॅन करू शकता. कॉन्फिगरेशन आवश्यक नाही.
Android: Google Play · थेट APK iOS: ॲप स्टोअर
- नेटिव्ह ॲप — जलद चालतो, फोन कॅमेरा अधिक चांगला वापरतो.
- स्वतःचे फोन बंद करून काम करणाऱ्या कर्मचाऱ्यांसाठी योग्य आहे (प्रीमियम सेवा, फील्ड वर्क, वितरण).
- तुम्ही बाह्य स्कॅनर कनेक्ट करू शकता आणि त्याच्यासह ग्राहक कार्ड स्कॅन करू शकता (या बाबतीत Autopilot मोड विचारात घ्या).
- किओस्क मोडमध्ये टॅबलेटवर चालवू शकतो.
- डायरेक्ट APK — ॲप पॅकेज थेट
https://downloads.7stamp.com/7stamp-scanner.apkवरून डाउनलोड करा. अँड्रॉइड पेमेंट टर्मिनल्ससाठी आणि डिव्हाइसेसच्या फ्लीटवर मध्यवर्तीपणे ॲप तैनात करण्यासाठी उपयुक्त.
काय निवडायचे. तुमच्याकडे टिलवर Android टॅबलेट किंवा काउंटरवर iPad असल्यास — मूळ ॲप इंस्टॉल करा. तुम्ही वेगवेगळ्या डिव्हाइसेसवरून काम करत असल्यास किंवा आतापर्यंत एकच सामायिक संगणक वापरत असल्यास — वेब आवृत्ती https://scanner.7stamp.com वर जा. प्रवेशासाठी लॉगिन आणि पासवर्ड कर्मचारी अंतर्गत प्रशासक पॅनेलमध्ये तयार केला आहे.
9.2 लॉगिन आणि नेव्हिगेशन
[स्क्रीनशॉट: 0101-Login.png]
तुम्ही कोणत्याही प्लॅटफॉर्मवरून (वेब / अँड्रॉइड / iOS) लॉग इन करू शकता त्याच Staff Login तुम्ही ॲडमिनमध्ये तयार केले आहे (स्टाफ → + क्रिएट → क्रिएटिंग Staff Login). लॉग इन केल्यानंतर, ॲप आपोआप तुमच्या व्यवसाय प्रोफाइलशी लिंक करतो.
साइड मेनू (वर डावीकडे ☰ चिन्हासह उघडतो):
- Manual Mode — मॅन्युअल स्कॅनिंग मोड (डीफॉल्ट).
- Kiosk Mode — ग्राहक स्व-सेवा मोड.
- ॲडमिन पॅनेल उघडा — प्रशासकाची द्रुत लिंक (
admin.7stamp.com). - लॉग आउट — साइन आउट करा (मेनूच्या तळाशी, लाल बटण).
तुम्हाला मेनूमधून मॅन्युअल आणि Autopilot दरम्यान “मोड स्विच करण्याची” आवश्यकता नाही. Autopilot हा Manual Mode चा उप-मोड आहे, मुख्य स्क्रीनवर थेट एका स्विचसह टॉगल केला जातो (खाली पहा).
9.3 Manual Mode — कर्मचारी हाताने स्कॅन करत आहेत
[स्क्रीनशॉट: 0201-WaitingScansManualMode.png]
Manual Mode ही मूळ परिस्थिती आहे जिथे कर्मचारी स्वतः ग्राहकाचे कार्ड स्कॅन करतात. प्रीमियम सेवेमध्ये वापरले जाते (ब्युटी सलून, नाईची दुकाने, स्पा, सिट-डाउन रेस्टॉरंट्स) जिथे स्टॅम्पिंग हा ग्राहकाशी वैयक्तिक संवादाचा भाग आहे.
Manual Mode मुख्य स्क्रीन
- हेडर इंडिकेटर: कार्ड स्कॅनची वाट पाहत आहे — ॲप स्कॅन स्वीकारण्यासाठी तयार आहे.
- वर उजवीकडे — Auto-Stamp (Scanner Only) टॉगल (मॅन्युअलमध्ये बंद).
- स्क्रीनच्या तळाशी — अलीकडील शिफ्ट इव्हेंट लॉग (जारी केलेले / वापरलेले / हटवलेले व्हाउचर). प्रत्येक एंट्री टॅप करण्यायोग्य आहे आणि तपशील उघडते.
- अगदी तळाशी - दोन क्रिया बटणे:
- 🔍 Search Customer — नाव, ईमेल, फोन किंवा कार्ड नंबरद्वारे ग्राहक शोधा.
- 📷 Use Camera — डिव्हाइस कॅमेरा उघडा आणि ग्राहक कार्ड QR स्कॅन करा.
ग्राहक शोधण्याचे चार मार्ग आणि स्टॅम्प कार्ड
१. डिव्हाइस कॅमेऱ्याने स्कॅन करणे (Use Camera). काम करण्याचा मुख्य मार्ग.
[स्क्रीनशॉट: 0302-ScanByCamera.png]
कर्मचारी सदस्य Use Camera टॅप करतो, ग्राहकाच्या कार्ड QR वर फोन/टॅबलेट कॅमेरा पॉइंट करतो (ग्राहक त्यांचे कार्ड Apple Wallet किंवा Google Wallet मध्ये उघडतो आणि स्क्रीन दाखवतो), ॲप काही सेकंदात कोड ओळखतो आणि लगेच ग्राहक कार्ड उघडतो.
२. बाह्य स्कॅनरसह ग्राहक कार्ड स्कॅन करणे.
स्कॅनरला तुमच्या डिव्हाइसशी कनेक्ट करा आणि त्याद्वारे ग्राहकाचे कार्ड स्कॅन करा.
३. ग्राहक शोध (Search Customer). ग्राहकाच्या हातात फोन नसताना फॉलबॅक.
[स्क्रीनशॉट: 0301-CustomerSearch.png]
उपयुक्त जेव्हा:
- ग्राहकाने त्यांचा फोन सोडला किंवा काढून टाकला;
- ग्राहकाने नुकतेच साइन अप केले आहे आणि कार्ड कुठे उघडते हे अद्याप समजले नाही;
- कर्मचारी सदस्य अपॉइंटमेंटनुसार काम करतो आणि ग्राहकाचे कार्ड आगाऊ उघडतो.
नाव, ईमेल किंवा कार्ड नंबर द्वारे शोध कार्य करते.
४. थेट व्हाउचर शोध (व्हाउचर शोध). जेव्हा ग्राहक हातात व्हाउचर घेऊन येतो (उदा. छापील कागद) आणि तो रिडीम करू इच्छितो. तुम्ही सर्चमध्ये व्हाउचर नंबर एंटर करू शकता, तो बाह्य स्कॅनरने स्कॅन करू शकता किंवा डिव्हाइस कॅमेऱ्याने स्कॅन करू शकता.
स्कॅन केल्यानंतर ग्राहक कार्ड
[स्क्रीनशॉट: 0401-CustomerCard.png]
कार्ड सापडल्यानंतर, ग्राहक कार्ड दोन टॅबसह उघडते:
- माहिती — मूलभूत माहिती (नाव, ईमेल, कार्ड आयडी
#XXXXXX, संपादनासह वाढदिवस ✏️). - वाउचर (N) — या सर्व ग्राहकांच्या व्हाउचरची यादी: सक्रिय, रिडीम केलेले, कालबाह्य.
वरच्या भागात लाल रीसेट स्टॅम्प बटण आहे — ते तुम्हाला ग्राहकाचे स्टॅम्प रीसेट करू देते (उदा. त्यांनी अंतिम ध्येय पूर्ण केले असल्यास, बक्षीस मिळाले आहे आणि तुम्हाला नवीन कार्ड सुरू करायचे आहे). टीप. तुम्हाला कार्ड रीसेट करण्याची गरज नाही: पुढच्या वेळी तुम्ही ते रीसेट न करता अंतिम लक्ष्यावर स्कॅन केल्यास, सिस्टम चक्रीयपणे नवीन पुनरावृत्तीचा पहिला स्टॅम्प टाकेल.
स्टॅम्प नियंत्रणे
[स्क्रीनशॉट: 0402-Stamped.png]
स्क्रीनच्या तळाशी — स्टॅम्प नियंत्रणे:
- 🟢 + (हिरवा) — स्टॅम्प जोडा.
- 🔴 − (लाल) — स्टॅम्प काढा (तुम्ही चूक केली असेल तर).
- − / + सह एक परिमाण फील्ड — एकाच वेळी अनेक स्टॅम्प जोडा (उदा., जर कार्ड
राशीनुसारवापरत असेल आणि ग्राहकाने मोठी रक्कम खर्च केली असेल). - 🔍 Search Customer — वेगळा ग्राहक उघडा.
- 📷 — पुन्हा स्कॅन करा.
ध्येय गाठण्यासाठी तीन परिस्थिती
जेव्हा स्टॅम्प ग्राहकाला ध्येयापर्यंत पोहोचवतो (एक टप्पे किंवा अंतिम ध्येय), स्कॅनर भेटवस्तूसह पॉपअप दाखवतो. पॉपअप सामग्री कार्डवर कॉन्फिगर केलेल्या रिवॉर्ड प्रकारावर अवलंबून असते.
१. बक्षीस = Award (झटपट मजकूर भेट).
[स्क्रीनशॉट: 0403-StampedAndGetAward.png]
स्क्रीनवर — भेट मजकूर आणि प्रतिमा (“फ्री कॉफी”, “1 फ्री पेस्ट्री”, इ.). कर्मचारी सदस्य ग्राहकाला स्क्रीन दाखवतो आणि वचन दिलेली भेटवस्तू देतो.
२. रिवॉर्ड = व्हाउचर (Smart Voucher सह Redeem Code).
[स्क्रीनशॉट: 0404-StampedAndGetVoucher.png]
इमेज, व्हाउचरचे शीर्षक आणि व्हाउचर नंबर #XXXXXXX सह व्हाउचर अनलॉक! पॉपअप. तीन क्रिया:
- वाउचर वापरा (हिरवे बटण) — स्कॅनरमध्येच व्हाउचर रिडीम करा. व्हाउचरमध्ये Redeem Code पर्याय सक्षम असल्यास, स्क्रीन कोड मजकूर + QR + बारकोड दर्शवेल. कर्मचारी कोड POS मध्ये प्रविष्ट / स्कॅन करतो. व्हाउचर
रिडीमवर हलवले जाते आणि ते पुन्हा वापरले जाऊ शकत नाही. - सर्व व्हाउचर पहा — सर्व ग्राहकांच्या व्हाउचरची सूची उघडा (उदा. ग्राहकाला आधी वेगळे व्हाउचर रिडीम करायचे असल्यास).
- बंद करा — पॉपअप बंद करा; व्हाउचर सक्रिय राहते आणि ग्राहक ते नंतर वापरू शकतात.
३. बक्षीस = Lottery (ड्रॉ).
[स्क्रीनशॉट: 0405-StampedAndGetLottery.png]
लॉटरी स्क्रीन स्टाफ सदस्याच्या डिव्हाइसवर उघडते. कर्मचारी ग्राहकाला उपकरण देतात (किंवा स्क्रीन दाखवतात) आणि त्यांना “प्ले” वर टॅप करण्यास सांगतात. फिरकीनंतर, व्हेरियंटपैकी एक सुरू होतो आणि नंतर ते Award किंवा व्हाउचर (वर पहा) म्हणून हाताळले जाते.
[स्क्रीनशॉट: 0406-LotteryUsed.png]
मॅन्युअल मोडमध्ये व्हाउचरची स्वत: ची पूर्तता
[स्क्रीनशॉट: 0407-CustomerVouchers.png] [स्क्रीनशॉट: 0408-VoucherUsed.png]
जर ग्राहक नंतर वचन दिलेल्या भेटवस्तूसाठी आला (ते मिळाल्यानंतर योग्य नाही), कर्मचारी त्यांचे कार्ड उघडतात आणि व्हाउचर (N) टॅबवर स्विच करतात. सर्व ग्राहकांचे व्हाउचर येथे दृश्यमान आहेत. कर्मचारी उजवीकडे टॅप करतात → व्हाउचर वाउचर वापरा → पुष्टी करा → स्थिती रिडीम करा सह उघडते.
सुरक्षा: व्हाउचर स्टेट मशीन (जारी केलेले → सक्रिय → रिडीम केलेले → कालबाह्य) दुहेरी वापर प्रतिबंधित करते. रिडीम केल्यानंतर व्हाउचर (किंवा त्याचा स्क्रीनशॉट) पुन्हा काम करणार नाही.
9.4 Autopilot Mode — पर्यंत पार्श्वभूमी स्कॅनिंग
[स्क्रीनशॉट: 0101-WaitingScans_AutoPilotMode.png]
Autopilot Mode हा Manual Mode चा उप-मोड आहे ज्यामध्ये स्टॅम्प जोडले जातात पार्श्वभूमीत, कोणतेही पुष्टीकरण आणि कोणतेही मॉडेल नाहीत. कॉफी शॉप, फास्ट फूड, बेकरी, कार वॉश मधील पीक अवर्ससाठी आदर्श — कुठेही रांग आहे आणि सेवा कमी होऊ शकत नाही.
ते कसे सक्षम करावे
Manual Mode मुख्य स्क्रीनवर, Auto-Stamp (Scanner Only) वरच्या उजवीकडे “चालू” (हिरव्या) वर टॉगल करा. स्क्रीन बदलते:
- आयकॉन बाह्य-स्कॅनर प्रतिमेवर स्विच करते.
- मुख्य शीर्षलेख वाचतो: Auto-Stamp मोड सक्रिय.
- उपशीर्षक: “सिस्टीम स्टॅम्प स्वयंचलितपणे केवळ स्कॅनर इनपुटसाठी.”
ते कसे कार्य करते
“Scanner Only” या वाक्प्रचाराचा अर्थ असा आहे की या मोडमध्ये स्टॅम्प फक्त हार्डवेअर स्कॅनरच्या इनपुटद्वारे जोडले जातात (कॉम्प्युटर/टॅब्लेटशी कनेक्ट केलेले बाह्य USB किंवा ब्लूटूथ बारकोड स्कॅनर). Use Camera आणि Search Customer बटणे स्क्रीनवर दृश्यमान राहतील आणि तुम्हाला त्यांची आवश्यकता असल्यास उपलब्ध आहेत, परंतु ते सामान्य Autopilot ऑपरेशनमध्ये वापरले जात नाहीत — ते बॅकअप म्हणून काम करतात (उदा. स्कॅनरने ग्राहक उचलला नाही आणि तुम्हाला ते व्यक्तिचलितपणे शोधण्याची आवश्यकता असल्यास).
कार्यप्रवाह:
- कर्मचारी नेहमीप्रमाणे ऑर्डर घेतात (पर्यंत, बार काउंटर, वॉश येथे).
- पेमेंट केल्यावर किंवा लगेच, ग्राहक त्यांचे वॉलेट कार्ड दाखवतो.
- बाह्य स्कॅनर QR “बारकोड म्हणून” पकडतो.
- 7Stamp Scanner पार्श्वभूमीत ग्राहकाच्या कार्डमध्ये स्टॅम्प जोडते.
- कोणतेही मॉडेल नाही — रांग थांबत नाही.
- ग्राहक त्यांच्या वॉलेटमध्ये PUSH सूचनेद्वारे प्रगती अपडेट नंतर पाहतो.
आपल्याला काय हवे आहे
- बारकोड स्कॅनर: USB किंवा Bluetooth, QR कोड वाचण्यास सक्षम. हनीवेल, झेब्रा, डेटालॉजिक मधील मानक मॉडेल करेल. स्कॅनर कीबोर्ड इम्युलेशन (HID मोड) वर सेट केले पाहिजे.
- एक कायमस्वरूपी डिव्हाइस:
स्कॅनर.7stamp.comउघडलेले किंवा Android/iOS ॲपसह लॅपटॉप किंवा टॅबलेट. - स्थिर इंटरनेट — प्रत्येक स्टॅम्प रिअल टाइममध्ये क्लाउडवर जातो.
ग्राहकाने Autopilot मध्ये व्हाउचरची स्व-पूर्तता
Autopilot मध्ये कर्मचारी “डायलॉग मोड” मध्ये वॉलेट कार्ड भौतिकरित्या स्कॅन करत नाहीत — ते रांगेत काम करतात. परंतु ग्राहक त्याचे व्हाउचर जागेवरच वापरू शकतो आणि त्यासाठी स्विचिंग मोडची आवश्यकता नाही. वॉलेटमधील कार्ड पेजवर ग्राहकाला त्यांच्या व्हाउचरची लिंक असते. ते उघडताना, ग्राहक एकतर:
- कॅशियरला Redeem Code कॉल करतो, जो टिलमध्ये प्रवेश करतो (जर टिल प्रोमो कोडचे समर्थन करत असेल), किंवा
- त्यांच्या फोन स्क्रीनवर QR/बारकोड दाखवतो, आणि रोखपाल बाह्य स्कॅनरने ते स्कॅन करतो.
त्यानंतर व्हाउचर रिडीम वर जाईल आणि यापुढे पुन्हा वापरता येणार नाही. पर्याय म्हणून, रोखपाल तात्पुरते Auto-Stamp टॉगल ऑफ फ्लिप करू शकतो, ग्राहक कार्ड मॅन्युअली उघडू शकतो आणि वाउचर वापरा सह व्हाउचर रिडीम करू शकतो.
मॅन्युअलवर परत कधी यायचे
कोणत्याही क्षणी कर्मचारी Auto-Stamp टॉगल बंद करू शकतात आणि मॅन्युअल स्कॅनिंगवर परत जाऊ शकतात — उदाहरणार्थ, जर ग्राहक समस्या घेऊन आला असेल (एक व्हाउचर हरवला असेल, स्टॅम्प मॅन्युअली समायोजित करू इच्छित असेल) किंवा तुम्हाला ते नाव/ईमेलद्वारे शोधण्याची आवश्यकता आहे. सर्व Manual Mode वैशिष्ट्ये उपलब्ध आहेत — शोध, कॅमेरा स्कॅन, मॅन्युअल व्हाउचर जारी करणे आणि रिडेम्पशन.
9.5 Kiosk Mode — ग्राहक स्व-सेवा
Kiosk Mode हा एक पूर्ण-स्क्रीन सेल्फ-सर्व्हिस मोड आहे ज्यामध्ये टॅबलेट ग्राहकाला सामोरे जातो आणि ग्राहक स्वतःचे कार्ड स्कॅन करतो. कर्मचारी या प्रक्रियेत अजिबात गुंतलेले नाहीत — म्हणून “शून्य कर्मचारी प्रशिक्षण”. हे कॉफी शॉप, बेकरी, जलद कॅज्युअल रेस्टॉरंट्स, लाइट रिटेल, कार वॉशसाठी आदर्श आहे.
[स्क्रीनशॉट: Kiosk_Bakery.png]
Kiosk Mode सेटअप
पायरी १. किओस्कवर स्विच करा.
[स्क्रीनशॉट: 0101_SwitchToKioskMode.png]
साइड मेनूमध्ये (☰) Kiosk Mode निवडा. ॲप सेटअप मोडमध्ये प्रवेश करतो.
Make Android टॅबलेट किंवा iPad वर ॲप कसे “पिन” करायचे याबद्दल ऑन-स्क्रीन टिपा नक्की वाचा जेणेकरून ग्राहक ते कमी किंवा बंद करू शकत नाही (डिव्हाइसचा तथाकथित किओस्क मोड). ही तुमच्या टॅब्लेटची सिस्टीम वैशिष्ट्ये आहेत — आमच्या स्क्रीनवरील सूचना वा तुमच्या डिव्हाइससाठी मॅन्युअल वाचा.
चरण २. प्रदर्शित करण्यासाठी कार्ड निवडा.
[स्क्रीनशॉट: 0201_StartKiosk_Select_Card.png]
तुमच्या व्यवसायाकडे अनेक स्टॅम्प कार्ड असल्यास (उदा. कॉफीसाठी वेगळे कार्ड आणि दुसरे पेस्ट्रीसाठी), या विशिष्ट टॅबलेटवर दाखवले जाणारे एक निवडा. तुम्ही वेगवेगळ्या कार्डांसाठी अनेक टॅब्लेट सेट करू शकता.
चरण 3. अतिरिक्त पर्याय.
[स्क्रीनशॉट: 0202_StartKiosk_Options.png]
अतिरिक्त कियोस्क लाँच सेटिंग्ज.
प्रथम — रंग योजना. तुम्ही तुमच्या कार्डच्या पॅलेटमध्ये Kiosk लाँच करू शकता किंवा आमच्या पूर्वनिर्धारित सेटपैकी एक निवडू शकता. तुम्हाला सर्वोत्तम वाटणारा पर्याय वापरून पहा!
सर्वात महत्त्वाचा पर्याय म्हणजे तात्काळ स्कॅन टाळा. हे एकाच ग्राहकाला सलग दोनदा स्टॅम्प मिळवण्यापासून अवरोधित करते: पर्याय चालू असल्यास, रिपीट स्कॅन ग्राहकाला त्यांचा मागील निकाल दाखवतो (शेवटचे रिवॉर्ड/स्क्रीन दाखवलेले), आणि स्टॅम्प जोडले जात नाही. हे काउंटरवर अपघाती दुहेरी स्कॅनपासून संरक्षण करते.
पुष्टीकरणानंतर — कियोस्क लॉन्च होईल.
Kiosk Mode मुख्य स्क्रीन
[स्क्रीनशॉट: 0301_Main.png]
टॅब्लेट जवळ आल्यावर ग्राहक काय पाहतो:
- शीर्षस्थानी — तुमचा व्यवसाय लोगो आणि नाव (कार्ड सेटिंग्जमधून काढलेले).
- शीर्षलेख: स्टॅम्प गोळा करा बक्षिसे मिळवा.
- ‘तुमचे बक्षीस’ कॅरोसेल — अंतिम भेटवस्तू दाखवते (आणि, माइलस्टोन रिवॉर्डसह, सर्व इंटरमीडिएट). स्वाइप करण्यायोग्य.
- “कार्ड स्कॅन करून तुमचे पुढील स्टॅम्प मिळवा” या सबलेबलसह एक मोठा काळा 📱 तुमचे कार्ड स्कॅन करा बटण. (किंवा “तुमचा फोन वाचकाजवळ धरा” — मजकूर अनुकूल होतो).
- तळाशी — नवीन-ग्राहक ब्लॉक: अद्याप कार्ड नाही? जॉईन पृष्ठ QR सह “QR-कोड स्कॅन करा आणि तुमच्या वॉलेटमध्ये कार्ड जोडा”.
Kiosk Mode मध्ये ग्राहक परिस्थिती
- ग्राहक टॅबलेट स्टँडवर येतो.
- त्यांच्याकडे आधीपासूनच कार्ड असल्यास → वॉलेट उघडा → टॅप करा तुमचे कार्ड स्कॅन करा → टॅबलेट कॅमेरा → स्टॅम्प जोडले वॉलेट स्क्रीन धरून ठेवा.
- त्यांच्याकडे अद्याप कार्ड नसल्यास → अजून कोणतेही कार्ड नाही? QR स्कॅन करा → त्यांच्या फोन कॅमेऱ्याने कार्ड त्वरित वॉलेटमध्ये सेव्ह होते → तुमचे कार्ड स्कॅन करा → त्यांचे पहिले स्टॅम्प मिळवा वर टॅप करा.
ध्येय गाठताना ग्राहक काय पाहतो
पुरस्कार = Award.
[स्क्रीनशॉट: 0501_RewardUnlocked_Award.png]
भेटवस्तूची प्रतिमा आणि वर्णन असलेली फुल-स्क्रीन अभिनंदन! स्क्रीन. ग्राहक कर्मचाऱ्यांना स्क्रीन दाखवतो आणि वचन दिलेली भेट गोळा करतो.
पुरस्कार = व्हाउचर.
[स्क्रीनशॉट: 0502_RewardUnlocked_Voucher.png]
A अभिनंदन! व्हाउचर अनलॉक केलेले! व्हाउचर कार्डसह स्क्रीन. ग्राहक कियॉस्कमध्येच **व्हाऊचर स्वतः ** रिडीम करू शकतो — वापर बटण Redeem Code (मजकूर + QR + बारकोड) असलेली स्क्रीन उघडते जी ग्राहक कॅशियरला दाखवतो, जो कोड स्कॅन करतो किंवा टिलमध्ये कोड टाकतो. रिडीम केल्यानंतर व्हाउचर रिडीम वर हलवले जाते आणि ग्राहकाने स्क्रीनशॉट ठेवला असला तरीही ते पुन्हा वापरले जाऊ शकत नाही.
तळाशी - बटणे:
- My Vouchers — माझे सर्व व्हाउचर पहा.
- 12s मध्ये बंद होत आहे — मुख्य स्क्रीनवर स्वयंचलित परत येण्यासाठी काउंटडाउन.
हा एक महत्त्वाचा कियोस्क नमुना आहे: स्वयं-बंद. त्याशिवाय कर्मचारी हस्तक्षेप करेपर्यंत टॅब्लेट एका ग्राहकाच्या स्क्रीनवर “अडकलेला” असेल. काउंटडाउन हे सुनिश्चित करते की टॅबलेट क्रियेनंतर 10-15 सेकंदांनी नेहमी स्वच्छ सुरुवातीच्या स्क्रीनवर परत येतो.
पुरस्कार = Lottery.
[स्क्रीनशॉट: 0503_RewardUnlocked_Lottery.png]
ग्राहक स्वतः स्क्रीनवर लॉटरी फिरवतो — एक आनंददायी गेम मेकॅनिक. व्हेरिएंट ड्रॉप झाल्यानंतर ([स्क्रीनशॉट: 0504_RewardUnlocked_LotteryUsed.png]), स्क्रीन Award किंवा वरील व्हाउचर प्रमाणे वागते.
ग्राहकाचे व्हाउचर पाहणे
[स्क्रीनशॉट: 0601_Vouchers.png]
कोणत्याही क्षणी ग्राहक कियोस्कच्या मुख्य स्क्रीनवर My Vouchers टॅप करू शकतो आणि त्यांचे सर्व सक्रिय व्हाउचर पाहू शकतो. हे सोयीचे आहे: जर ग्राहकाकडे मागील भेटीतील न वापरलेले व्हाउचर असेल, तर ते वॉलेट न उघडता लगेच कर्मचाऱ्यांना दाखवू शकतात.
किओस्क स्टँडसाठी तांत्रिक आवश्यकता
- टॅबलेट: 10” किंवा 12” iPad / Android टॅबलेट. स्क्रीन जितकी मोठी असेल तितकी ग्राहकांसाठी अधिक सोयीस्कर. आम्हाला आयपॅड मिनी आवडतो.
- स्टँड: स्थिर, ग्राहकाकडे तोंड करून. स्टँडने त्यांना टॅबलेट कॅमेरापर्यंत वॉलेट फोन ठेवू द्यावा.
- पॉवर: सतत मुख्य कनेक्शन. कियोस्क दिवसभर चालते.
- इंटरनेट: विश्वसनीय वाय-फाय किंवा मोबाइल 4G.
- पर्यायी — स्टँडच्या पुढे एक साधे सूचना कार्ड: “१) तुमचे कार्ड वॉलेटमध्ये उघडा. २) ते कॅमेऱ्यासमोर धरा. ३) पूर्ण झाले!” - तुमच्याकडे आंतरराष्ट्रीय पाहुणे असल्यास दोन भाषांमध्ये. आमच्या Kiosk UI सह व्यवस्थित ठेवलेला टॅबलेट सहसा ही भूमिका स्वतःच हाताळतो.
9.6 Terminal Mode — पेमेंट टर्मिनलवर निष्ठा
Terminal Mode थेट विद्यमान Android पेमेंट टर्मिनलवर लॉयल्टी चालवते. हे अधिग्रहणकर्ते, पेमेंट प्रोसेसर, ISOs आणि चेकआउट करताना आधीपासून टर्मिनल असलेल्या आणि नवीन हार्डवेअरशिवाय निष्ठा इच्छित असलेल्या कोणत्याही व्यापाऱ्यासाठी आदर्श आहे.
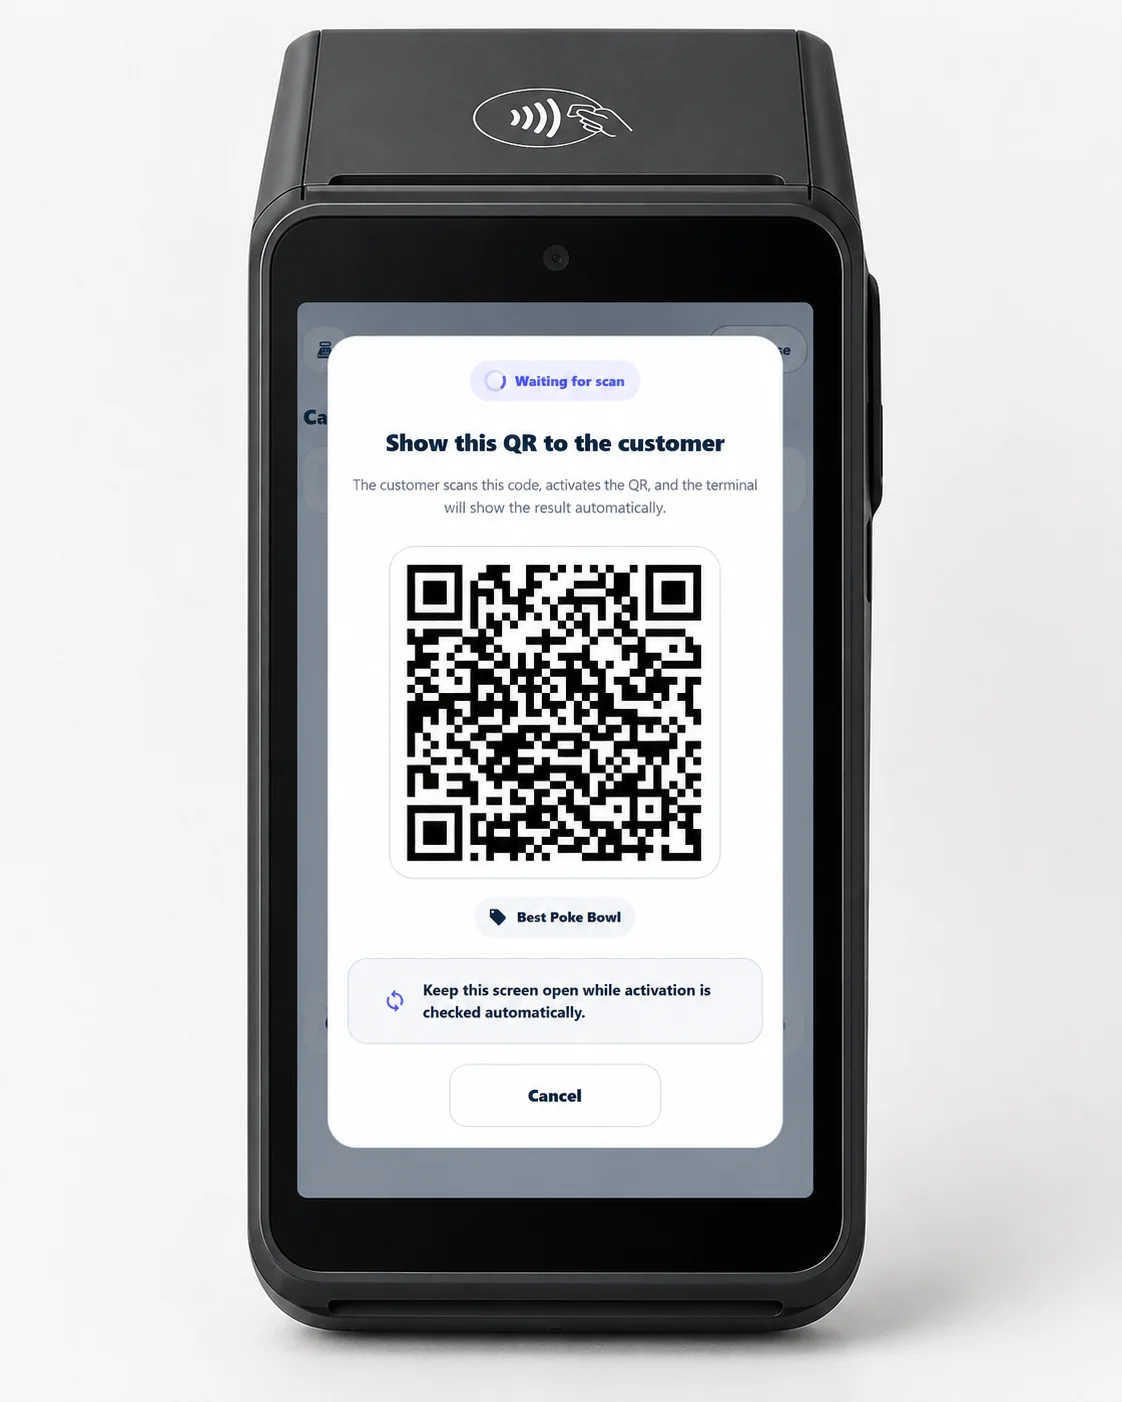
ते कसे कार्य करते
- ग्राहक नेहमीप्रमाणे टर्मिनलवर पैसे देतो.
- 7Stamp Scanner app उघडतो — स्वयंचलितपणे प्रकाश एकत्रीकरणासह किंवा कॅशियरच्या एका टॅपसह.
- कॅशियर टॅप करतो Serve customer; टर्मिनल स्क्रीनवर एक अद्वितीय डायनॅमिक QR कोड दिसतो.
- ग्राहक त्यांच्या फोनने QR स्कॅन करतो. नवीन कार्ड तयार केले जाते आणि वॉलेटमध्ये सेव्ह केले जाते (पहिल्या स्टॅम्पांसह), किंवा विद्यमान कार्ड त्वरित अपडेट होते.
स्टॅम्प जोडत आहे
स्टॅम्प निश्चित रक्कम (प्रति खरेदी एक) किंवा रकमेनुसार जोडले जाऊ शकतात (कॅशियर टर्मिनलवर एकूण पावती प्रविष्ट करतो).
टर्मिनलवर बक्षिसे
- Award: टर्मिनल कॅशियरला जेव्हा ध्येय गाठले जाते तेव्हा भेटवस्तू देण्यास सूचित करते.
- Smart Voucher: नंतरच्या भेटीत, रोखपाल टर्मिनलवर ग्राहकाचे व्हाउचर उघडतो (किंवा व्हाउचर नंबर टाकतो) आणि एका टॅपमध्ये एक रिडीम करतो.
- Lottery: ग्राहक त्यांच्या फोनवर चाक फिरवतो; परिणाम टर्मिनल स्क्रीनवर दिसेल.
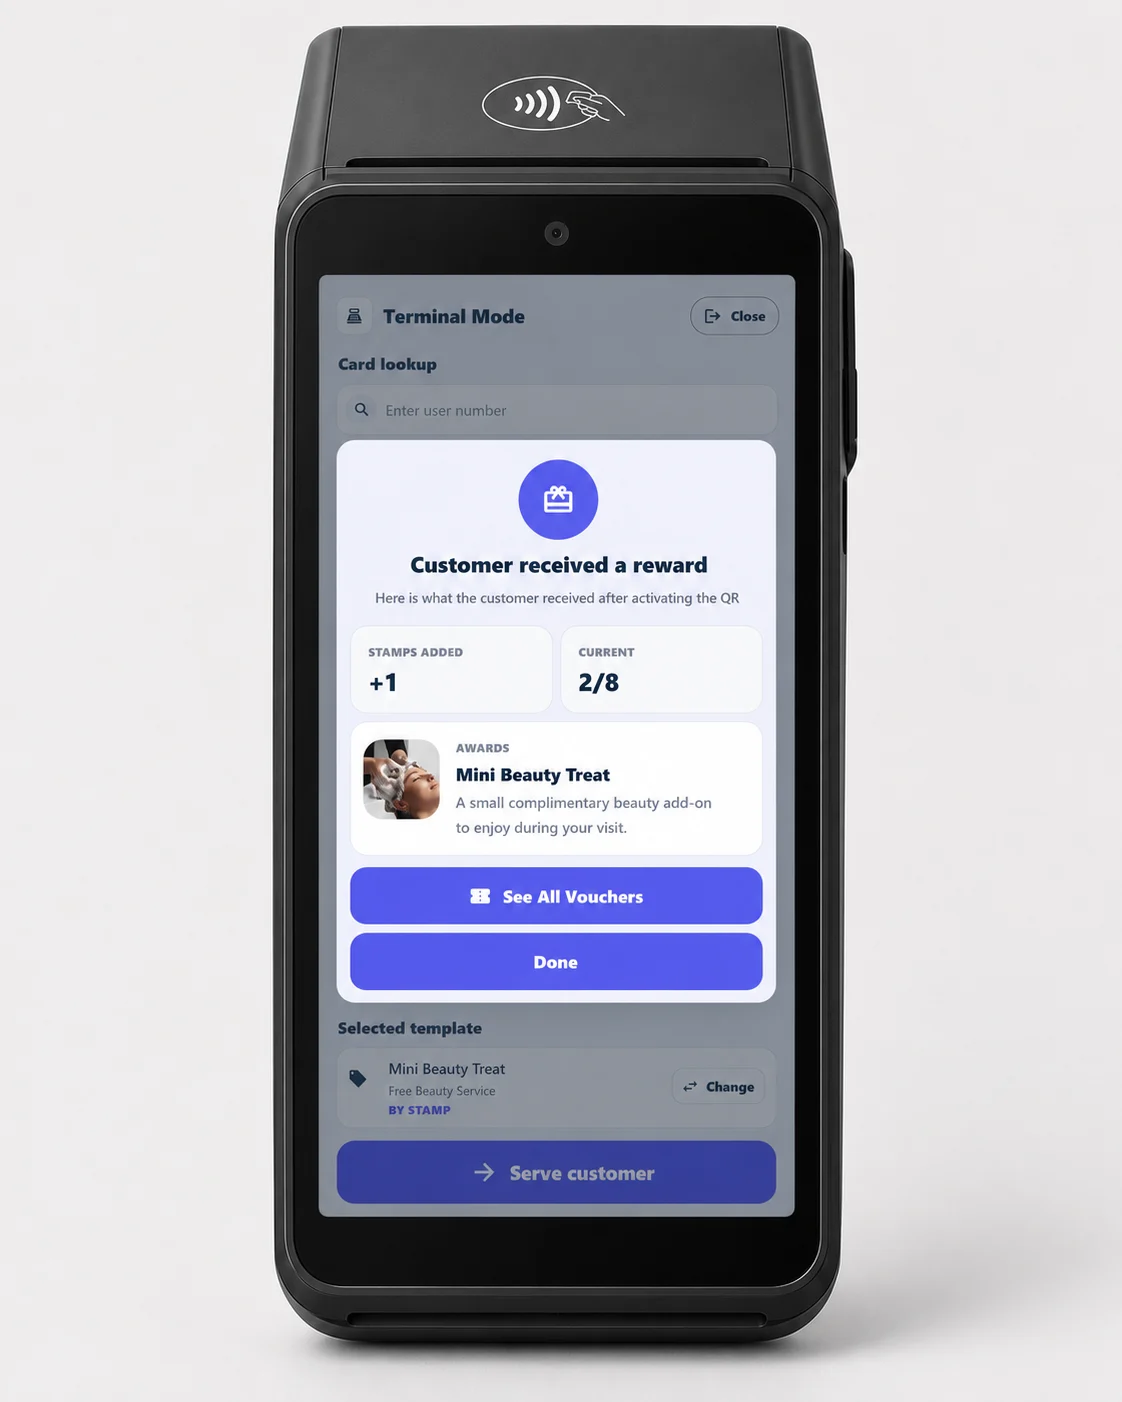
टर्मिनलवर स्थापित करत आहे
Google Play वरून 7Stamp Scanner app स्थापित करा किंवा थेट APK तुमच्या टर्मिनल फ्लीटवर तैनात करा.
प्रगत एकत्रीकरण (विनंतीनुसार)
Apple VAS आणि Google Smart Tap वर टॅप-टू-कलेक्ट करा — टर्मिनलच्या पेमेंट ॲप्लिकेशनद्वारे VAS/स्मार्ट टॅप-प्रमाणित टर्मिनलवर वाचा — आणि कार्ड-लिंक्ड लॉयल्टी (प्रोसेसर स्तरावर नेटवर्क-टोकन जुळणारे), विनंतीवर उपलब्ध असलेले प्रगत एकत्रीकरण आहेत.
भागीदार आणि व्यावसायिक तपशीलांसाठी, अधिग्रहक आणि पेमेंट नेटवर्क आणि Terminal Mode पहा.
9.7 मोड कसा निवडावा — तुलना
| पॅरामीटर | Manual Mode | Autopilot Mode | Kiosk Mode | Terminal Mode |
|---|---|---|---|---|
| कोण स्कॅन करतो | फोन/कॅमेरा द्वारे कर्मचारी | बाह्य स्कॅनर “बारकोड म्हणून” | ग्राहक स्वतः स्टँडवर | ग्राहक टर्मिनल स्क्रीनवर QR स्कॅन करतो |
| व्यवसाय प्रकार | प्रीमियम सेवा, सलून, रेस्टॉरंट्स | कॉफी शॉप्स, फास्ट फूड, व्यस्त काउंटर | कॉफी शॉप, बेकरी, कार वॉश, हलकी रिटेल | पेमेंट टर्मिनल असलेला कोणताही व्यापारी; अधिग्रहक/प्रोसेसर इस्टेट |
| हार्डवेअर | डिव्हाइस कॅमेरा | बाह्य QR स्कॅनर | 10-12” टॅबलेट + स्टँड | विद्यमान Android पेमेंट टर्मिनल |
| जिथे तो राहतो | कर्मचारी फोन/टॅबलेट | पर्यंत लॅपटॉप/टॅबलेट | ग्राहकाकडे तोंड करून स्टँडवर टॅब्लेट | चेकआउटवर पेमेंट टर्मिनल |
| कर्मचारी प्रशिक्षण धोका | किमान (एक टॅप) | शून्य (पार्श्वभूमीचे काम) | शून्य (ग्राहक ते करतो) | किमान (एक टॅप: “Serve customer”) |
| Lottery | ग्राहक स्टाफ स्क्रीनवरून खेळतो | मॅन्युअल कृतीद्वारे उपलब्ध | ग्राहक ते स्वतः खेळतो | ग्राहक त्यांच्या फोनवर खेळतो; टर्मिनलवर परिणाम |
तुम्ही एकाच वेळी अनेक मोड वापरू शकता. उदाहरणार्थ, रेस्टॉरंट आणि स्पा असलेले हॉटेल: स्पामध्ये — Manual Mode (प्रीमियम, वैयक्तिक संपर्क); रेस्टॉरंटच्या कॅफेमध्ये — Kiosk Mode स्टँडवर (जलद, वेटरचा सहभाग नाही); रिसेप्शनवर — नियमितांसाठी Autopilot. एक Staff Seat एका वेळी एका लॉगिनला समर्थन देते; तुम्हाला एकाचवेळी अनेक गुण हवे असल्यास, प्रशासनामध्ये Staff Logins जोडा.
9.8 स्कॅनर लाँच करण्यासाठी व्यावहारिक टिपा
- उघडण्यापूर्वी चाचणी करा. शिफ्टच्या आधी सकाळी तुमच्या स्वतःच्या कार्डने ५-१० चाचणी स्कॅन करा — कॅमेरा फोकस करत आहे, इंटरनेट काम करत आहे, स्टॅम्प जोडले आहेत याची खात्री करा.
- किओस्क टॅबलेटवर, स्वयं-लॉक आणि सूचना अक्षम करा. कोणीही चुकून OS मधून बाहेर पडू नये किंवा एखादी भटकी सूचना मिळू नये. iOS वर मार्गदर्शित प्रवेश वापरा, Android वर स्क्रीन पिनिंग वापरा.
- इंटरनेट आऊटेजेससाठी छापलेली QR लेबले जवळपास ठेवा (प्रशासकाकडून निर्यात केलेली) — ग्राहक ते स्वतः स्कॅन करतो आणि स्कॅनर तात्पुरता अनुपलब्ध असला तरीही कार्ड मिळवतो.
- ऑनबोर्ड नवीन कर्मचारी. प्रत्येक नवीन शिफ्ट सदस्याला पाच गोष्टी माहित असाव्यात: स्कॅनरमध्ये लॉग इन कसे करायचे, कार्ड कसे स्कॅन करायचे, स्टॅम्प कसे जोडायचे,
Voucher Unlocked!कसे हाताळायचे, ‘वाउचर’ टॅबमधून व्हाउचर कसे रिडीम करायचे. पाच मिनिटे प्रशिक्षण. - Manual Mode च्या तळाशी अलीकडील इव्हेंट लॉग हा तुमचा कार्यरत लॉग आहे. जर ग्राहकाने तक्रार केली तर “स्टॅम्प गेले नाही”, तर ते तपासा: तुम्हाला वेळ, कार्ड आयडी आणि काय जारी/वापरले गेले ते दिसेल.
Visual walkthrough
Use the screen sets below as a visual companion to the article. Open any image to inspect it at full size.