
リファレンス
7Stamp Scanner は、スタッフ、顧客、キオスク、Android 決済端末向けの実用的なアプリです。カードのスキャンが stamping、クーポンの引き換え、宝くじの回転、チェックアウトのロイヤルティ Terminal Mode に変わります。スタッフの 1 回のログインで、メインのスキャナ モードにアクセスできます。選択はビジネスのペースとサービス シナリオによって異なります。
9\。 7Stamp Scanner アプリケーション — マニュアル / Autopilot / キオスク / Terminal Mode
7Stamp Scanner は、スタッフ、顧客、キオスク、Android 決済端末向けの実用的なアプリです。その仕事は、カードのスキャンを stamping、クーポン引き換え、宝くじの回転、そして Terminal Mode のチェックアウト ロイヤルティに変えることです。それは、レジ、スタッフのポケット、顧客に面したスタンド、またはすでにチェックアウト時に設置されている決済端末に物理的に置かれているものです。 1 回のスタッフ ログインで、メインのスキャナ モードにアクセスできます。モードの選択は、ビジネスのペースとサービス シナリオによって異なります。
[スクリーンショット: 1101_How_To_Scanpng.png]
9.1 7Stamp Scanner が実行される場所
Web バージョン (任意のデバイス): スキャナー.7stamp.com
- スマートフォン、タブレット、コンピューターなど、最新のブラウザーで動作します。
- インストールなし — ページを開いて Staff Login を入力し、作業を始めてください。
- レジでの共有作業用ラップトップ、スタンド上のタブレット、カメラ付きの Windows/Mac/Linux デバイスに最適です。
- 外部スキャナを接続し、顧客カードをスキャンできます。設定は必要ありません。
Android: Googleプレイ · ダイレクトAPK iOS: アプリストア
- ネイティブ アプリ — 動作が速くなり、携帯電話のカメラがより効率的に使用されます。
- 自分の携帯電話を使って仕事をするスタッフ (プレミアム サービス、現場作業、配達など) に適しています。
- 外部スキャナを接続して、顧客カードをスキャンすることができます (その場合は Autopilot モードを検討してください)。
- タブレット上でキオスク モードで実行できます。
- 直接 APK —
https://downloads.7stamp.com/7stamp-scanner.apkからアプリ パッケージを直接ダウンロードします。 Android 決済端末や、多数のデバイスにわたってアプリを一元的に展開する場合に役立ちます。
何を選ぶか。 レジに Android タブレットがある場合、またはカウンターに iPad がある場合は、ネイティブ アプリをインストールしてください。さまざまなデバイスで作業する場合、またはレジで 1 台の共有コンピューターを使用する場合は、Web バージョンhttps://scanner.7stamp.comを使用してください。ログインと入力用のパスワードは管理パネルの スタッフ で作成されます。
9.2 ログインとナビゲーション
[スクリーンショット: 0101-Login.png]
管理者で作成したのと同じ Staff Login を使用して、任意のプラットフォーム (Web / Android / iOS) からログインできます (スタッフ → + 作成 → Staff Login の作成)。ログイン後、アプリは自動的にビジネス プロフィールにリンクします。
サイド メニュー (左上の ☰ アイコンで開きます):
- Manual Mode — 手動スキャン モード (デフォルト)。
- Kiosk Mode — 顧客セルフサービス モード。
- 管理パネルを開く — 管理者へのクイック リンク (
admin.7stamp.com)。 - ログアウト — サインアウトします (メニューの下部にある赤いボタン)。
メニューを通じて 手動 と Autopilot の間で「モードを切り替える」必要はありません。 Autopilot は Manual Mode のサブモードで、メイン画面の右側の 1 つのスイッチで切り替えられます (下記を参照)。
9.3 Manual Mode — スタッフが手作業でスキャン
[スクリーンショット: 0201-WaitingScansManualMode.png]
Manual Mode は、スタッフが顧客のカードを自分でスキャンする基本シナリオです。 stamping が顧客との個人的なやり取りの一部であるプレミアム サービス (美容院、理髪店、スパ、着席レストラン) で使用されます。
Manual Mode メイン画面
- ヘッダー インジケーター: カード スキャンを待機中 — アプリはスキャンを受け入れる準備ができています。
- 右上 — Auto-Stamp (Scanner Only) トグル (手動ではオフ)。
- 画面の下部 — 最近のシフト イベント ログ (発行/使用/削除された伝票)。すべてのエントリはタップ可能で、詳細が開きます。
- 一番下にある 2 つのアクション ボタン:
- 🔍 Search Customer — 名前、電子メール、電話番号、またはカード番号で顧客を検索します。
- 📷 Use Camera — デバイスのカメラを開き、顧客カード QR をスキャンします。
顧客とスタンプカードを見つける 4 つの方法
1\。デバイスのカメラ (Use Camera) を使用してスキャンします。 主な作業方法。
[スクリーンショット: 0302-ScanByCamera.png]
スタッフが Use Camera をタップし、携帯電話/タブレットのカメラを顧客のカード QR に向けます (顧客は Apple Wallet または Google Wallet でカードを開いて画面を表示します)。アプリはほんの数秒でコードを認識し、すぐに顧客カードを開きます。
2\。外部スキャナーで顧客カードをスキャンします。
スキャナーをデバイスに接続し、顧客のカードをスキャンするだけです。
3\。顧客検索 (Search Customer)。 顧客が手元に電話がない場合のフォールバック。
[スクリーンショット: 0301-CustomerSearch.png]
次の場合に役立ちます。
- 顧客が携帯電話を放置したり、携帯電話を使い切ったりした。
- 顧客はサインアップしたばかりで、カードがどこで開くのかをまだ理解していません。
- スタッフは予約制で勤務し、事前に顧客のカードを開封します。
名前、メールアドレス、カード番号で作品を検索します。
4\。直接バウチャー検索 (「バウチャー検索」)。 顧客がバウチャー (印刷された紙のバウチャーなど) を持って到着し、それを引き換えたい場合。検索にバウチャー番号を入力するか、外部スキャナーでスキャンするか、デバイスのカメラでスキャンすることができます。
スキャン後の顧客カード
[スクリーンショット: 0401-CustomerCard.png]
カードが見つかると、顧客カードが 2 つのタブで開きます。
- 情報 — 基本情報 (名前、メールアドレス、カード ID
#XXXXXX、誕生日 (編集あり) ✏️)。 - クーポン (N) — この顧客のすべてのクーポンのリスト: 有効、引き換え済み、期限切れ。
上部の領域には、赤い リセットスタンプ ボタンがあります。これにより、顧客のスタンプをリセットできます (たとえば、最終目標を達成し、報酬を獲得し、新しいカードを開始したい場合)。 注意: カードをリセットする必要はありません。次回、リセットせずに最終ゴールでカードをスキャンすると、システムは循環的に新しい反復の最初のスタンプを配置します。
スタンプコントロール
[スクリーンショット: 0402-Stamped.png]
画面の下部にあるスタンプコントロールは次のとおりです。
- 🟢 + (緑) — スタンプを追加します。
- 🔴 − (赤) — スタンプを削除します (間違った場合)。
- − / + の数量フィールド — 複数のスタンプを一度に追加します (例: カードが「金額別」を使用し、顧客が多額の金額を支払った場合)。
- 🔍 Search Customer — 別の顧客を開きます。
- 📷 — 再度スキャンします。
目標を達成するための 3 つのシナリオ
スタンプが顧客を目標 (マイルストーンの 1 つまたは最終目標) に導くと、スキャナーはギフトを含むポップアップを表示します。ポップアップの内容は、カードに設定されている特典の種類によって異なります。
1\。報酬 = Award (インスタント テキスト ギフト)。
[スクリーンショット: 0403-StampedAndGetAward.png]
画面上 — ギフトのテキストと画像 (「無料のコーヒー」、「無料のペストリー 1 つ」など)。スタッフはお客様に画面を見せ、約束したプレゼントを渡します。
2\。報酬 = クーポン (Smart Voucher と Redeem Code)。
[スクリーンショット: 0404-StampedAndGetVoucher.png]
クーポンのロックが解除されました! ポップアップ (画像、クーポンのタイトル、クーポン番号 #XXXXXXX) が表示されます。 3 つのアクション:
- クーポンを使用 (緑色のボタン) — スキャナーで直接クーポンを引き換えます。伝票で Redeem Code オプションが有効になっている場合、画面にはコード テキスト + QR + バーコードが表示されます。スタッフはコードを POS に入力/スキャンします。バウチャーは「引き換え済み」に移行し、再度使用することはできません。
- すべてのバウチャーを表示 — 顧客のすべてのバウチャーのリストを開きます (たとえば、顧客が最初に別のバウチャーを引き換えたい場合)。
- 閉じる — ポップアップを閉じます。バウチャーはアクティブなままであり、顧客は後で使用できます。
3\。報酬 = Lottery (引き分け)。
[スクリーンショット: 0405-StampedAndGetLottery.png]
スタッフの端末に抽選画面が開きます。スタッフはお客様にデバイスを渡し(または画面を見せ)、「Play」をタップしてもらいます。スピン後、バリアントの 1 つが発火し、Award またはバウチャーとして処理されます (上記を参照)。
[スクリーンショット: 0406-Lotteryused.png]
手動モードでのバウチャーのセルフ引き換え
[スクリーンショット: 0407-CustomerVouchers.png] [スクリーンショット: 0408-Voucherused.png]
顧客が約束したギフトを受け取りに後で (受け取り直後ではなく) 到着した場合、スタッフはカードを開いて [クーポン (N)] タブに切り替えます。すべての顧客のバウチャーがここに表示されます。スタッフが正しいものをタップすると、クーポンを使用と表示されたバウチャーが開き、確認し、ステータスが「引き換え済み」になります。
セキュリティ: バウチャー ステート マシン (「発行→有効→引き換え→期限切れ」) により二重使用が防止されます。 「引き換え」後は、バウチャー (またはそのスクリーンショット) は再び機能しなくなります。
9.4 Autopilot Mode — レジでのバックグラウンド スキャン
[スクリーンショット: 0101-WaitingScans_AutoPilotMode.png]
Autopilot Mode は Manual Mode のサブモードで、バックグラウンドで スタンプが追加され、確認やモーダルはありません。コーヒーショップ、ファストフード、ベーカリー、洗車場など、行列ができてサービスの速度が低下できない場所のピーク時に最適です。
有効にする方法
Manual Mode メイン画面で、右上の Auto-Stamp (Scanner Only) トグルを「オン」 (緑色) に切り替えます。画面が変わります。
- アイコンが外部スキャナー画像に切り替わります。
- メインヘッダーには、Auto-Stamp Mode Active と表示されます。
- サブヘッダー: 「システムスタンプはスキャナー入力に対してのみ自動的に使用されます。」
仕組み
「Scanner Only」というフレーズは、このモードでは スタンプがハードウェア スキャナ (コンピュータ/タブレットに接続された外部 USB または Bluetooth バーコード スキャナ) からの入力を介してのみ追加されることを意味します。 「Use Camera」ボタンと「Search Customer」ボタンは画面上に表示されたままで、必要に応じて使用できますが、通常の Autopilot 操作では使用されません。これらはバックアップとして機能します (たとえば、スキャナーが顧客を認識できず、手動で見つける必要がある場合)。
ワークフロー:
- スタッフは通常どおり注文を受けます (会計、バーカウンター、洗い場で)。
- 支払い時または支払い直後、顧客はウォレット カードを提示します。
- 外部スキャナが QR を「バーコードとして」捕捉します。
- 7Stamp Scanner は、バックグラウンドで顧客のカードにスタンプを追加します。
- モーダルなし — キューは停止しません。
- 顧客は、PUSH 通知を介してウォレットで進捗状況の更新を後で確認します。
必要なもの
- バーコード スキャナ: USB または Bluetooth、QR コードを読み取ることができます。 Honeywell、Zebra、Datalogic の標準モデルで十分です。スキャナはキーボード エミュレーション (HID モード) に設定する必要があります。
- レジに常駐するデバイス:「scanner.7stamp.com」が開いているか、Android/iOS アプリがインストールされているラップトップまたはタブレット。
- 安定したインターネット — すべてのスタンプがリアルタイムでクラウドに送信されます。
Autopilot での顧客によるバウチャーのセルフ引き換え
Autopilot では、スタッフは「ダイアログ モード」でウォレット カードを物理的にスキャンせず、キューを処理します。ただし、顧客は その場でバウチャーを使用でき、モードを切り替える必要はありません。 Wallet のカード ページには、顧客のバウチャーへのリンクがあります。それを開くと、顧客は次のいずれかを行います。
- レジ係に Redeem Code を呼び出します。レジ係はそれをレジに入力します (レジがプロモーション コードをサポートしている場合)。または
- 携帯電話の画面に QR/バーコードが表示されます。レジ係はそれを外部スキャナでスキャンします。
その後、バウチャーは「引き換え済み」に移行し、再利用できなくなります。別の方法として、レジ係は Auto-Stamp トグルを一時的にオフにし、顧客カードを手動で開き、クーポンを使用 してクーポンを引き換えることができます。
いつマニュアルに戻るか
スタッフはいつでもAuto-Stampトグルをオフにして手動スキャンに戻すことができます。たとえば、顧客に問題がある場合(伝票を紛失した場合、stampsを手動で調整したい場合)、または名前/メールアドレスで顧客を検索する必要がある場合などです。検索、カメラスキャン、手動バウチャー発行と引き換えなど、すべての Manual Mode 機能を利用できます。
9.5 Kiosk Mode — 顧客セルフサービス
Kiosk Mode は、タブレットを顧客に向け、顧客が自分のカードをスキャンする全画面セルフサービス モードです。スタッフはプロセスにまったく関与していないため、「スタッフのトレーニングはゼロ」です。コーヒーショップ、ベーカリー、ファストカジュアルレストラン、軽小売店、洗車場に最適です。
[スクリーンショット: Kiosk_Bakery.png]
Kiosk Mode セットアップ
ステップ 1\。キオスクに切り替えます。
[スクリーンショット: 0101_SwitchToKioskMode.png]
サイド メニュー (☰) で Kiosk Mode を選択します。アプリがセットアップモードに入ります。
Make Android タブレットまたは iPad 上でアプリを「固定」して、お客様がアプリを最小化したり閉じたりできないようにする方法 (デバイスのいわゆるキオスク モード) に関する画面上のヒントを必ずお読みください。これらはタブレットのシステム機能です。画面上のヒントまたはデバイスのマニュアルをお読みください。
ステップ 2\。表示するカードを選択してください。
[スクリーンショット: 0201_StartKiosk_Select_Card.png]
あなたのビジネスに複数のスタンプ カードがある場合 (例: コーヒー用のカードとペストリー用の別のカード)、この特定のタブレットに表示されるものを選択してください。異なるカードに対して複数のタブレットを設定できます。
ステップ 3\。追加オプション。
[スクリーンショット: 0202_StartKiosk_Options.png]
追加のキオスク起動設定。
まず、配色です。カードのパレットでキオスクを起動することも、事前定義されたセットの 1 つを選択することもできます。あなたにとって最適と思われるオプションをお試しください!
最も重要なオプションは 即時スキャンを防止 です。同じ顧客が 2 回連続でスタンプを獲得することをブロックします。オプションがオンの場合、繰り返しスキャンでは顧客に前回の結果 (最後に表示された報酬/画面) が表示されるだけで、stamp は追加されません。これにより、カウンターでの偶発的な二重スキャンを防ぎます。
確認後 — キオスクが起動します。
Kiosk Mode メイン画面
[スクリーンショット: 0301_Main.png]
お客様がタブレットに近づくと何が見えるか:
- 上部 — ビジネスのロゴと名前 (カード設定から取得)。
- ヘッダー: スタンプを集めて報酬を獲得。
- 「あなたの報酬」カルーセル — 最後のギフト (マイルストーン報酬の場合はすべての中間ギフト) を表示します。スワイプ可能。
- 「カードをスキャンして次のスタンプを入手」というサブラベルが付いた大きな黒い 📱 カードをスキャン ボタン。 (または「携帯電話をリーダーの近くにかざしてください」 - テキストが適応します)。
- 一番下の新規顧客ブロック: まだカードをお持ちですか? 「QR-コードをスキャンして、ウォレットにカードを追加してください」と参加ページ QR が表示されます。
Kiosk Mode の顧客シナリオ
- 顧客がタブレットスタンドに近づきます。
- 相手がすでにカードを持っている場合 → Wallet を開く → カードをスキャン をタップ → Wallet 画面をタブレットのカメラにかざします → スタンプが追加されます。
- ユーザーがまだカードを持っていない場合 → 携帯電話のカメラで カードがまだありませんか QR をスキャン → カードはすぐにウォレットに保存されます → [カードをスキャン] をタップ → 最初のスタンプを取得します。
目標を達成したときに顧客が見ているもの
報酬 = Award.
[スクリーンショット: 0501_RewardUnlocked_Award.png]
ギフトの画像と説明が表示された全画面の「おめでとうございます!」画面。顧客はスタッフに画面を見せ、約束したプレゼントを受け取ります。
報酬 = バウチャー。
[スクリーンショット: 0502_RewardUnlocked_Voucher.png]
おめでとうございます!バウチャー カードが表示された [バウチャーのロックが解除されました]! 画面。顧客はキオスクで自分でバウチャーを引き換えできます。使用ボタンを押すと、Redeem Code (テキスト + QR + バーコード) が表示された画面が開き、顧客はそれをレジ担当者に示し、レジ担当者はコードをスキャンするかレジに入力します。引換後、バウチャーは「引き換え済み」に移行し、顧客がスクリーンショットを保存していたとしても、再度使用することはできません。
下部にある — ボタン:
- My Vouchers — すべてのバウチャーを表示します。
- 12 秒後に終了 — メイン画面に自動的に戻るまでのカウントダウン。
これは重要なキオスク パターンです: 自動終了。これがなければ、スタッフが介入するまでタブレットは 1 人の顧客の画面に「スタック」したままになってしまいます。カウントダウンにより、アクションの 10 ~ 15 秒後にタブレットは常にクリーンな開始画面に戻ります。
報酬 = Lottery.
[スクリーンショット: 0503_RewardUnlocked_Lottery.png]
顧客自身が画面上で宝くじを回すという、楽しいゲームの仕組みです。バリアントがドロップされると ([スクリーンショット: 0504_RewardUnlocked_Lotteryused.png])、画面は上記の Award またはバウチャーのように動作します。
顧客のバウチャーを表示する
[スクリーンショット: 0601_Vouchers.png]
顧客はいつでもキオスクのメイン画面で My Vouchers をタップして、有効なクーポンをすべて確認できます。これは便利です。顧客が前回の訪問で未使用のバウチャーを持っている場合、Wallet を開くことなく、すぐにスタッフにそれを見せることができます。
キオスク スタンドの技術要件
- タブレット: 10 インチまたは 12 インチの iPad / Android タブレット。画面が大きいほど、顧客にとって利便性が高くなります。私たちはiPad miniが好きです。
- スタンド: 固定、顧客の方向を向いています。スタンドを使用すると、おサイフケータイをタブレットのカメラに向けて保持できるようになります。
- 電源: 常時電源接続。キオスクは一日中稼働しています。
- インターネット: 信頼性の高い Wi-Fi またはモバイル 4G。
- オプション - スタンドの横にある簡単な説明カード: 「1) Wallet でカードを開きます。2) カメラにかざします。3) 完了!」 — 海外からのゲストがいる場合は 2 か国語で。ただし、キオスク UI を備えた適切に配置されたタブレットは、通常、この役割を単独で処理します。
9.6 Terminal Mode — 決済端末でのロイヤルティ
Terminal Mode は、既存の Android 決済端末上でロイヤルティを直接実行します。これは、アクワイアラー、決済処理業者、ISOs、およびすでにチェックアウト時に端末を所有しており、新しいハードウェアを必要としないロイヤルティを求める販売者にとって理想的です。
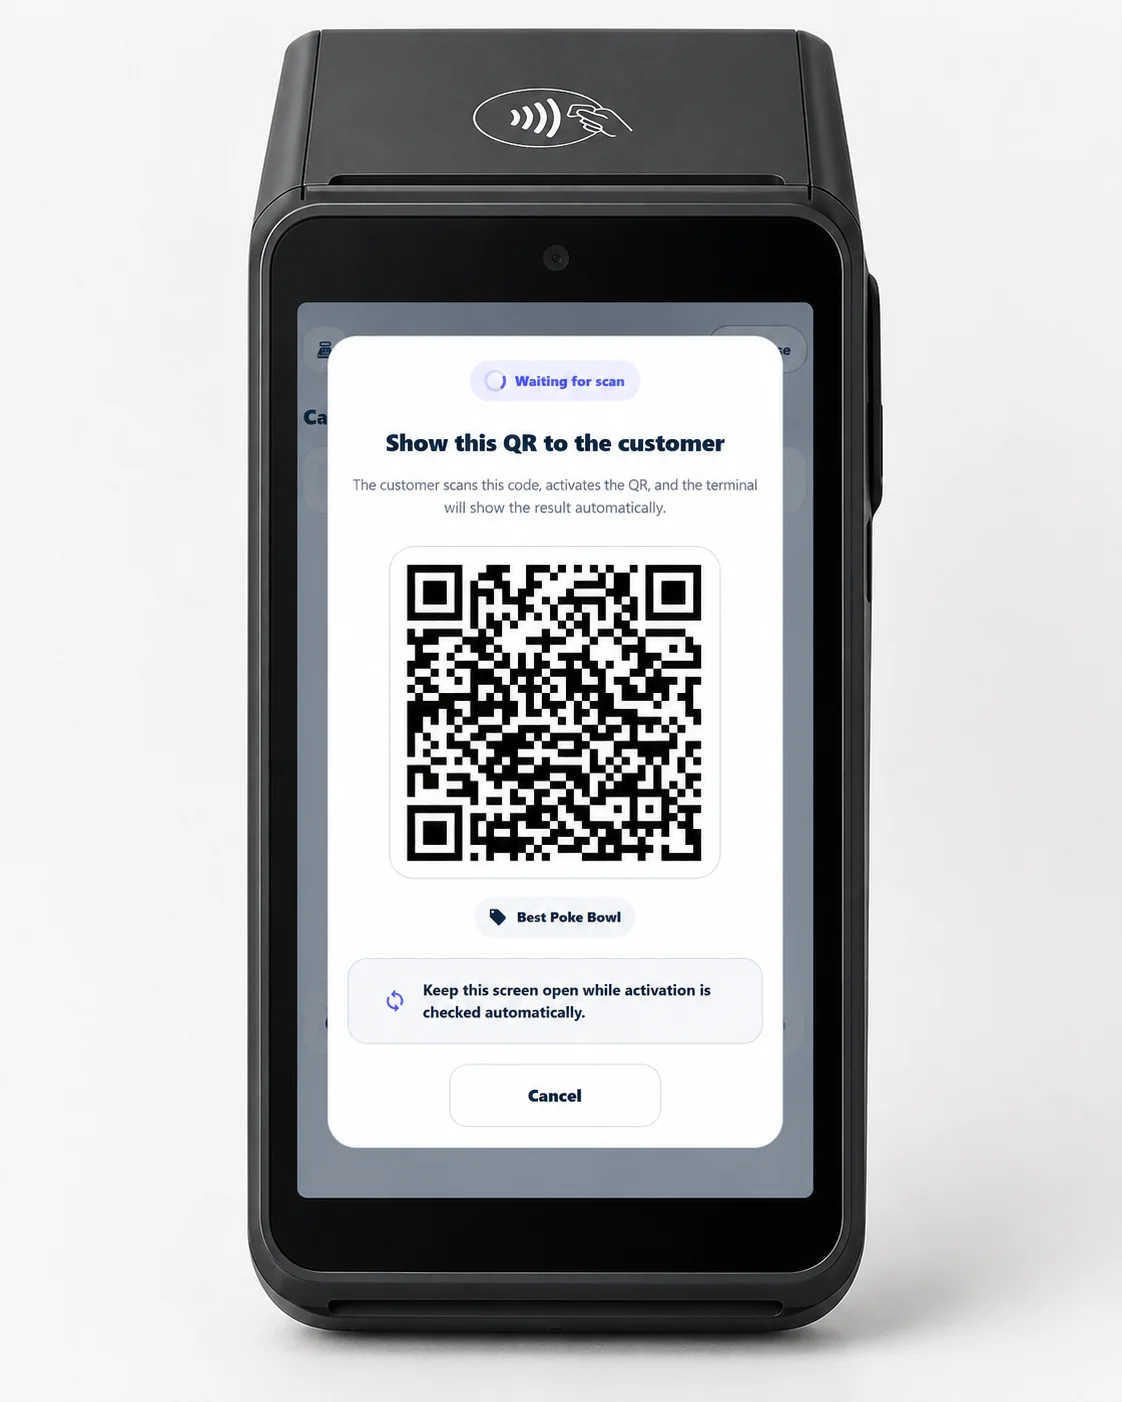
仕組み
- 顧客は通常どおり端末で支払います。
- 7Stamp Scanner app は、ライト統合により自動的に、またはレジ係が 1 回タップするだけで開きます。
- レジ担当者は Serve customer をタップします。固有の動的な QR コードが端末画面に表示されます。
- 顧客は携帯電話で QR をスキャンします。新しいカードが作成されてウォレットに保存されます (最初のスタンプ)。または、既存のカードが即座に更新されます。
スタンプの追加
スタンプは、定額 (購入ごとに 1 つ) または金額 (レジ担当者が端末でレシートの合計を入力) として追加できます。
ターミナル上の特典
- Award: 目標に達すると、端末はレジ係にギフトを渡すように求めます。
- Smart Voucher: 後で訪問すると、レジ担当者が端末で顧客のバウチャーを開き (またはバウチャー番号を入力し)、タップするだけで 1 枚を引き換えます。
- Lottery: 顧客は携帯電話でホイールを回転させます。結果が端末画面に表示されます。
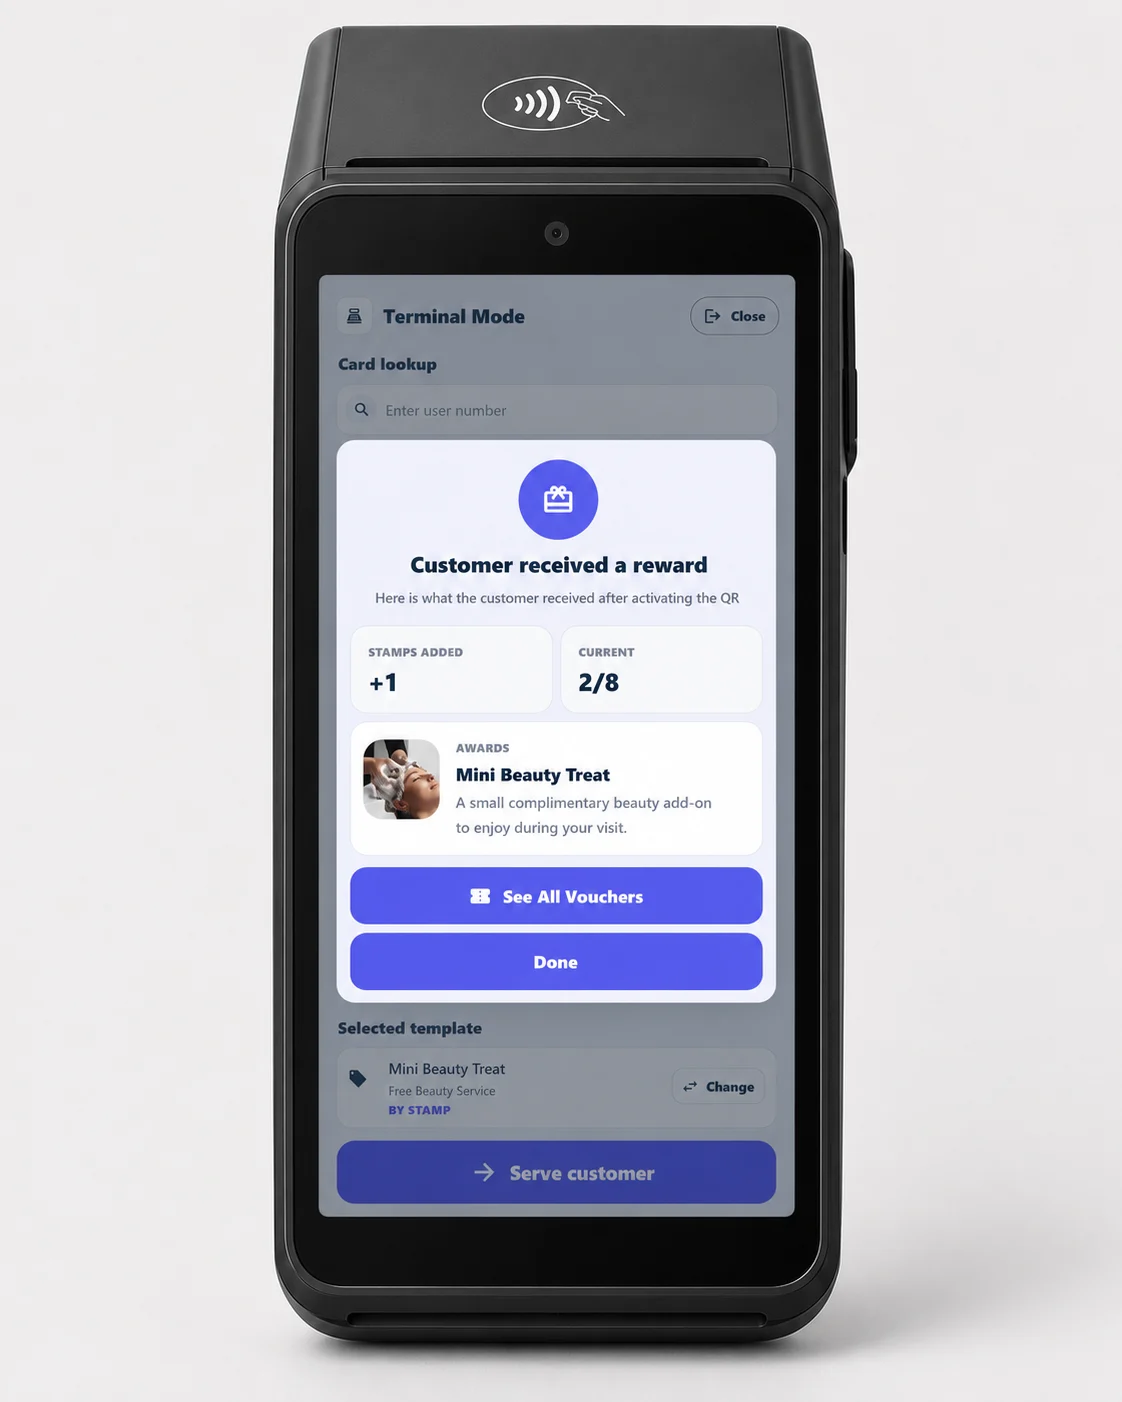
端末へのインストール
Googleプレイ から 7Stamp Scanner app をインストールするか、端末フリート全体に 直接APK を展開します。
高度な統合 (リクエストに応じて)
Apple VAS および Google Smart Tap を介したタップツーコレクト (VAS/スマート タップ認定端末上の端末の支払いアプリケーションによって読み取られる) およびカードにリンクされたロイヤルティ (プロセッサ レベルでのネットワーク トークンの照合) は、リクエストに応じて利用できる高度な統合です。
パートナーおよび商用の詳細については、アクワイアラーと決済ネットワーク および Terminal Mode を参照してください。
9.7 モードの選択方法 — 比較
| パラメータ | Manual Mode | Autopilot Mode | Kiosk Mode | Terminal Mode |
|---|---|---|---|---|
| 誰がスキャンするか | 電話/カメラによるスタッフ | 外部スキャナ「バーコードとして」 | お客様自身がスタンドに立つ | 顧客は端末画面上の QR をスキャンします |
| 業種 | プレミアムサービス、サロン、レストラン | コーヒーショップ、ファストフード、混雑したカウンター | コーヒーショップ、パン屋、洗車場、軽小売店 | 決済端末を備えたあらゆる販売者。取得者/処理者財産 |
| ハードウェア | デバイスカメラ | 外部 QR スキャナー | 10~12 インチのタブレット + スタンド | 既存のAndroid決済端末 |
| どこに住んでいるのか | スタッフの携帯電話/タブレット | レジでのラップトップ/タブレット | 顧客に向かってスタンドに置かれたタブレット | チェックアウト時の決済端末 |
| スタッフトレーニングのリスク | 最小限(ワンタップ) | ゼロ(バックグラウンドワーク) | ゼロ(顧客が行う) | 最小(ワンタップ:「Serve customer」) |
| Lottery | お客様はスタッフ画面からプレイ | 手動操作で利用可能 | お客様自身でプレイしていただく | 顧客は携帯電話でプレイします。端末上の結果 |
一度に複数のモードを使用できます。 たとえば、レストランとスパのあるホテル: スパ内 — Manual Mode (プレミアム、個人連絡先);レストランのカフェで — Kiosk Mode スタンドで (迅速、ウェイターの関与なし)。レセプションでは、常連の場合は Autopilot です。 1 つの Staff Seat は、一度に 1 つのログインをサポートします。複数の同時ポイントが必要な場合は、管理者に Staff Login を追加します。
9.8 スキャナーを起動するための実践的なヒント
- 開封前にテストしてください。 シフト前の朝、自分のカードで 5 ~ 10 回の試しスキャンを実行します。カメラの焦点が合っていること、インターネットが機能していること、スタンプが追加されていることを確認します。
- キオスク タブレットでは、自動ロックと通知を無効にします。 誤って OS を終了したり、通知が表示されたりすることがないようにしてください。 iOS では ガイド付きアクセス を使用し、Android では 画面固定 を使用します。
- インターネットの停止に備えて、印刷した QR ラベルを近くに保管してください (管理者からエクスポート)。スキャナーが一時的に利用できない場合でも、顧客は自分でラベルをスキャンしてカードを取得します。
- 新しいスタッフをオンボードします。 すべての新しいシフト メンバーは、スキャナへのログイン方法、カードのスキャン方法、stamp の追加方法、「Voucher Unlocked!」の処理方法、「バウチャー」タブからバウチャーを引き換える方法の 5 つのことを知っておく必要があります。 5分間のトレーニング。
- Manual Mode の下部にある最近のイベント ログは作業ログです。顧客が「スタンプが通過しなかった」と苦情を言ったら、それを確認してください。時間、カード ID、発行/使用された内容が表示されます。
ビジュアルウォークスルー
以下のスクリーンセットを記事のビジュアルガイドとして使用してください。任意の画像をクリックしてフルサイズで確認できます。