
7. カードの配布チャネル
カードはダウンロードが必要なアプリではなく、Web ページ(Join Page)+ Apple Wallet / Google Wallet のパスです。顧客をこのページに案内するには、QR コード、直接リンク、印刷用の同梱カードなどの入口が必要です。7Stamp は主要な配布チャネルをすべてサポートしているので、ビジネスに合うものを選んでください。複数のチャネルを並行して使うことも多くあります。
7.1 印刷用 QR ラベル(2つのサイズ)
Stamp Cards ギャラリーでカードの下にある 🖨️ アイコンから、QR ラベルを次の2つのサイズで書き出せます。
- 4×6 in / 10×15 cm:大きいサイズ。ポスター、入口の案内板、インフォメーションスタンド、店内のバナーに向いています。
- 2×2 in / 5×5 cm:小さいサイズ。各テーブルのテーブルテント、パッケージのステッカー、注文ごとに入れる小さなカードに向いています。
どちらのサイズにも2つの方法があります。Download(PDF/PNG をダウンロードして印刷所で印刷)と Print(プリンターに直接送信)です。
QR は、顧客がすでに足を止める場所に置きましょう。レジ、テーブル、化粧室、出口付近などです。行列から離れた場所には置かないでください。顧客が後で思い出すのではなく、待っている間にスキャンできることが大切です。
7.2 直接リンク(Join Page)
カードの下にある ⤴️ アイコン → Copy Join Page Link。カードの公開 URL で、次のような場所に貼り付けられます。
- Instagram のプロフィールやストーリーズ。
- Web サイトやランディングページ(「ロイヤルティカードを受け取る」ボタン)。
- スタッフのメール署名。
- ニュースレターやウェルカムメール。
- デリバリーサイトのメニュー、または QR メニュー内のリンク。
同じ Join Page が iOS でも Android でも使えます。端末に応じて、Apple Wallet または Google Wallet へのカード保存が自動的に案内されます。
7.3 View as Customer:顧客の目線でプレビュー
カードの下にある ⤴️ アイコン → View as Customer。顧客に表示されるのとまったく同じカードページが開きます。実際のデザイン、Add to Wallet ボタン、画面全体を確認できます。公開前に、次の点を確かめましょう。
- 小さな画面でもロゴが読める。
- スクロールしなくても、スタンプの進み具合がひと目でわかる。
- Reward Title(特典名)が収まっていて、内容がわかりやすい。
- 色同士が溶け込んで見分けにくくなっていない。
7.4 Staff QR Page:登録用 QR を表示するスタッフ用カード
カードの下にある 🔳 アイコン → Open Staff QR Page または Copy Staff QR Page Link。顧客の登録用 QR を生成する専用ページです。スタッフは次のように使います。
- スマートフォンで Staff QR Page を開きます(または自分用のパスとして Apple/Google Wallet に保存します)。
- 会計や接客のときに、QR の画面を顧客に見せます。
- 顧客がスマートフォンのカメラでスキャンし、カードを保存します。
この方法は、美容サロン、着席型のレストラン、理容室、スパなどの上質な接客に最適です。QR ポスターと違って人の対応があるため、スタッフがプログラムを説明し、質問に答えられます。
7.5 Delivery Inserts:デリバリー注文用の同梱カード
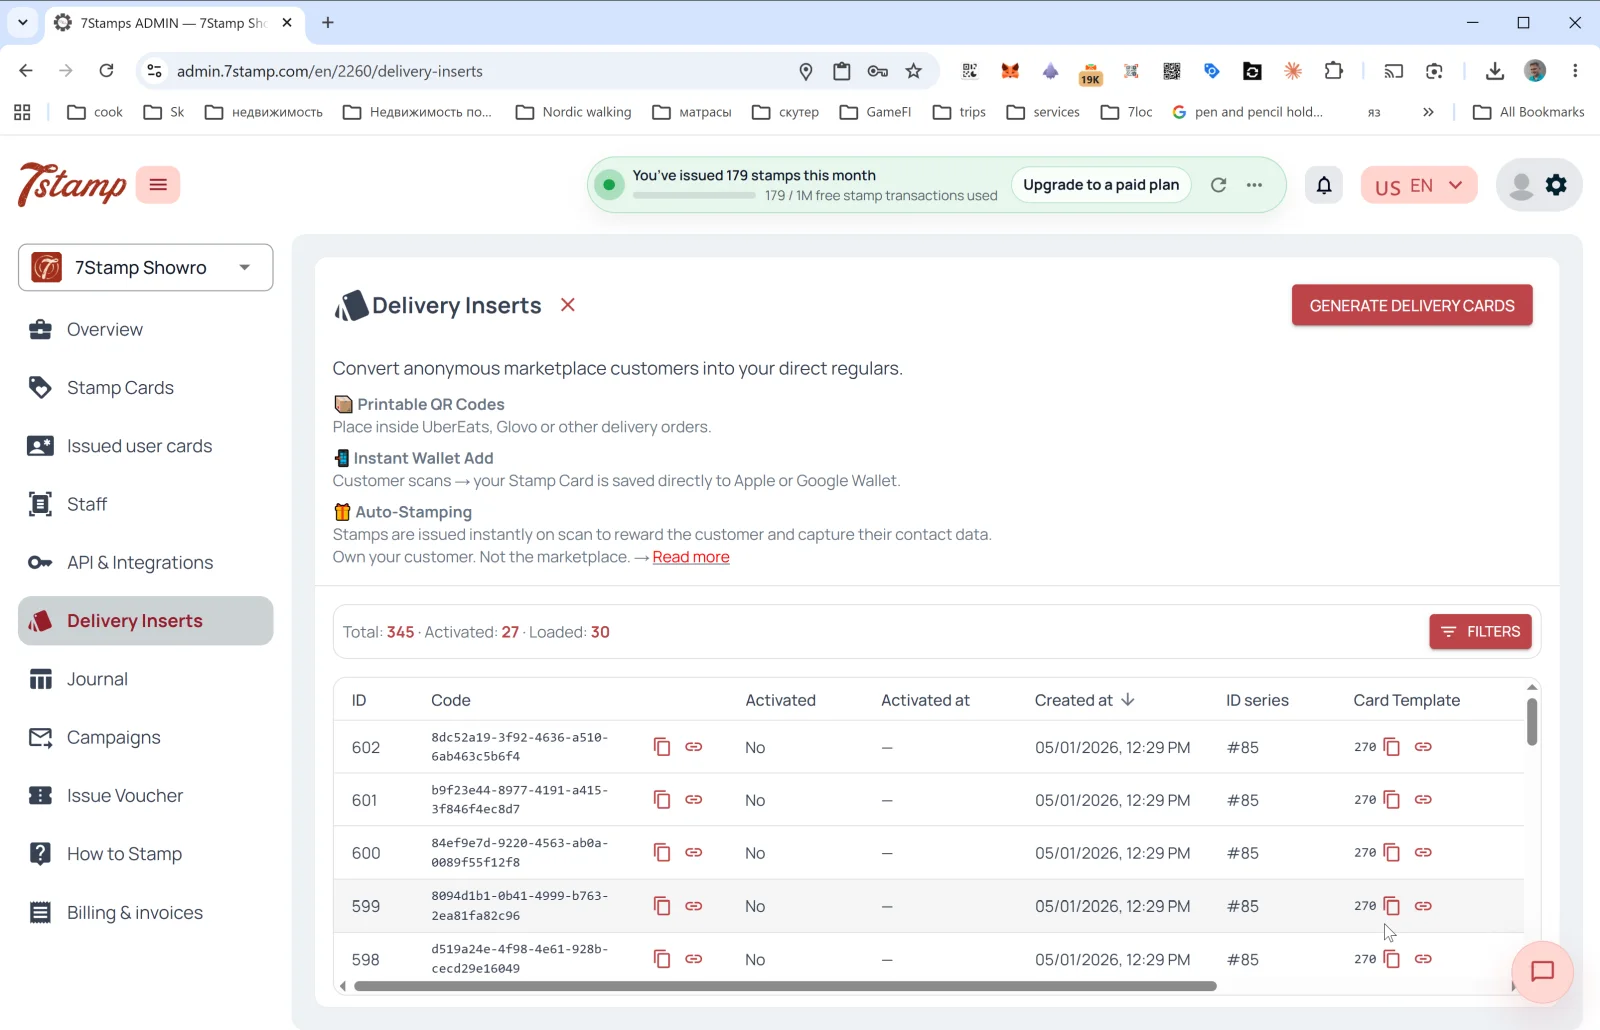
Delivery Inserts はサイドメニューにある専用セクションです。主な目的は、マーケットプレイス経由の匿名の顧客を、自店の直接の顧客に変えることです(Glovo、UberEats、Wolt などのデリバリープラットフォームは顧客の連絡先を共有しませんが、Delivery Inserts がこれを解決します)。
内容:
- 📦 Printable QR Codes:注文品に同梱する印刷用 QR コード。
- 📱 Instant Wallet Add:スキャンすると、カードがすぐに Apple/Google Wallet に保存されます。
- 🎁 Auto-Stamping:スキャンした時点でスタンプが自動的に付与されます。
バッチの生成方法
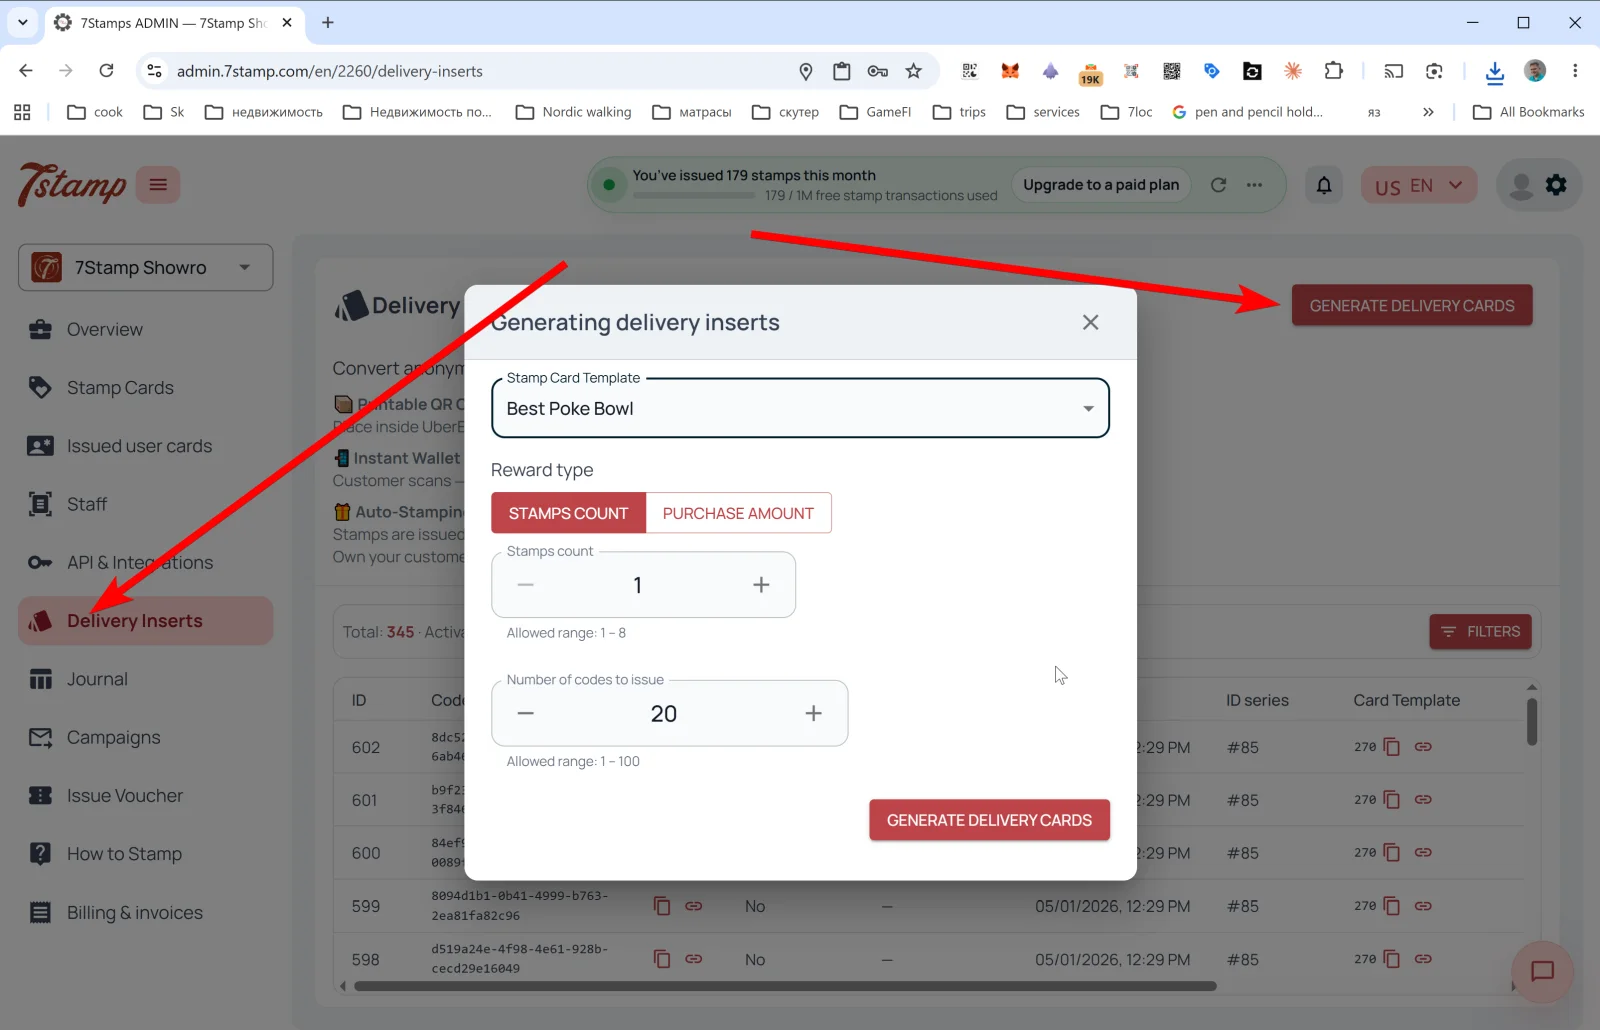
右上の GENERATE DELIVERY CARDS を押すと、Generating delivery inserts ポップアップが開きます。
- Stamp Card Template:同梱カードをひも付けるカードを選びます。
- Reward type:STAMPS COUNT(1回のスキャンで N 個のスタンプを付与)と PURCHASE AMOUNT(ルールが
By amountの場合、購入金額に応じてスタンプを付与)から選びます。 - Stamps count:付与するスタンプの数(例:
1)。指定できる範囲は 1~N(N はカードのスタンプ総数)です。 - Number of codes to issue:一度に生成する固有コードの数(1~100)。
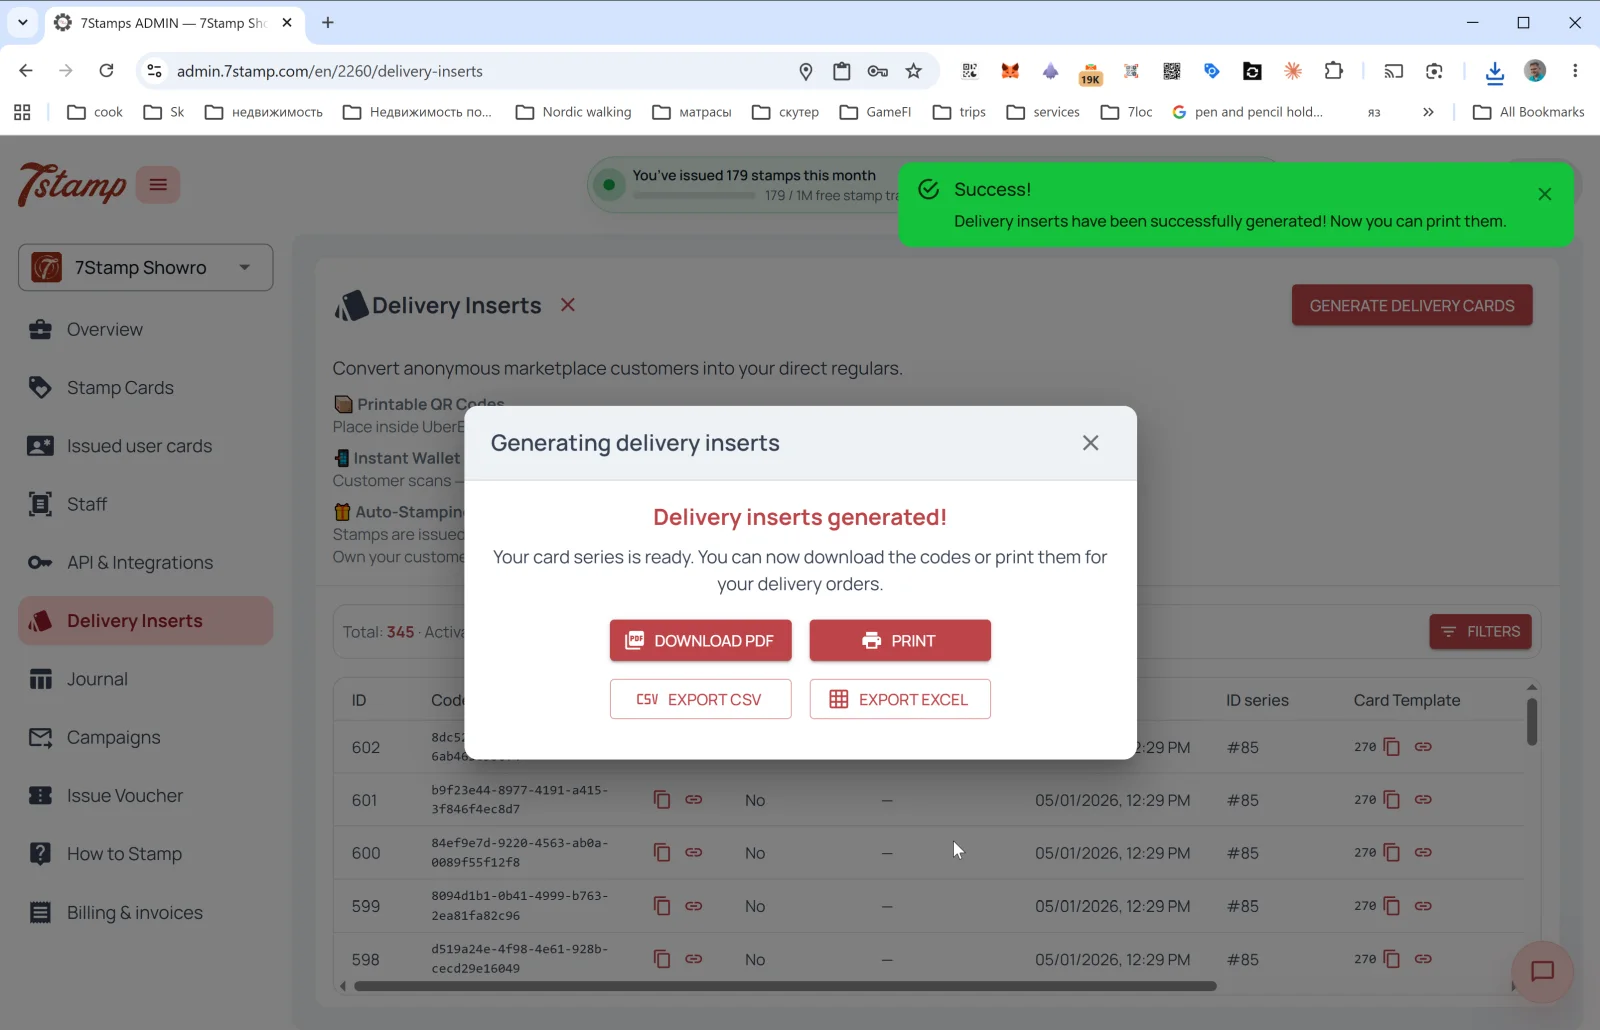
生成が終わると Delivery inserts generated! ウィンドウが開き、4つの書き出しボタンが表示されます。
- DOWNLOAD PDF:印刷所やプリンターで印刷するため。
- PRINT:直接印刷。
- EXPORT CSV:CRM や外部ツールに取り込むため。
- EXPORT EXCEL:事務作業で処理するため。
発行済み同梱カードの一覧表
Delivery Inserts のメインページには、Total / Activated / Loaded の統計と、発行済みのすべてのコードの一覧表が表示されます。列は次のとおりです。
- ID:通し番号。
- Code:同梱カードの UUID(コピーしたり、ページとして開いたりできます)。
- Activated:使用済みかどうか(
Yes/No)。 - Activated at:有効化された日。
- Created at:生成日。
- ID series:バッチ(例:
#85)。 - Card Template:ひも付いているカード。
FILTERS ボタンで、有効化の有無、日付、シリーズで絞り込めます。
ヒント: 同梱カードは50~100枚単位で印刷し、デリバリー注文ごとに1枚入れましょう。デザインには、顧客が何を受け取れるかをはっきり書きます。例:「このコードをスキャン → カードを保存 → 9回目の注文でコーヒー1杯無料」。
7.6 Receipt QR:レシートや仮伝票の QR
管理画面に Receipt QR 専用のメニュー項目はありませんが(レシートに印刷した Delivery Insert、または POS 連携として実装します)、基本的な流れは同じです。
- QR をレシート、仮伝票、注文確認メールに印刷します。
- 顧客は支払い後にスキャンします。カードが発行され(まだ保存していない場合)、完了した購入分のスタンプが付与されます。
- スタッフ側のソフトウェアは不要で、純粋な Zero-Level Integration です。
- スキャンで Lottery が発生した場合は、顧客のスマートフォンのブラウザでカードページ上にそのまま抽選が表示されます。アプリのインストールは不要です。
1回限りのレシート用コードは Delivery Inserts で生成できます(Reward type = STAMPS COUNT または PURCHASE AMOUNT)。レシートに常設の QR を載せる場合は、すべてのレシートに Join Page の QR を1つ印刷する(この場合スタンプは自動付与されず、顧客は登録するだけです)か、POS 連携を利用します。
7.7 CRM からの個別リンクと API による発行
API(セクション 14 を参照)を使うと、次のことができます。
- CRM から特定の顧客向けに、個人用カードリンクをプログラムで作成する。
- スタンプ付きでカードを発行する(例:店舗で購入した顧客に、フォローアップのキャンペーンで改めてアプローチしたい場合)。
- 顧客セグメントを取り込み、個別の招待を送る。
ビジュアルウォークスルー
以下のスクリーンセットを記事のビジュアルガイドとして使用してください。任意の画像をクリックしてフルサイズで確認できます。